
Does anyone else instantly think of game day or a big party when they smell perfectly crisp bacon and melting cheddar? I know I do! When I started MDLATDMM Recipes, I promised myself I’d tackle the classics—the ones that actually bring people together, not the fussy ones that stress you out. And let me tell you, these homemade potato skins are the *definitive* guide. We nail that restaurant-style crunch on the shell every single time, load them up with smoky bacon and sharp cheddar, and keep the process amazingly straightforward. If you loved my thoughts on my one-pot bacon cheeseburger soup, you’ll know I only share the best comfort food—and these reliable, easy potato skins are about to become your favorite way to host!
- Why You Will Make These Crispy Potato Skins Again and Again
- Assembling Your Ingredients for Loaded Potato Skins Recipe
- The Essential Steps to Perfect Oven Baked Potato Skins
- Tips for Making Crispy Potato Skins That Never Get Soggy
- Variations for Your Loaded Potato Skins Recipe
- Serving Suggestions for These Party Snacks
- Storage and Reheating Instructions for Leftover Potato Skins
- Frequently Asked Questions About Homemade Potato Skins
- Nutritional Snapshot of These Cheesy Potato Bites
- Nutritional Snapshot of These Cheesy Potato Bites
Why You Will Make These Crispy Potato Skins Again and Again
I can tell you right now these Crispy Potato Skins are going to be your new party obsession. Seriously, they become magnetic once they hit the table! We focused hard on making sure these are sturdy, flavorful, and don’t dissolve into mush the second you look at them. Here’s why you’ll keep turning to this recipe:
- You get those perfect, sturdy shells! We talk about how to get them properly dry so they don’t go soggy when you load them up. These really are the best Crispy Potato Skins around.
- The crisp factor is unmatched because of that crucial second bake—it’s a simple step that separates these from all the sad, heavy shells out there.
- They are the ultimate crowd-pleaser, perfect for football Sundays or any time you need a simple appetizer that vanishes instantly.
- We use sharp cheddar because, frankly, anything less just doesn’t stand up to the bacon and potato flavor. It’s worth finding the good stuff!
- This recipe is incredibly flexible; you can bake them entirely ahead of time and just top them off when guests arrive. So easy!
- Because we use russets, the insides stay fluffy while the edges get gloriously crunchy. It’s the perfect texture contrast for those cheesy potato bites.
They just hit all the right comfort food buttons, don’t they?
Assembling Your Ingredients for Loaded Potato Skins Recipe
Alright, let’s look at what we need to gather. When you’re making something this classic, sticking to good, honest ingredients really pays off. I’ve listed out exactly what my tried-and-true Loaded Potato Skins Recipe calls for. Remember, the quality of your cheese makes a huge difference here; don’t skimp if you can help it!
We’re keeping these traditional for a reason—they are perfect! I always find it helpful to prep things like bacon and green onions while the potatoes are baking, just to save a few minutes later on. Trust me, organizing your components first makes the assembly phase fly by so you can get these cheesy potato bites into the oven faster!
Here is the definitive list for this fantastic hash brown egg casserole make-ahead buddy recipe:
- 3 large russet potatoes (These are the best for getting that sturdy shell!)
- 2 tablespoons olive oil
- 1/4 teaspoon salt
- 1/8 teaspoon ground black pepper
- 1 teaspoon garlic powder
- 1/8 teaspoon cayenne pepper (Just a tiny bit for a background warmth, nothing too spicy!)
- 6 slices bacon, cooked and crumbled
- 2 cups shredded sharp cheddar cheese
- 4 green onions, sliced for garnish
- 1/2 cup sour cream, for serving
That’s it! Simple, delicious, and ready for maximum flavor.
The Essential Steps to Perfect Oven Baked Potato Skins
Making truly fantastic potato skins isn’t just about throwing toppings on a baked potato half. Nope! It’s a process, and trust me, when you follow these steps, you get those restaurant style potato skins that make everyone ask where you bought them. The secret weapon here is dryness—we need that skin firm and crisp before we even think about cheese.
Baking the Potatoes for Sturdy Potato Shells
First thing’s first: grab your oven and get it humming at 400 degrees F. You have to start with pristine potatoes, so give those russets a good scrub down. This is important! Then, grab a fork and poke them everywhere—seriously, multiple times. This lets the steam escape while they bake; if you skip this, you might end up with a potato explosion, and nobody wants that risk in their kitchen!
Rub them lightly with olive oil and salt, and let them bake right on the rack. We aren’t rushing this part. They need a full 50 to 60 minutes until they are super tender when you give them a little squeeze. Once they’re done, you *must* let them cool down enough so you don’t burn your fingers when you start slicing.
Scooping and Seasoning the Potato Skins with Bacon and Cheddar
Now for the delicate part! Cut each cooled potato in half lengthwise. Your goal here is to create a true shell, so you need to scoop out most of that fluffy potato goodness. But don’t scrape them bare! Leave about a quarter-inch thickness all the way around. That’s your structure! Save the scooped-out insides for mashed potatoes later, because we aren’t wasting a thing.
Take a tiny bit of leftover olive oil and brush both the inside and the outside of those empty shells. Then, mix up your seasoning—garlic powder, black pepper, and that little bit of cayenne pepper. Sprinkle that flavor mixture evenly inside. This seasoning step is what really sets the foundation for incredible, flavorful potato skins! If you want more tips on getting potatoes crispy outside, check out my guide on oven roasted potatoes.
Achieving Maximum Crispiness for Your Potato Skins
Okay, this next part is non-negotiable if you want true crispiness! Place your seasoned shells cut-side up on a baking sheet. Back into the 400-degree oven they go for about 10 minutes. This initial bake is designed to dry out any remaining moisture trapped in the potato walls. My personal trick is to tap the bottom of one shell before I load it; if it feels stiff and dry, it’s ready for toppings!
Loading and Final Melt
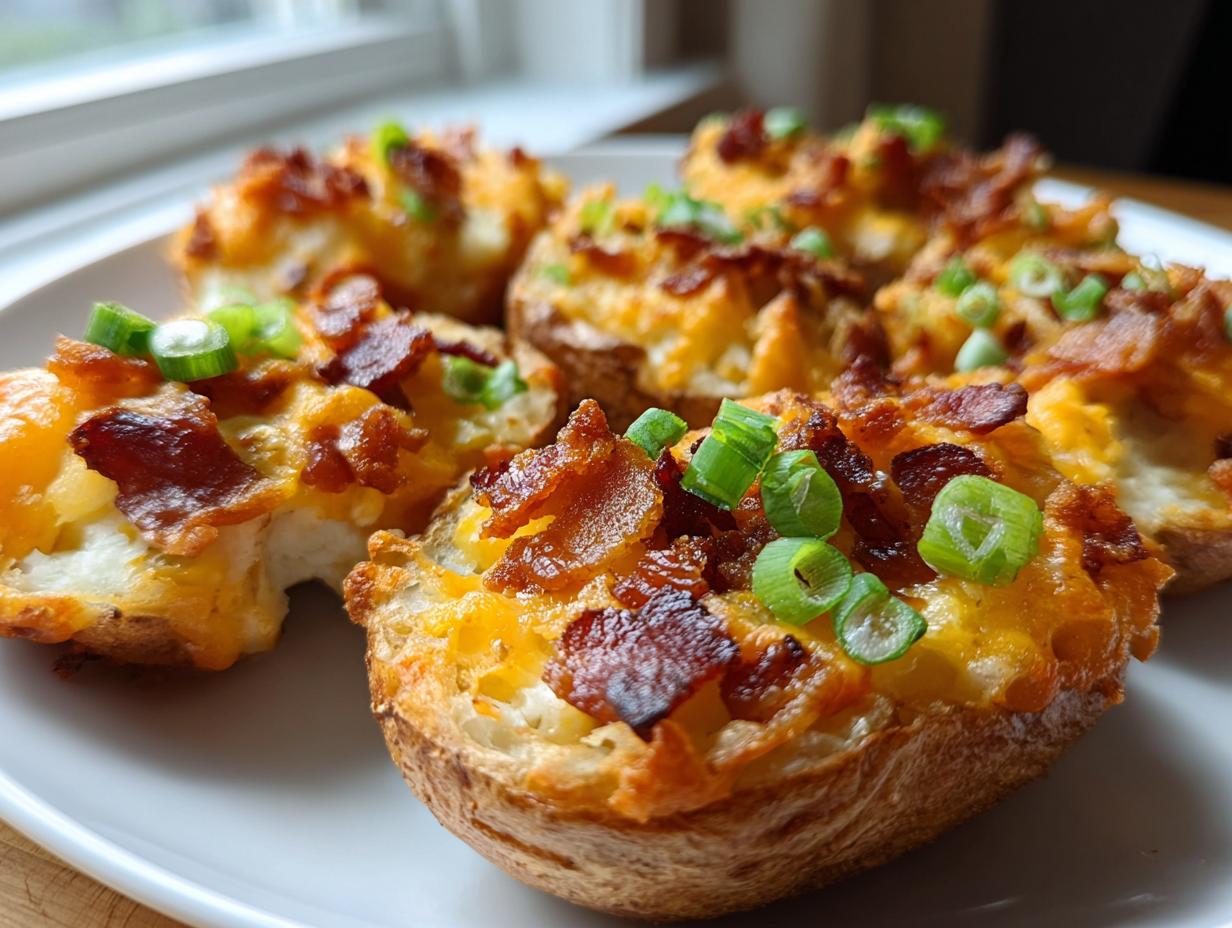
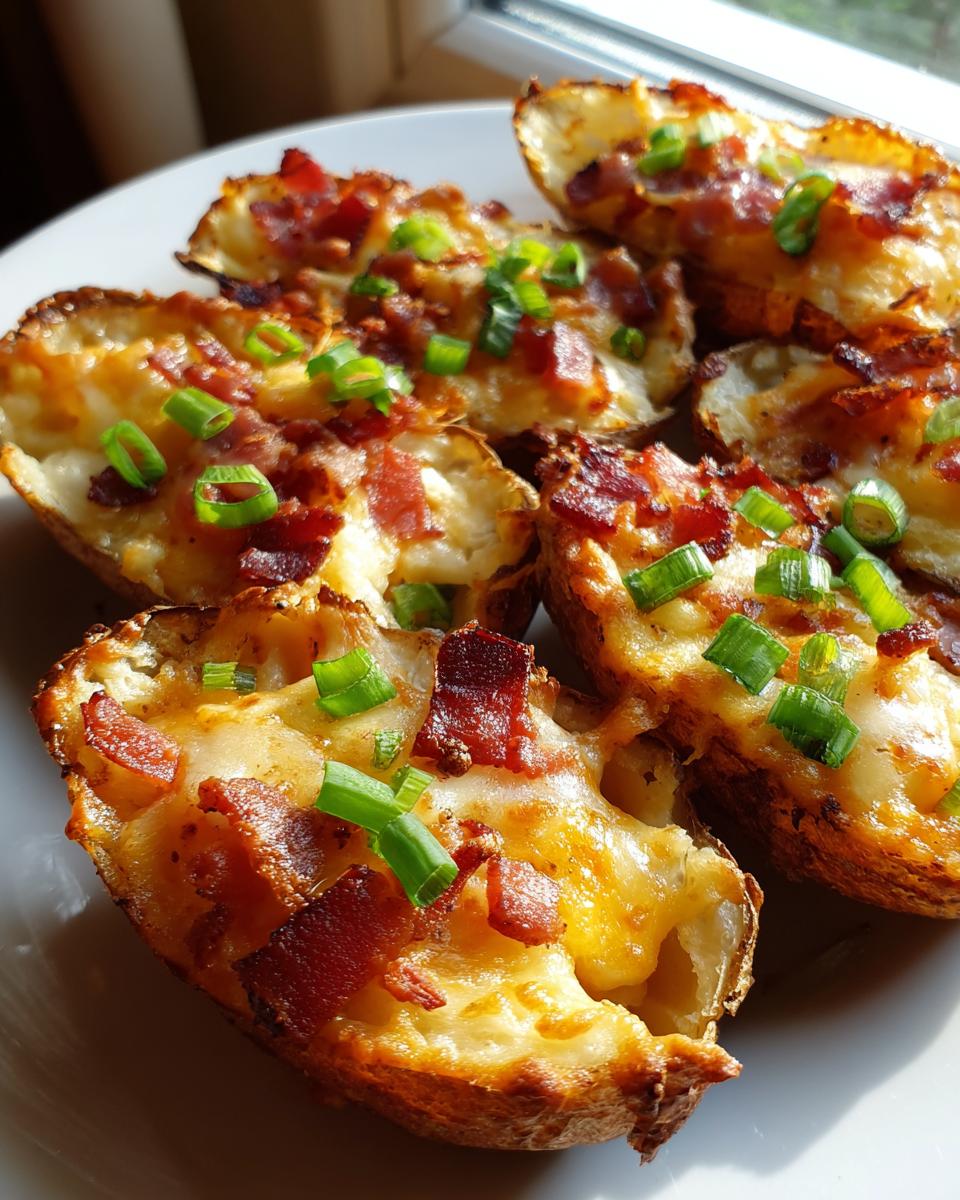
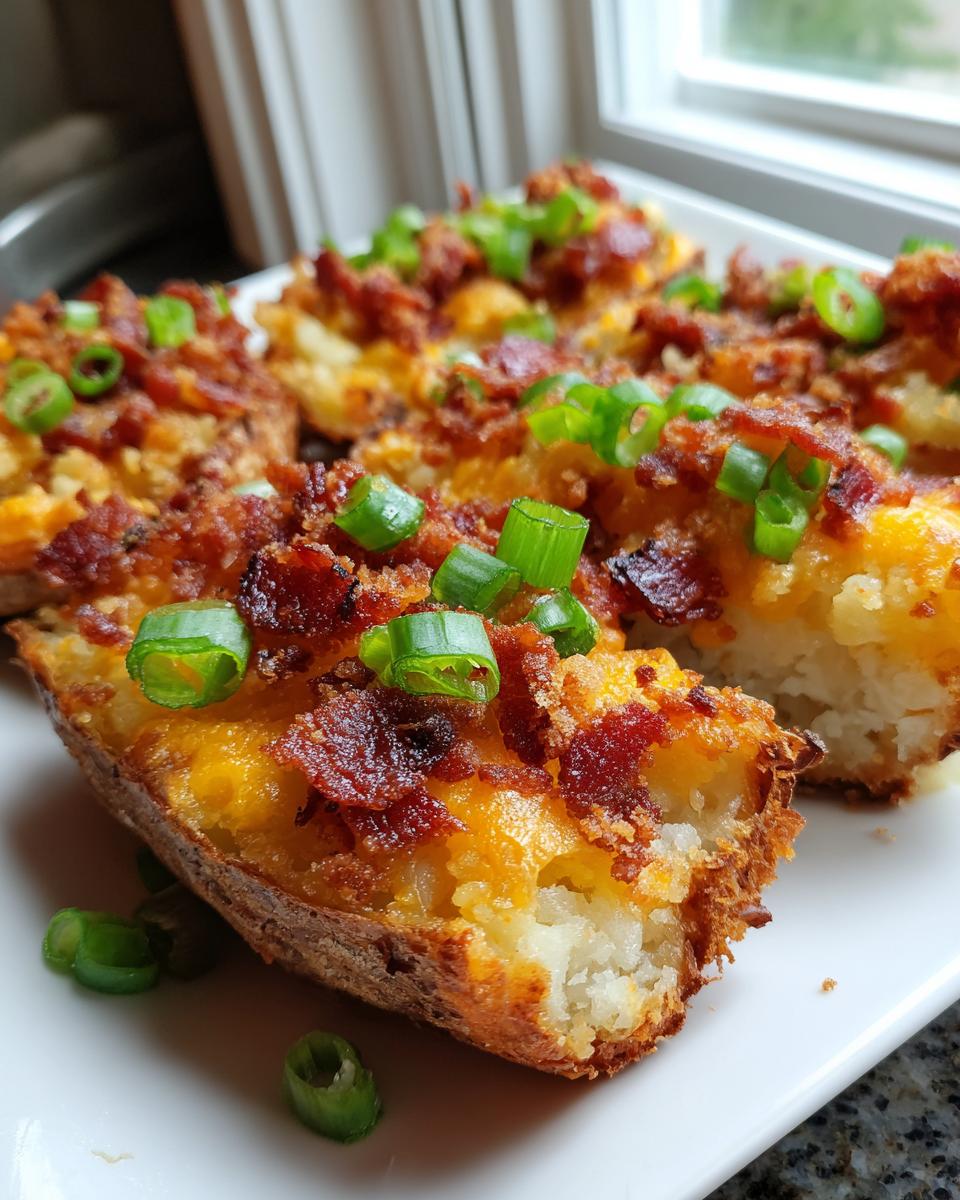
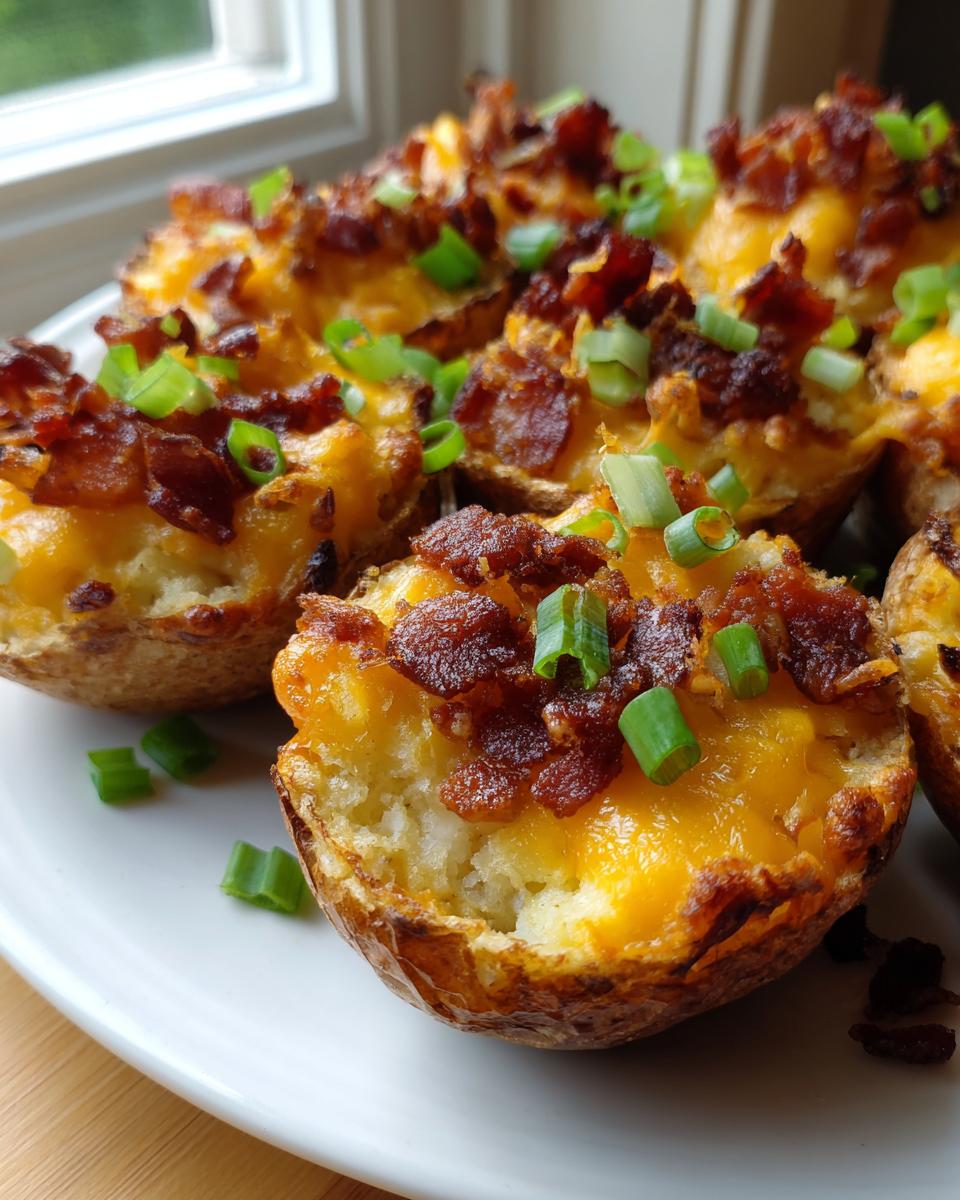
Once those shells are beautifully dried out and looking ready for their second act, pull them out. Now it’s time for the fun stuff! Sprinkle that sharp cheddar cheese generously inside—use more than you think you need—and top it all off with that crumbled bacon we cooked up earlier. They should look hearty and inviting!
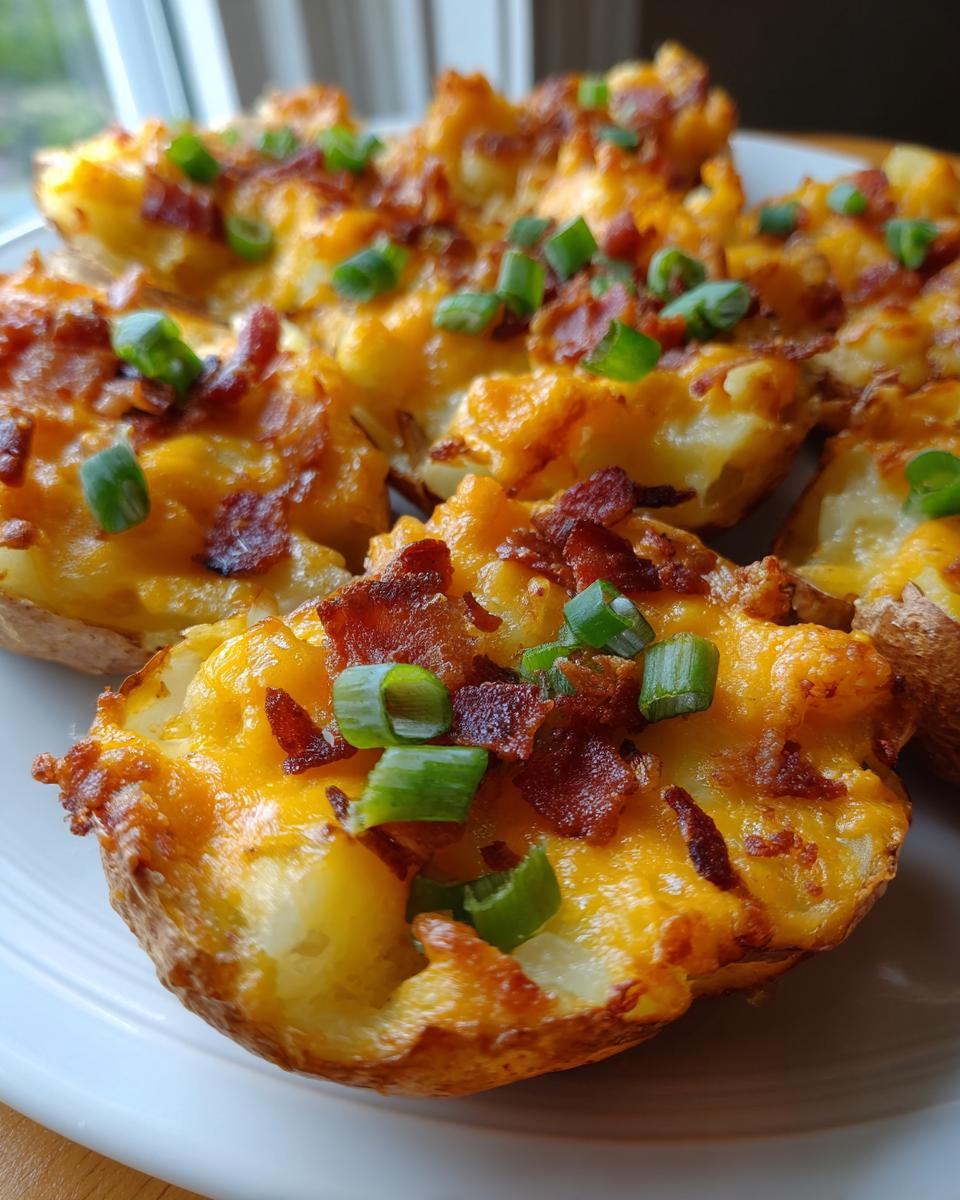
Back into the oven they go for just 5 to 8 minutes more. You’re just waiting for that cheese to turn into a shiny, bubbly molten blanket. Once it’s perfect, pull them out right away! These party snacks are best eaten when they are piping hot, so grab your sour cream and green onions and get them on the plate immediately!
Tips for Making Crispy Potato Skins That Never Get Soggy
If you’re chasing that perfect snap—the one you get at a great sports bar—you need these tips up your sleeve. We want these to be glorious, restaurant style potato skins, not little potato canoes filled with sadness! I learned the hard way that moisture is the enemy of crispiness, so let’s make sure your shells stay sturdy. Many folks struggle with how to make crispy potato skins that actually hold their shape; I found these tricks really help me when I’m prepping for a big game, just like the folks over at Insider Mama suggest.
From the notes my recipe scribbles give me, here’s the deal for getting that perfect crunch:
- If you want them extra crisp right out of the oven, give the inside of the scooped shell just a *light* brush with olive oil before that second bake. It helps seal the potato structure.
- Don’t be tempted to skip the cooling time! If you try scooping hot potatoes, you’ll tear the skin, and you’ll end up with mushy shells that fall apart. We need room-temperature stability for the best results.
- Pro-tip from the source data: you can totally prepare these ahead! Bake your potatoes and scoop out the insides up to two days early. Keep those empty shells covered nice and snug in the fridge. Then, when party time hits, just brush them, season them, and do that second bake to crisp them up before loading. It makes entertaining so much easier!
Remember, these ingredients make this a fantastic gluten-free appetizer too, which is always a bonus when guests have different needs. If you’re looking for something creamy to go with something like my garlic parmesan mashed potatoes, these are the perfect salty counterpoint!
Variations for Your Loaded Potato Skins Recipe
Look, I love the classic bacon and cheddar combo—it’s the gold standard for a reason, right? But once you understand the technique for getting those crispy potato shells down, you can go absolutely wild with the toppings! These baked potato appetizers are basically edible bowls just waiting for your creative touch. So, when you’re tired of the standard fare, try dressing up your next batch of melty cheese potato bites with one of these fun themes.
We talked about the BBQ Pulled Pork variation floating around, and honestly, that’s a winner for a weekend cookout. Imagine taking that smoky, saucy meat and loading it into the shells instead of bacon—I sometimes even swap the cheddar for some pepper jack just to amp up the heat!
If you need a great vegetarian option, ditch the meat and go big on flavor. I love a fully loaded vegetarian potato skin using sautéed mushrooms, sliced black olives, finely diced jalapeños, and maybe some caramelized onions. Use Monterey Jack or a good smoked Gouda instead of cheddar for a total flavor shift. It’s still hearty, still cheesy, and satisfies that craving perfectly!
And here’s a weird one that actually blew my mind: Buffalo Chicken Potato Skins. You take some leftover shredded chicken, toss it lightly in your favorite Buffalo sauce, and then top it with cream cheese mixed with a little mozzarella before baking. Finish it with a drizzle of ranch dressing instead of sour cream when they come out. Everyone asks for the recipe when I bring those out for events!
These ideas just prove that once you master the shell, you’ve unlocked an entire universe of delicious, savory potato snacks. Feel free to get creative; maybe try them smothered in chili or taco meat next time! If you’re looking for another easy side that keeps things simple but delicious, you have to check out my thoughts on Jiffy Corn Casserole; it’s the easiest addition to any party spread.
Serving Suggestions for These Party Snacks
Okay, once these amazing potato skins are piping hot out of the oven, what do you serve them with? Because let’s be real, they are the star, but every star needs a good supporting cast, especially when you’re talking about game day food or a big buffet spread for your favorite party snacks.
The beauty of these cheesy potato bites is they stand up perfectly on their own thanks to all that cheese and bacon. But if you want to really elevate the snack table, here are my favorite pairings. For dipping, you can’t go wrong with a cool, tangy contrast. If you’re feeling particularly ambitious—and I absolutely encourage it—you *have* to try making my recipe for Crockpot Buffalo Chicken Dip. It’s spicy, creamy, and fantastic for dipping the leftover potato flesh or just scooping up alongside the skins.
If you’re serving them alongside something more substantial, like a big pot of chili or maybe even as a side to BBQ, keep the sides simple. A fresh, crunchy slaw or a simple green salad dressed with vinaigrette cuts right through the rich cheese and bacon fats perfectly. It just cleanses the palate delightfully!
And here’s a fun note I pulled from my testing notes: these loaded potato skins make a wonderful, hearty, gluten-free appetizer! Since we aren’t adding any flour here, you can feel extra good about feeding a crowd knowing that almost everyone can enjoy a few of these irresistible bites without worry. They really are the ultimate crowd-pleasing appetizer!
Storage and Reheating Instructions for Leftover Potato Skins
Now, here is a little secret: making these amazing cheddar and bacon potato skins usually means you end up with some leftovers, even if they are just a couple. And while they are definitely best eaten hot right out of the oven, I totally get that sometimes you need to save them for later—maybe for another batch of game day snacks the next day!
If you have leftovers that are already loaded with cheese and toppings, you need to be gentle when reheating. The microwave is easy, but I hate how it steams the crisp right out of the shell. If you *have* to microwave a loaded skin, do it in short 20-second bursts. Even better, wrap the individual skins loosely in foil and reheat them in a 350-degree oven for about 10 minutes. That helps keep some of that texture solid. They won’t be *quite* as perfect as time one, but they’ll be yummy comfort food appetizers for sure!
But my real recommendation, which I mentioned briefly before, is focusing on the make-ahead strategy. If you are planning a big party, don’t load them up ahead of time! Bake your potatoes, scoop out your shells, and toss the empty little potato boats in an airtight container in the fridge. You can keep those empty shells fresh for up to two days, just like my notes suggested. Then, on party day, you just treat them like Step 5 in the main recipe: brush them with oil, give them that crucial second bake to crisp up, *then* you load them with cheese and bacon and melt everything under the broiler.
This prepping ahead method is a lifesaver because it lets you focus on other things, like perhaps making my chicken broccoli casserole for dinner the next night! It keeps your entertaining stress way, way down, and you still serve up perfectly crispy potato skins.
Frequently Asked Questions About Homemade Potato Skins
I know when I’m trying a new recipe, especially one that needs to be perfect for a party, I always have a mile-long list of ‘what ifs’ running through my head. People always ask me the same few things when they try this loaded potato skins recipe for the first time. Let’s clear up any worries so you can focus on enjoying your guests!
What type of potato is best for crispy potato skins?
Hands down, you absolutely must use Russet potatoes for this! They have that perfect texture combination: the skin gets wonderfully stiff and crisp when baked, and the inside is starchy fluffy. That contrast is what makes these savory potato snacks so satisfying. If you try using waxy potatoes, they tend to stay too moist and won’t dry out properly for that critical crunch. Stick to Russets for the best results!
Can I skip the second bake to make this an easier appetizer recipe?
Oh, I wish you could, honey! But that second, shorter bake is the single most important step for getting crispy potato skins. Skipping it means you’re just loading cheese onto hot, steamed potato flesh, and that moisture will soak right into your shell, leading to sogginess. If you’re genuinely short on time, you can cut the initial bake time down slightly, but you absolutely cannot skip the 10 minutes in the oven *before* loading the toppings. That dry-out phase is everything!
Can I make these potato skins in an air fryer instead of the oven?
Yes, you totally can, and it cuts the cooking time down quite a bit! If you’re using an air fryer, you’ll want to bake the potato first, of course. Once you scoop them and brush them with oil, you can air fry the empty shells at about 380 degrees F for 6 to 8 minutes to crisp them up. Then load them and pop them back in for another 4 minutes until the cheese melts. It’s a great hack for slightly smaller batches or if you are looking for ultra-fast easy appetizer recipes—though I still rely on the oven for big game days!
What if I don’t want to use bacon? What are some other topping ideas?
That’s a totally fair question, especially if someone in your crowd doesn’t eat pork! It’s easy to turn these into incredible melty cheese potato bites without bacon. You can double up on the cheese and add things like finely diced green bell peppers or jalapeños during the final bake. Another great option that really pops is making them BBQ style; swap the bacon for shredded smoked chicken or pulled pork, and use a drizzle of BBQ sauce instead of sour cream. I talk more about other fun toppings in the variations section, but honestly, just using great smoked paprika and extra sharp cheddar works wonders too. Don’t forget to check out my tips for quick weeknight dinners if you need a full meal idea!
For more confirmation on achieving that perfect crunch, you can always look at other tried-and-true methods shared by cooks like those over at Small Town Woman for inspiration!
Nutritional Snapshot of These Cheesy Potato Bites
Sharing nutritional estimates is always a little tricky because the final count depends on how much bacon you pile on versus how much cheese actually melts and stays behind, right? But for consistency, here is the breakdown based on the recipe ratios provided, serving size being two cheesy potato bites. Remember, these are just helpful estimates!
- Serving Size: 2 skins
- Calories: 320
- Fat: 20g
- Saturated Fat: 10g
- Trans Fat: 0.5g
- Carbohydrates: 25g
- Fiber: 3g
- Protein: 12g
- Sugar: 2g
- Cholesterol: 45mg
- Sodium: 350mg
These are definitely rich comfort food appetizers, packed with good protein from the cheese and bacon! If you are looking for lighter side dishes, you might want to check out my ideas for healthy lunch recipes, but for game day, these potato skins are worth every bite!
PrintCrispy Loaded Potato Skins with Bacon and Cheddar

Make restaurant-style potato skins at home. This easy recipe delivers crispy potato shells loaded with melted cheddar cheese and savory bacon, perfect for game day or any party.
- Prep Time: 20 min
- Cook Time: 70 min
- Total Time: 90 min
- Yield: 8 servings (16 skins) 1x
- Category: Appetizer
- Method: Baking
- Cuisine: American
- Diet: Vegetarian
Ingredients
- 3 large russet potatoes
- 2 tablespoons olive oil
- 1/4 teaspoon salt
- 1/8 teaspoon ground black pepper
- 1 teaspoon garlic powder
- 1/8 teaspoon cayenne pepper
- 6 slices bacon, cooked and crumbled
- 2 cups shredded sharp cheddar cheese
- 4 green onions, sliced for garnish
- 1/2 cup sour cream, for serving
Instructions
- Preheat your oven to 400 degrees F. Scrub the potatoes clean and prick them several times with a fork. Rub the potatoes lightly with olive oil and sprinkle with salt.
- Bake the potatoes directly on the oven rack for 50 to 60 minutes, or until they are tender when squeezed. Let them cool until you can handle them safely.
- Cut each baked potato in half lengthwise. Scoop out most of the inside potato flesh, leaving about a 1/4-inch thick shell. Reserve the scooped potato for another use.
- Brush the inside and outside of each potato shell lightly with the remaining olive oil. Mix the garlic powder and cayenne pepper together, then sprinkle this mixture evenly over the inside of the shells.
- Place the shells cut-side up on a baking sheet. Bake for 10 minutes to dry out the shells and make them crisp.
- Remove the shells from the oven. Sprinkle the inside of each shell generously with shredded cheddar cheese and crumbled bacon.
- Return the potato skins to the oven and bake for another 5 to 8 minutes, or until the cheese is fully melted and bubbly.
- Remove from the oven. Top each skin with a dollop of sour cream and a sprinkle of sliced green onions before serving immediately.
Notes
- For extra crispy potato skins, lightly brush the inside of the scooped shells with a little more olive oil before the second bake.
- You can prepare the baked potatoes and scoop the insides up to 2 days ahead. Store the empty shells covered in the refrigerator.
- This recipe makes a fantastic gluten free appetizer for your next gathering.
Nutrition
- Serving Size: 2 skins
- Calories: 320
- Sugar: 2
- Sodium: 350
- Fat: 20
- Saturated Fat: 10
- Unsaturated Fat: 10
- Trans Fat: 0.5
- Carbohydrates: 25
- Fiber: 3
- Protein: 12
- Cholesterol: 45