
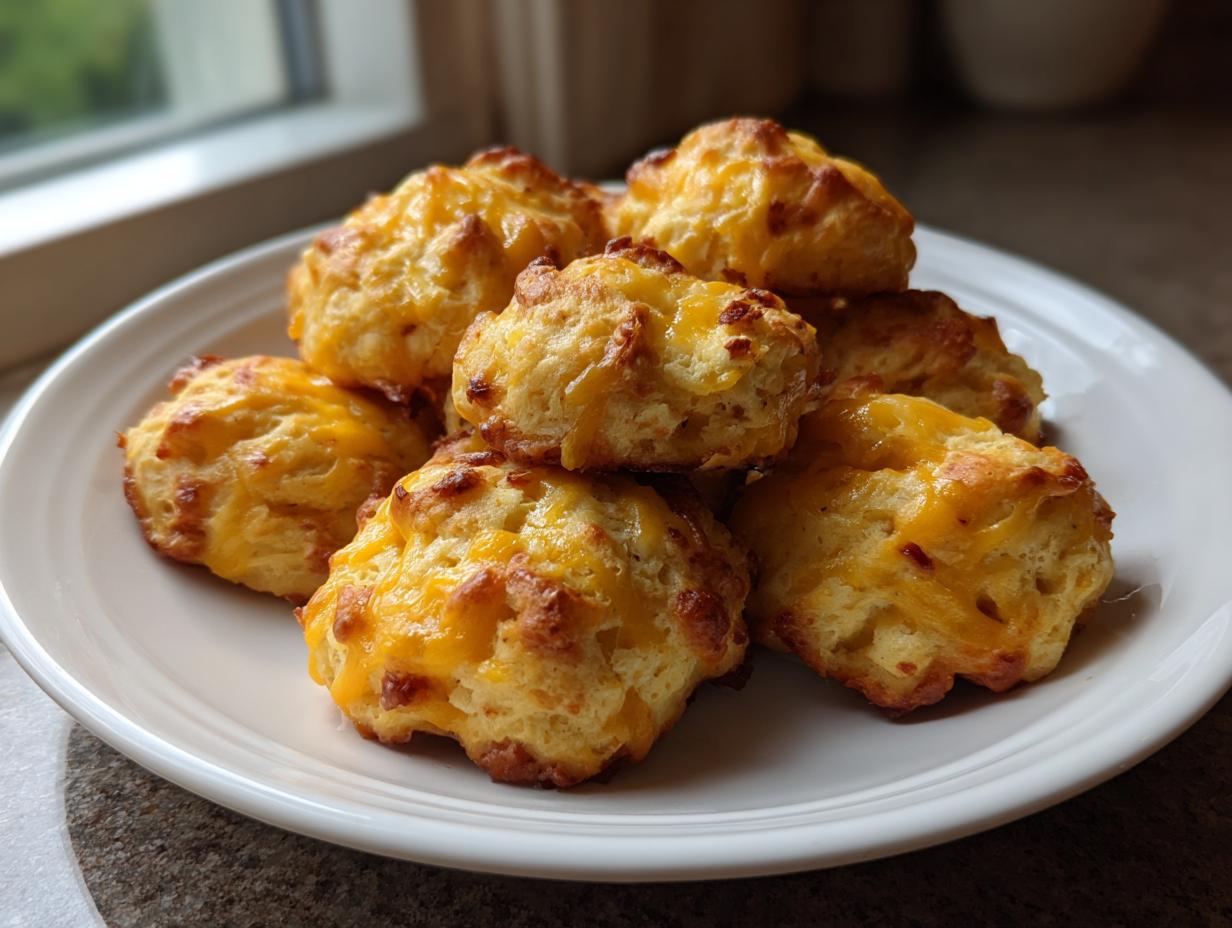
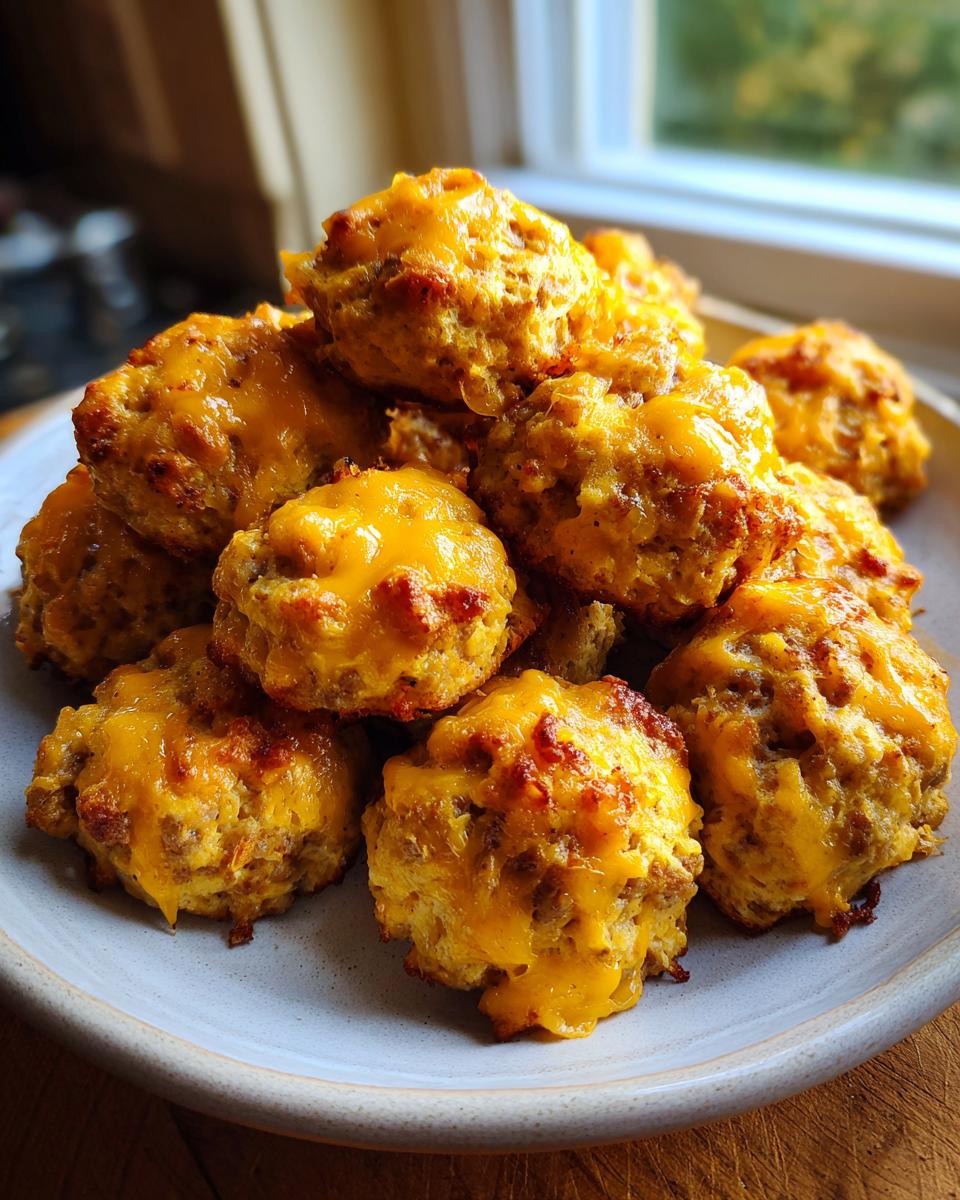
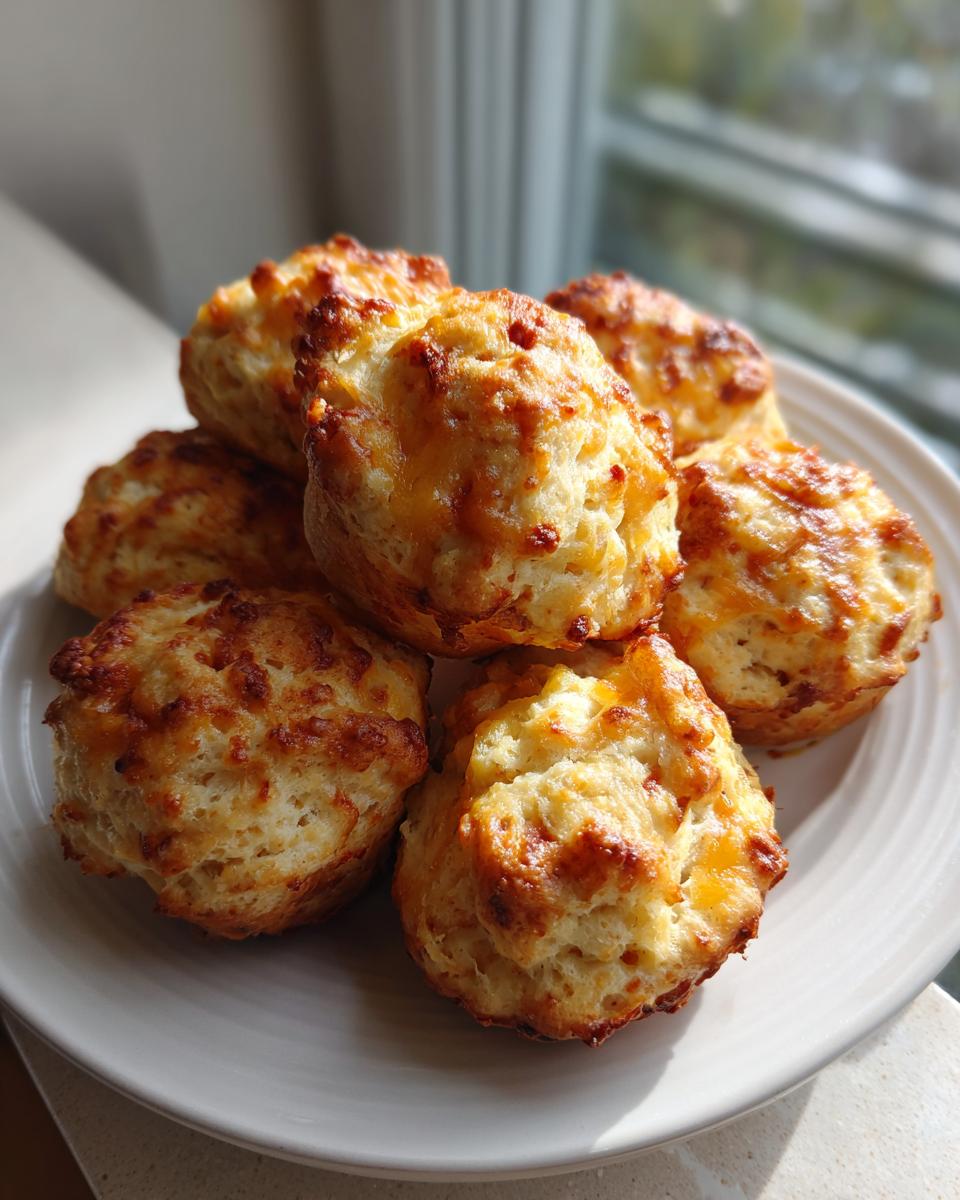
If you’re anything like me, sometimes you need a recipe that just *works*. You know, the kind you pull out when company shows up unexpectedly, or when you realize you need a truly satisfying, savory bite for the big game. Forget fussy assembly and endless chopping! That’s why I’m here to tell you about the absolute king of easy appetizers: the bisquick sausage balls. When I started recreating the honest flavors of home, this recipe was one of the first I perfected. It’s pure comfort food, made with just three core things. I promise, these Cheesy Sausage Bites are so simple, you’ll wonder why you haven’t been making them forever.

- Why These bisquick sausage balls Are a Kitchen Staple (EEAT Focus)
- Gathering Your Ingredients for Cheesy Sausage Bites
- Step-by-Step Instructions: How to Make bisquick sausage balls
- Tips for Success When Preparing bisquick sausage balls
- Serving Suggestions for these Crowd Pleasing Snacks
- Make Ahead Appetizers and Freezer Friendly Snack Storage
- Variations on Classic bisquick sausage balls
- Nutritional Snapshot of your bisquick sausage balls
- Share Your Experience Making bisquick sausage balls
Why These bisquick sausage balls Are a Kitchen Staple (EEAT Focus)
Honestly, this recipe has stuck around for decades because it just works. It’s the definition of a Classic Comfort Food Recipe that requires zero fuss but delivers huge flavor. When I test a recipe, I’m looking for reliability, and these never fail me. They come out perfect whether I’m making a half batch for a quiet weekend breakfast or scaling them up for a huge holiday party. They are the savory, cheesy equivalent of a warm hug.
For something so easy, they have this wonderful Southern charm that makes them feel special, too. If you are looking for some other easy savory bites, I have a whole section on easy ways to shake up your morning meals that you might enjoy!
The Magic of the 3 Ingredient Appetizer
The genius here is that you only need three things, and each one does heavy lifting. The ground pork sausage brings all the flavor and necessary fat. The Bisquick baking mix is the structural genius, acting like a quick, easy biscuit base. And the sharp cheddar? That’s your binder, your saltiness, and your cheesy richness all rolled into one glorious component. That’s it! No eggs, no extra spices needed for the base version!
Maddie’s Expert Tip for Perfect bisquick sausage balls
Here is where you stop them from becoming little hockey pucks! When you mix your ingredients—and yes, you must use your hands for this part—you incorporate air but you must stop before it gets smooth and tough. As soon as you can’t see dry streaks of Bisquick anymore, you stop mixing immediately. Overworking the dough develops the gluten in the mix, and that is how you get dense bisquick sausage balls instead of those wonderfully tender ones we are hoping for!
Gathering Your Ingredients for Cheesy Sausage Bites
Okay, let’s get down to the essentials! Because this is such a short list, every ingredient needs to be the right type. We want that classic, savory, Southern Sausage Balls flavor, which means we need specific components in the right ratio. You need a full pound that is nice and fatty because that fat cooks out and melts the cheese, helping everything hold together.
- 1 pound ground pork sausage (mild or spicy)
- 1 cup Bisquick baking mix
- 1 cup shredded sharp cheddar cheese
Ingredient Notes and Substitutions for bisquick sausage balls
For the best results on this 3 Ingredient Appetizer, trust me on the cheese: use sharp cheddar! Mild cheddar just doesn’t give you that needed, tangy punch to balance the richness of the pork. If you want a real kick, absolutely swap the mild sausage for hot ground pork sausage—that instantly turns these into better Game Day Snacks. Now, if you’re absolutely craving the extra creaminess that some people love, you can substitute 4 ounces of cream cheese for about half a cup of the cheddar cheese. It makes them incredibly moist, but it steps away from the true 3-ingredient classic we’re aiming for here!
Step-by-Step Instructions: How to Make bisquick sausage balls
This filling recipe is so quick that the hardest part of the whole process is just waiting for the oven to heat up! We want to be organized here so we can mix it fast and get these beauties baking. Remember what I said about not overmixing? That’s going to be key once we combine everything. Make sure you have your baking sheet ready to go before you even touch the ingredients, trust me on that one!
- First things first: get your oven set to 350 degrees Fahrenheit. While it’s heating up, grab a baking sheet and give it a very light grease, or if you want guaranteed easy cleanup, line it completely with some parchment paper.
- In your biggest mixing bowl—the one you feel most comfortable getting your hands into—toss in that pound of sausage, the cup of Bisquick mix, and all of that sharp cheddar cheese.
- Time to mix! You need to use your actual hands here. Work the ingredients together until they are just combined. Stop right when the dry streaks of mix disappear. Don’t mash it! We are combining, not kneading bread here.
- Now, roll out those Cheesy Sausage Bites. You want them uniform, so aim for about 1 inch across—a nice little bite size. Place them on your prepared sheet, leaving just a tiny bit of space between them so they can brown nicely.
- Into the oven they go! Bake them for 15 to 20 minutes. If you want to check on them, you can always peek, but you’re looking for them to be fully cooked through and beautifully golden brown on the tops.
- Once they look perfect, pull that wonderful aroma out of the oven and let them sit on the pan for just a couple of minutes before moving them to a cooling rack.
Mixing and Shaping Your Cheddar Sausage Puffs
When you are mixing, think about gently folding everything together rather than aggressively squishing it all. You’re aiming for a slight shaggy texture, not a smooth dough ball. If you see any little pockets of white mix, that’s fine! If you mix until it’s completely smooth, you’ve gone too far and they’ll be tough. When rolling them into those little 1-inch rounds, try to work quickly. Your hands add warmth, and if the dough gets too warm, it gets mushy and sticks to you!
Baking Time and Temperature for Simple Baked Appetizers
The temperature of 350°F is crucial because it allows the center of the pork sausage to cook safely without burning the Bisquick exterior. If your oven runs hot, watch them closer near the 15-minute mark. You are generally looking at that lovely shade of amber on the outside. Once they are richly golden brown, they are done! That color tells you the cheese has melted beautifully and bound everything tight, making them sturdy Savory Breakfast Bites. This setting works perfectly for my super simple corn casserole, too—consistency is everything!

Tips for Success When Preparing bisquick sausage balls
I’ve learned a few things over the years about what makes these go from good to absolutely amazing, which is why I want you to have the best results! The major rookie mistake anyone makes with these bisquick sausage balls is trying to cram too much seasoning or too many extras into the mix. Keep it simple! If you start adding too many wet ingredients, you throw off the balance that your Bisquick needs to puff up just right. That’s why I love the classic three-ingredient approach for reliability.
The other big pitfall is dryness. You want them tender, not crumbly when you bite in. If you find your mix is pulling apart when you try to roll it, grab a tiny drizzle—maybe just a teaspoon—of cold water or a splash of milk and work it in *very* gently. Don’t add it all at once! Cold liquid helps keep the fat firm momentarily, which helps with rolling. Seriously, if you want more inspiration on amazing comfort food that pairs well, check out my Bacon Cheeseburger Soup—it’s another winner!
If you’re curious about simplifying other classics, I saw a great take on a similar concept over at All Things Mamma that you might enjoy looking at, too!
Serving Suggestions for these Crowd Pleasing Snacks
These little bites are so versatile! While they are absolutely perfect as Game Day Snacks—popping them out during halftime is always a win—they shine just as brightly during the holidays. They make phenomenal additions to any Holiday Appetizer Recipes platter because they are easy to pick up and eat while mingling.
When I serve them, I always put out a couple of simple dipping sauces. Ranch dressing is a classic, but honey mustard is my absolute favorite pairing! It cuts through the richness of the sausage and cheese so nicely. If you’re serving these alongside something creamy and cheesy like my no-fail Crockpot Buffalo Chicken Dip, make sure you have plenty of crunchy crackers or celery sticks nearby for dipping!
Make Ahead Appetizers and Freezer Friendly Snack Storage
I love planning ahead, especially when holidays or big events are looming! The great news about these bisquick sausage balls is that they are total champs when it comes to prepping early. This lets you focus on other things when the actual party day rolls around. You can mix up the entire sausage, cheese, and Bisquick combination up to 24 hours ahead of time. Just mix it all up, cover that bowl tightly—plastic wrap works great—and tuck it right into the fridge.
When you’re ready to bake those Make Ahead Appetizers, you can roll them straight from the fridge! If you want to make them even further out, these are truly a Freezer Friendly Snack winner. Roll them into balls just like normal, lay them out on a baking sheet to freeze solid for about an hour, then transfer them to a heavy-duty freezer bag. I use this same make-ahead method for my hash brown egg casserole, too!
The best part? You don’t need to thaw them first! You can bake them directly from frozen. Just toss them onto your prepared sheet and plan on adding an extra 5 to 10 minutes to the bake time. Pop over and check out the simple freezing advice on The Typical Mom’s site if you want another perspective on storage!
Variations on Classic bisquick sausage balls
While the classic three ingredients are pure magic, I totally get that sometimes you just need to tweak things a little, you know? Don’t be afraid to treat this recipe like a friendly base rather than a strict rule book once you’ve nailed the original. If you loved using hot ground pork sausage before, keep doing that! Spice is always welcome in my kitchen.
But if you want to introduce a fourth ingredient without wrecking the texture, I highly recommend leaning into pantry spices. A half teaspoon of onion powder and maybe a half teaspoon of garlic powder elevates these Cheesy Sausage Bites instantly. It really deepens that savory flavor profile. If you are looking for other great ways to use sausage, check out my recipe for Italian Sausage Gnocchi Soup sometime!
You could also sneak in a splash of Worcestershire sauce or even a little dried mustard if you want something tangy. Just remember, if you add anything wet, mix it in super carefully at the very end!
Nutritional Snapshot of your bisquick sausage balls
Now, I know what you might be thinking: “Maddie, my family loves these, but are they secretly a whole meal in one bite?” Well, let’s be transparent about what we are working with here! Since this is a truly customizable recipe—you might use spicy sausage, I might use extra sharp cheese—these numbers are just estimates based on the core three ingredients we discussed.
Don’t treat this like strict diet tracking, but it’s good to know that these are flavorful bites, packed with protein, but they do carry some fat, which is what makes them so delicious and satisfying. I always say, everything in moderation, especially when it tastes this good!
Here is a quick look at the approximate nutritional breakdown, based on getting about 30 balls from the full batch:
- Serving Size: 1 ball
- Calories: About 105
- Fat: 8 grams
- Protein: 6 grams
- Carbohydrates: 4 grams
See? That protein count is fantastic if you are serving these up for a Quick Weekend Breakfast! They are definitely a savory treat, not a light salad, but they are incredibly effective as a crowd-pleasing party staple that keeps everyone happy and satisfied.
Share Your Experience Making bisquick sausage balls
Now that you’ve got the absolute easiest, most reliable party food in your arsenal, I really, truly want to know how they turn out for you! This is the part of cooking I love the most—seeing this recipe come to life in your kitchen!
Please, please leave me a rating down below. Five stars is always wonderful, but honestly, any feedback helps me make this space even better for you. Did you serve these as a hearty Savory Breakfast Bites option for your family? Did they disappear first at your last get-together? I live for those stories!
If you snap a picture of your golden, cheesy batch, tag me on social media! Knowing that one of my recipes helped you feed the people you love without stressing out? That’s what this whole thing started for me. And hey, if you’re looking for more ways to lighten up the morning routine after serving up all that delicious sausage, pop over and see some of my other ideas here!
PrintClassic 3-Ingredient Bisquick Sausage Balls

Make these simple, cheesy sausage balls using only three core ingredients. They are a reliable appetizer or quick breakfast bite perfect for game days or holiday gatherings.
- Prep Time: 10 min
- Cook Time: 20 min
- Total Time: 30 min
- Yield: About 30 servings 1x
- Category: Appetizer
- Method: Baking
- Cuisine: American
- Diet: Vegetarian
Ingredients
- 1 pound ground pork sausage (mild or spicy)
- 1 cup Bisquick baking mix
- 1 cup shredded sharp cheddar cheese
Instructions
- Preheat your oven to 350 degrees Fahrenheit. Lightly grease a baking sheet or line it with parchment paper.
- In a large bowl, combine the ground sausage, Bisquick baking mix, and shredded cheddar cheese.
- Mix the ingredients thoroughly with your hands until everything is evenly combined. Do not overmix.
- Roll the mixture into small, uniform balls, about 1 inch in diameter. Place them on the prepared baking sheet, leaving a small space between each ball.
- Bake for 15 to 20 minutes, or until the sausage balls are golden brown and cooked through.
- Remove from the oven and let them cool slightly on the pan before serving.
Notes
- For a spicier flavor, use hot ground pork sausage instead of mild.
- You can prepare this mixture ahead of time, cover it, and keep it refrigerated for up to 24 hours before rolling and baking.
- These freezer friendly snacks bake well directly from frozen; add about 5 to 10 minutes to the baking time.
- Serve these crowd pleasing snacks with your favorite dipping sauce, like honey mustard or ranch dressing.
Nutrition
- Serving Size: 1 ball
- Calories: 105
- Sugar: 0.5
- Sodium: 250
- Fat: 8
- Saturated Fat: 3
- Unsaturated Fat: 5
- Trans Fat: 0.1
- Carbohydrates: 4
- Fiber: 0.2
- Protein: 6
- Cholesterol: 25