
Sometimes you need a dessert that feels like a warm hug from the past but only takes minutes of effort, right? I get it—life is busy! That’s why I am absolutely thrilled to share what might be my favorite easy baking secret: the sopapilla cheesecake bars. Forget everything you think you know about complicated layered pastries. This recipe is so straightforward, yet the result tastes like pure magic—a perfect, sweet little mashup between a creamy cheesecake and that dreamy, buttery cinnamon-sugar crunch of a churro. Trust me, this simple layered process delivers the ultimate sweet comfort food experience, and once you bake this sopapilla cheesecake, it’ll be haunting your weekend plans!
- Why This Easy Sopapilla Cheesecake Recipe is Your New Family Favorite Dessert
- Gathering Ingredients for Your Sopapilla Cheesecake
- Step-by-Step Instructions for the Best Sopapilla Cheesecake
- Tips for Success with Your Layered Pastry Dessert
- Make Ahead Dessert Bars and Storage for Sopapilla Cheesecake
- Serving Suggestions for This Tex Mex Dessert
- Frequently Asked Questions About Sopapilla Cheesecake
- Estimated Nutritional Data for Sopapilla Cheesecake
- Share Your Experience Making This Sopapilla Cheesecake
Why This Easy Sopapilla Cheesecake Recipe is Your New Family Favorite Dessert
I really believe that the best sopapilla cheesecake recipe is the one that brings the most joy with the least amount of fuss. And this one? It’s foolproof, I promise! It’s become a staple around my house because it travels beautifully and always disappears first at any gathering. You get the richness of cheesecake without the fuss of a water bath, and it’s ready faster than you think. If you’re looking for something to pin right now, check out more of my delicious dessert recipes!
The Perfect Churro Inspired Dessert Texture
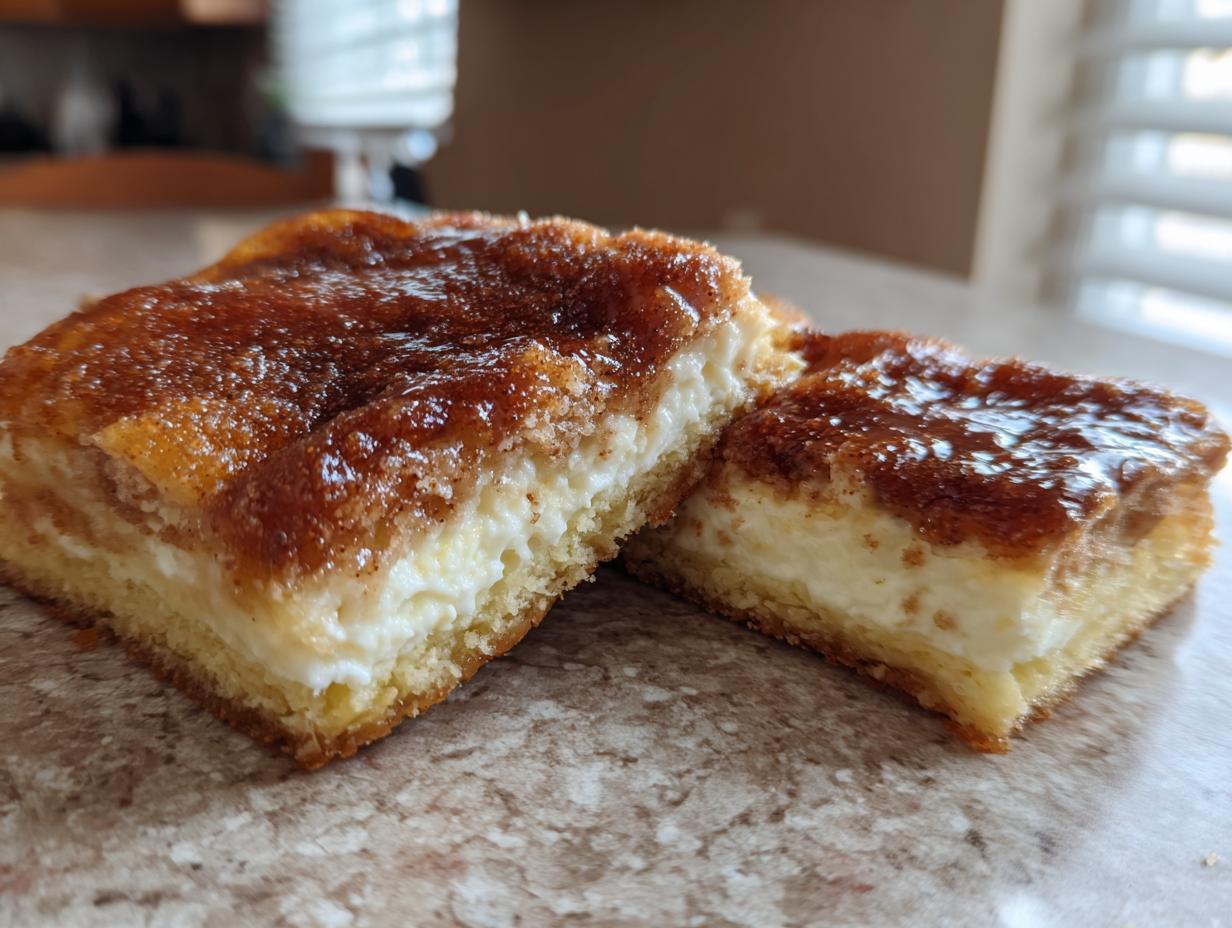
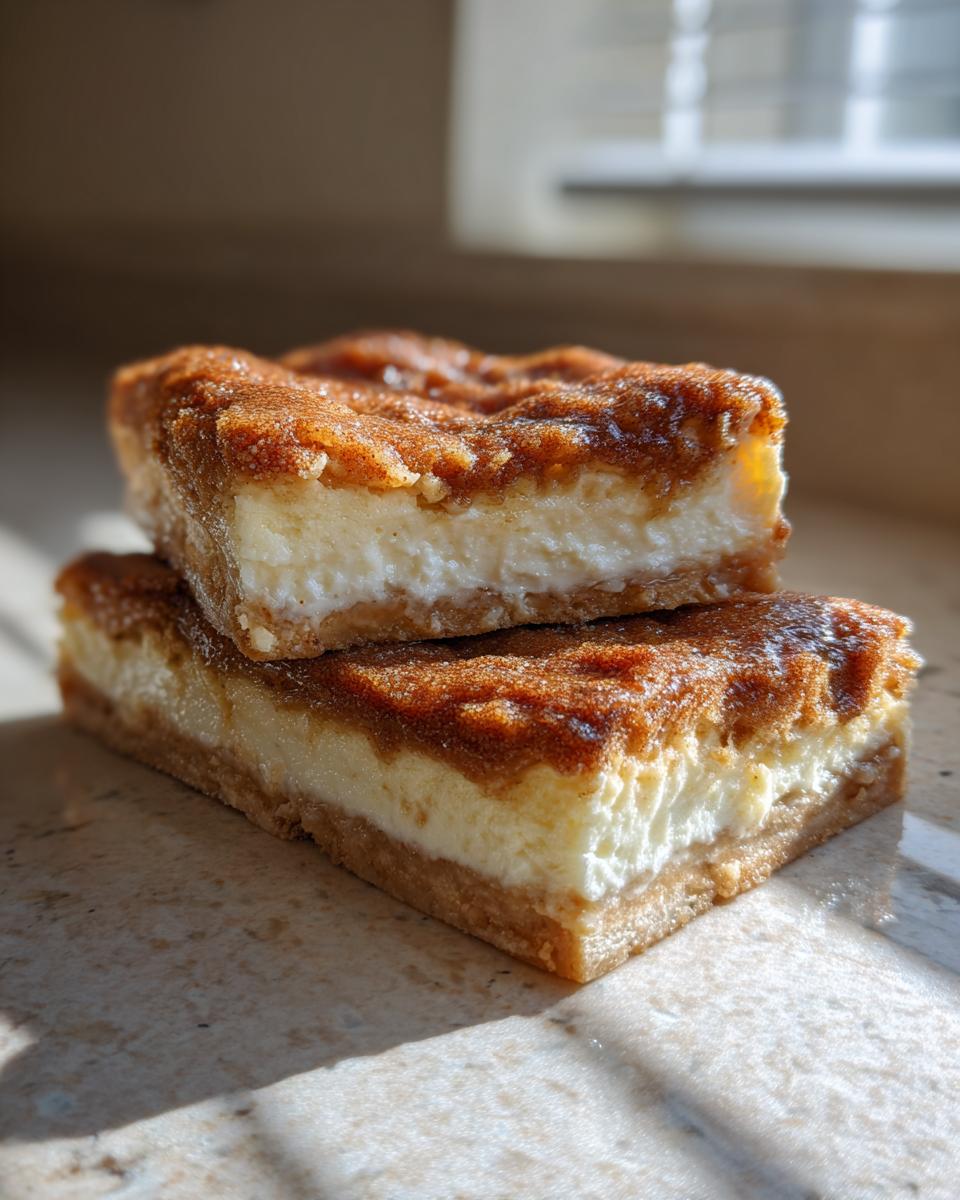
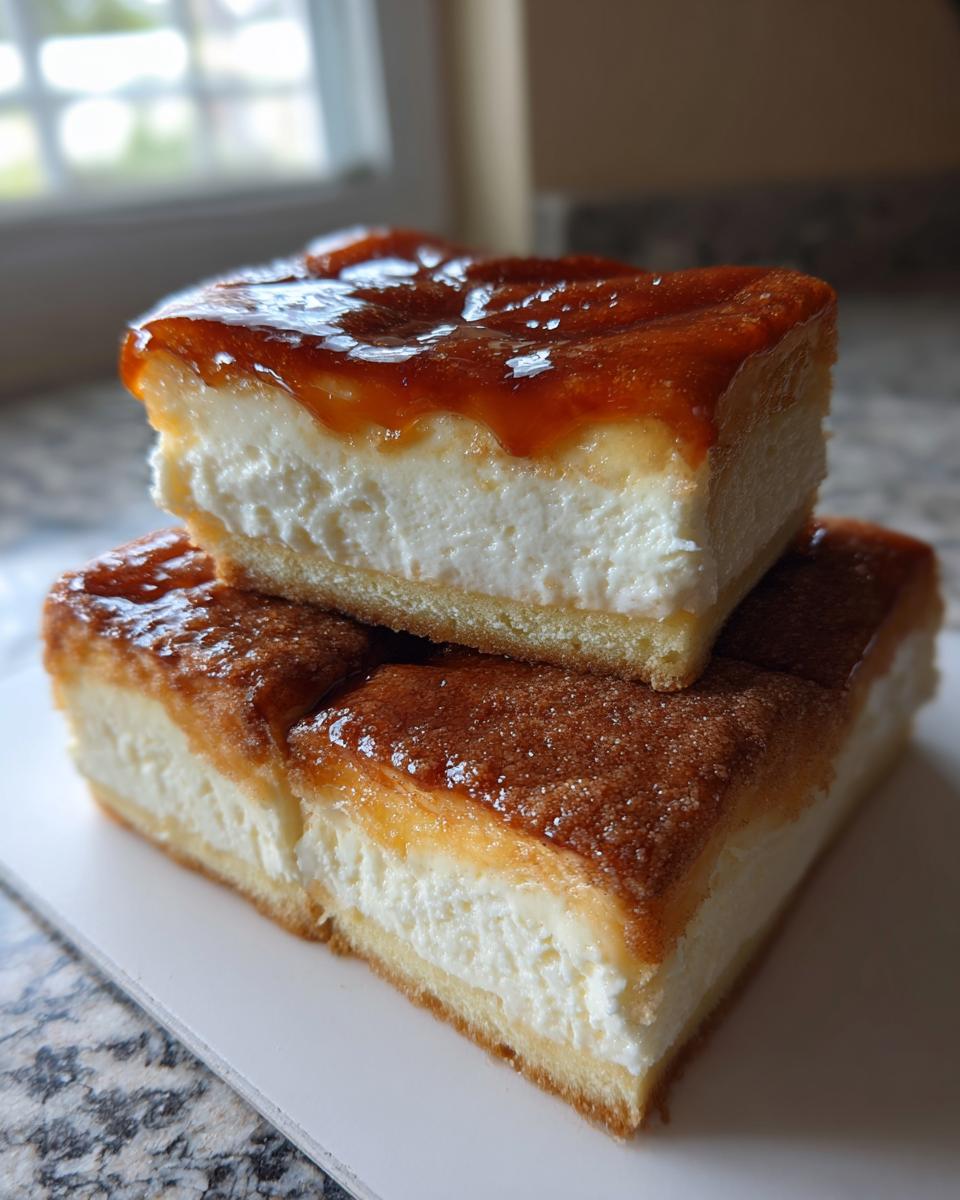
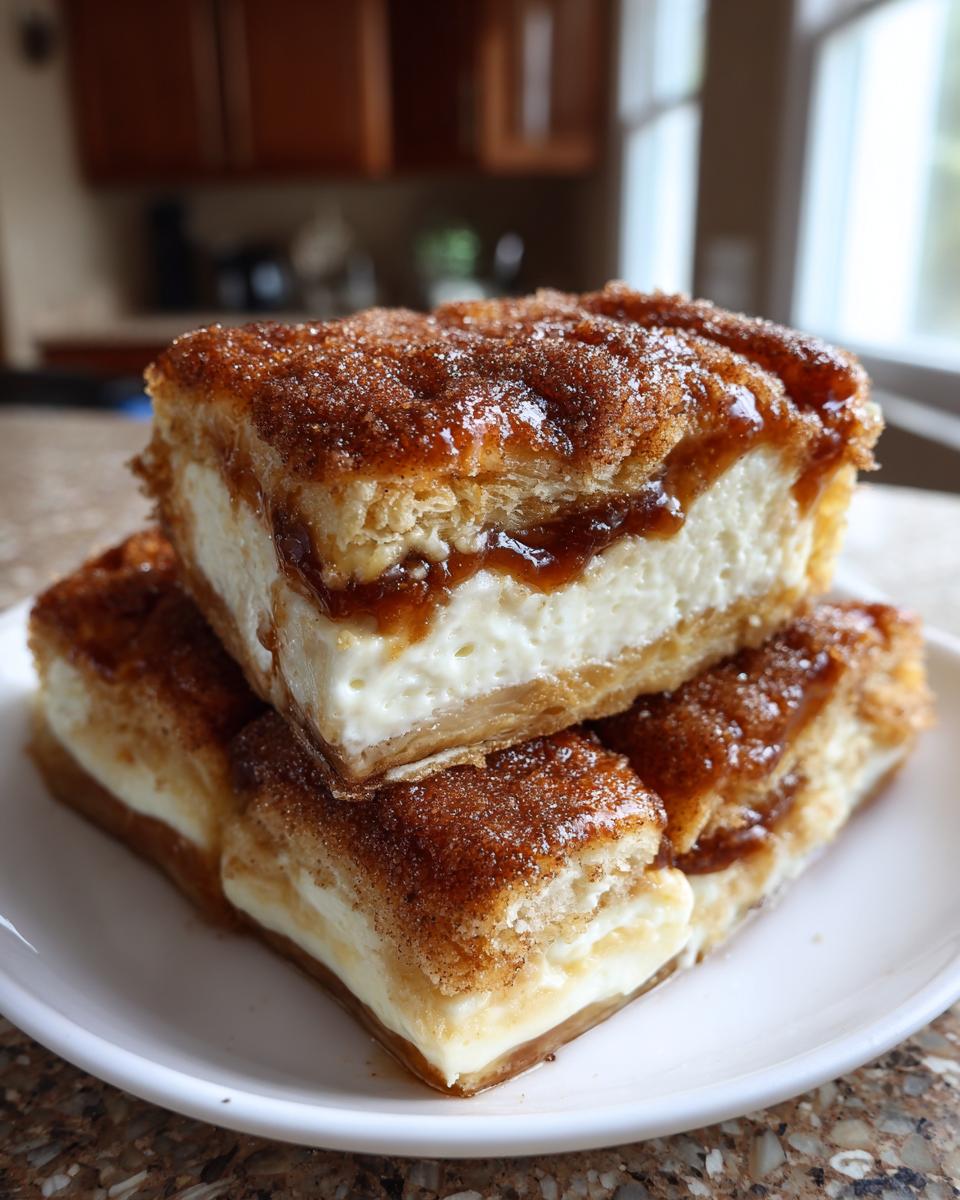
This is where the magic happens, honestly. You get that incredible contrast! We’re talking about a flaky crust dessert on the bottom, that cool, creamy baked treat filling hugging the center, and then that crackly, buttery cinnamon sugar topping. It hits all the right notes, making it the ultimate churro inspired dessert. It truly is a quick baked dessert that tastes like you slaved away for hours.
Simple Layered Cheesecake Using Crescent Roll Dough
Seriously, you don’t need any fancy pastry skills here. The secret is relying on that good old canned dough! Using crescent roll dessert sheets makes this a super accessible easy dessert recipe. It takes what used to be a more complicated project and turns it into this gorgeous, simple layered cheesecake that works perfectly as cheesecake bars. It’s just smart baking, my friends!
Gathering Ingredients for Your Sopapilla Cheesecake
Okay, gathering supplies! This is where we keep things super simple, which is why this sopapilla cheesecake is such a winner for a weeknight treat or a last-minute party. We are relying on pantry staples here, but make sure your cream cheese is actually softened—that makes a huge difference in getting a beautifully smooth filling.
Cream Cheese Filling Components
- 1 (8 ounce) package cream cheese, softened
- 1 cup granulated sugar
- 1 large egg
- 1 teaspoon vanilla extract
Cinnamon Sugar Topping Essentials
For the layers and that gorgeous top, you’ll need:
- 2 (8 ounce) cans refrigerated crescent roll dough
- 1/2 cup (1 stick) unsalted butter, melted
- 3/4 cup granulated sugar
- 2 teaspoons ground cinnamon
- 1/2 cup honey, for drizzling (optional)
Step-by-Step Instructions for the Best Sopapilla Cheesecake
I know you’re eager to get this fabulous layered pastry dessert into the oven! Don’t rush the prep, though, because the order you do things in really matters, especially how you mix that cream cheese filling. Since this is such a quick bake, everything needs to be ready to go. For more quick baking inspiration, check out my collection of easy breakfast ideas—some of those techniques cross over!
Preparing the Flaky Crust Dessert Base
First things first: get your oven set to 350 degrees F and grease your 9×13 inch baking dish really well. Now, take one whole tube of that dessert using crescent dough and unroll it. I carefully press that dough all over the bottom of the dish until it’s one solid layer. That’s our foundation for the final flaky crust dessert!
Creating the Creamy Baked Treat Filling
This part needs your mixer—or a strong arm! In a separate bowl, beat that softened cream cheese until it looks totally smooth. No one wants lumps in their creamy baked treat! Once it’s velvety, mix in the 1 cup of sugar, the egg, and the vanilla extract until everything is just combined and silky. Spread that goodness right over the bottom dough layer.
Finishing and Baking Your Sopapilla Cheesecake Bars
Time for the top layer! Unroll the second package of dough and lay it gently over the cream cheese. Pinch those edges together so none of that delicious filling tries to sneak out while it bakes! Brush the top with melted butter, then sprinkle generously with your cinnamon sugar topping. Bake it all for about 25 to 30 minutes, watching closely until it’s beautifully golden brown. That’s how you know you’ve achieved that perfect “bake until golden” finish!
Tips for Success with Your Layered Pastry Dessert
Even though this sopapilla cheesecake is incredibly easy, those little details make the difference between good and absolutely unforgettable. If you want that crunchy, buttery top to really stick and maximize that churro inspired dessert vibe, you have to treat the dough right before that final sprinkle!
Achieving the Ideal Cinnamon Sugar Topping
Don’t skip brushing the top layer of crescent dough with melted butter before you add your cinnamon sugar mixture. I mean it! A light coating of that butter acts like glue, making sure that sweet topping adheres perfectly when it bakes up golden. Trust me, this simple extra swipe gives you the best flavor adhesion and that fantastic crust texture. You can see more of my favorite baking tricks in my chewy cookie post, which uses similar layering concepts!
Cooling and Cutting the Sopapilla Cheesecake
This is probably the hardest part, because they smell so good right out of the oven! You must let these cool down before you try slicing them into perfect cheesecake bars. If you cut them too soon, that lovely cream cheese filling will just ooze everywhere. Let it cool on the counter for at least 30 minutes, maybe even an hour, so the filling has time to set up. That way, when you cut them, you get those perfect, clean squares every single time.
Make Ahead Dessert Bars and Storage for Sopapilla Cheesecake
Oh, planning ahead for parties is my love language! The absolute best part about these sopapilla cheesecake bars is that they are fantastic make ahead dessert bars. You can totally whip this up the day before your big event. Just follow the steps through baking, let it cool completely, and then cover it tightly with plastic wrap. Easy peasy!
When you’re ready to serve your crowd-pleasing Tex Mex dessert, pull it out of the fridge about 30 minutes before you plan to slice it. That little bit of rest time on the counter helps soften the crust just enough. For more great recipes you can prep early, you should totally browse through my make ahead dessert bars collection!
Serving Suggestions for This Tex Mex Dessert
Presentation matters, even for something as wonderfully simple as these sopapilla cheesecake bars! If you made an extra effort to prepare that honey drizzle I mentioned in the recipe, please, please use it. That sticky sweetness running over the warm cinnamon sugar is just divine, making it feel extra special for hosting.
I also love setting these out on a big platter alongside fresh strawberries or raspberries—the tartness cuts through the richness of the cream cheese filling so nicely. And hey, if you’re serving this delicious Tex Mex dessert right after a savory meal, like my favorite Jiffy Corn Casserole, a light dusting of powdered sugar instead of honey keeps it a little less overwhelmingly sweet. Either way, it’s a guaranteed hit!
Frequently Asked Questions About Sopapilla Cheesecake
I’ve had so many people ask me questions after they try this sopapilla cheesecake recipe, especially when they take it to a party! It’s easy to see why this becomes everyone’s go-to easy dessert recipe. Here are a few things I always get asked about making sure these cheesecake bars turn out perfect every time. If you need more easy ideas, I’ve got a whole section on easy dessert recipes!
Can I use puff pastry instead of crescent roll dessert dough?
That’s a great question! You definitely *could* try puff pastry, but I really wouldn’t recommend it for this specific dessert. The beauty of this sopapilla cheesecake is that flaky, slightly chewy texture you get from the pre-cut crescent sheets. Puff pastry tends to puff up way too much and gets too airy, which really messes with that tight layering we need for the cream cheese filling to stay nicely sandwiched in there. Stick to the refrigerated dough for the best results!
How do I prevent the top crust from getting too dark when baking?
This happens sometimes, especially if your oven runs a little hot! We all want that perfect color—bake until golden, not black, right? If you notice the crust is getting too dark (usually around the 20-minute mark), just grab a sheet of aluminum foil and loosely tent it over the top of the baking dish. This shields the sugary top from direct heat while still allowing the center to finish setting up. Keep checking until the middle is firm!
Is this a good holiday potluck dessert option?
Are you kidding me? This is the MVP of every holiday potluck dessert table! It’s sturdy, it travels famously well—check out my advice on making make ahead dessert bars for tips on transport!—and it satisfies everyone from the picky eater to the dessert connoisseur. It’s a crowd-pleaser every single time, and because it’s pre-sliced, serving is a breeze. It’s the ultimate sweet comfort food for any celebration!

Estimated Nutritional Data for Sopapilla Cheesecake
Now, I’m no nutritionist, not by a long shot! I’m just Madison, figuring out my kitchen the same way you are. But I always like to give you a heads-up on what you’re getting into with this amazing sopapilla cheesecake treat. These values are just estimates based on standard measurements, so they might shift a tiny bit depending on your exact brands and that optional honey drizzle. Still, it’s good info to have for a beloved family favorite dessert!
- Serving Size: 1 bar
- Calories: 350
- Sugar: 28g
- Fat: 20g
- Protein: 5g
Share Your Experience Making This Sopapilla Cheesecake
That’s it! You’ve got the easiest, creamiest, most satisfying sopapilla cheesecake recipe right here! I truly hope you loved learning how to make these simple cheesecake bars as much as I enjoy sharing them. Seriously, when you make these, you have to come back and let me know how they turned out!
Did you drizzle them with honey? Did your topping get extra crunchy? Or maybe you tried a little twist of your own. Drop a comment below with your rating and tell me all about your experience. Seeing your baked goods—especially those beautiful golden tops—is what makes all this recipe testing worthwhile for me. If you’re curious about how I test recipes and build this blog, you can head over to my About Page, but for now, I’m anxious to hear about your batch! You can also check out how others are loving this dessert over at Ultimate Grub for some extra inspiration!
PrintEasy Sopapilla Cheesecake Bars with Cinnamon Sugar Topping

Make this simple, layered dessert that combines flaky crescent roll dough, a creamy cheesecake filling, and a buttery cinnamon sugar topping. This recipe delivers a sweet comfort food experience, tasting like a blend of churros and cheesecake.
- Prep Time: 15 min
- Cook Time: 30 min
- Total Time: 45 min
- Yield: 12-16 servings 1x
- Category: Dessert
- Method: Baking
- Cuisine: Tex-Mex
- Diet: Vegetarian
Ingredients
- 2 (8 ounce) cans refrigerated crescent roll dough
- 1 (8 ounce) package cream cheese, softened
- 1 cup granulated sugar
- 1 large egg
- 1 teaspoon vanilla extract
- 1/2 cup (1 stick) unsalted butter, melted
- 3/4 cup granulated sugar
- 2 teaspoons ground cinnamon
- 1/2 cup honey, for drizzling (optional)
Instructions
- Preheat your oven to 350 degrees F. Lightly grease a 9×13 inch baking dish.
- Unroll one package of crescent roll dough and press it evenly into the bottom of the prepared baking dish.
- In a medium bowl, beat the softened cream cheese, 1 cup of sugar, egg, and vanilla extract until the mixture is smooth and creamy. Spread this cream cheese filling evenly over the bottom layer of dough.
- Unroll the second package of crescent roll dough and carefully place it over the cream cheese layer. Gently pinch the seams together to seal the edges.
- In a small bowl, mix the 3/4 cup of sugar and 2 teaspoons of cinnamon for the topping.
- Brush the top layer of dough evenly with the melted butter. Sprinkle the cinnamon-sugar mixture over the buttered top layer.
- Bake for 25 to 30 minutes, or until the top is golden brown and the filling is set.
- Remove the dish from the oven and let it cool slightly. If desired, drizzle with honey before cutting into bars.
- Cut into squares and serve warm or at room temperature.
Notes
- You can prepare this make ahead dessert bars recipe a day in advance and keep it covered in the refrigerator. Let it sit at room temperature for 30 minutes before serving.
- For an extra churro inspired dessert flavor, use a pastry brush to lightly coat the top layer with melted butter before adding the cinnamon sugar.
- This recipe works well for a holiday potluck dessert because it travels easily.
Nutrition
- Serving Size: 1 bar
- Calories: 350
- Sugar: 28g
- Sodium: 250mg
- Fat: 20g
- Saturated Fat: 11g
- Unsaturated Fat: 9g
- Trans Fat: 0g
- Carbohydrates: 35g
- Fiber: 1g
- Protein: 5g
- Cholesterol: 45mg