

Forget those sad, plastic-wrapped flatbreads from the supermarket aisle! There is nothing—and I mean *nothing*—quite like breaking open a piece of warm, pillowy **naan bread** straight from your very own skillet. I used to think this kind of soft and fluffy bread was only possible if you had a roaring hot tandoor oven, but nope! I promised my readers when I started MDLATDMM Recipes that we would translate heritage cooking into results that work for busy people. This recipe keeps the soul of authentic Indian bread alive, but it skips the fancy equipment. Trust me, we’re making that perfect chewy flatbread right on your stovetop.
If you want to know more about why I focus on these achievable, comforting recipes, you can check out my story right here. Now, grab your flour; we’re making magic happen!
- Why This Skillet Naan Bread Recipe Delivers Soft and Fluffy Bread
- Gathering Ingredients for Authentic Naan Bread
- Step-by-Step Instructions: How to Make Naan Bread at Home
- Creating the Flavorful Garlic Naan Recipe Finish
- Tips for Success When Making Homemade Naan Bread
- Serving Suggestions for Your Freshly Made Naan Bread
- Storage and Reheating Instructions for Leftover Naan Bread
- Frequently Asked Questions About Making Naan Bread
- Share Your Homemade Naan Bread Experience
Why This Skillet Naan Bread Recipe Delivers Soft and Fluffy Bread
I know you see a lot of **homemade naan recipe** tutorials out there, but sticking to the core ingredients is how we get that restaurant-quality, soft and fluffy bread without the fancy clay oven. This method isn’t complicated, but those key components are working hard behind the scenes to give you the best texture possible. If you’re looking for quick side dishes for curry night, this is the one to trust! If you have a busy week, you can even try making a big batch and prepping for those stressful evenings ahead of time.
- The yogurt tenderizes the flour proteins naturally, creating a dough that stretches beautifully instead of tearing when you’re rolling it out. You’ll see the difference immediately!
- We rely on a ridiculously hot cast-iron skillet; this shock of heat is what makes those big beautiful bubbles pop up, mimicking the effect of a traditional tandoor.
The Role of Yogurt in Achieving Chewy Flatbread
That little bit of plain yogurt is crucial! Since it’s acidic, it reacts slightly with the flour, which keeps the gluten structure relaxed. That’s the real secret to getting that wonderful, slightly chewy flatbread that feels luxurious, not dense. It makes this totally different from a standard yeast bread recipe that skips the dairy; it truly elevates this into a fantastic easy flatbread tutorial.
Mastering the No Tandoor Naan Cooking Technique
Forget needing a special oven! We are going for serious heat here. The pan—cast iron is my absolute favorite—needs to be screaming hot before the dough even touches it. If you place the dough on just a warm skillet, it’ll cook slow and turn hard. We want fast cooking so those massive bubbles inflate instantly, giving you that airy, authentic **no tandoor naan** experience. Seriously, let that pan pre-heat, it’s non-negotiable for success!
Gathering Ingredients for Authentic Naan Bread
Okay, let’s talk about what goes into making truly magnificent **naan bread**. Since this is a yeast bread recipe, precision matters just a little bit more, but don’t panic! Every pantry staple we are using plays a huge part in achieving that soft, pliable texture we are aiming for. I’ve laid out exactly what you need below. Just stick close to these measurements, and I promise you’ll have the best **authentic Indian bread** batch ever!
- 1 teaspoon active dry yeast
- 1 teaspoon sugar
- 1/2 cup warm water (about 105-115°F)
- 2 1/2 cups all-purpose flour, plus more for dusting
- 1 teaspoon salt
- 1/2 cup plain yogurt (full-fat recommended)
- 2 tablespoons olive oil, plus more for brushing
- 2 tablespoons melted butter, for brushing
- 1 clove garlic, minced (optional, for garlic naan)
- 1 tablespoon fresh cilantro, chopped (optional)
Ingredient Notes and Substitutions for Your Naan Bread
I want to highlight a couple of things here. When you are dealing with yeast, temperature is your friend! Make sure that water is warm—not hot—when you mix it with the sugar and yeast. If it’s too cold, the yeast won’t wake up; if it’s too hot, you’ll kill it! That’s why I always tell people to check for that nice foam after about five or ten minutes; that lovely froth means your yeast is ready to make magic for your easy side dishes for curry.
The other major thing is the yogurt! If you can swing it, use the full-fat plain yogurt for this **yogurt bread recipe**. It just adds richness and moisture that makes the final **chewy flatbread** so much better. If you only have low-fat, it will still work, but the texture might not be quite as plush as the full-fat version.
Oh, and for the flour? All-purpose works perfectly fine, but if you happen to have bread flour, go for it! It just has a little extra protein, which will give you a slightly firmer structure. But honestly, regular flour is what most of us have on hand, and it produces fantastic results for this **how to make naan at home** tutorial!
Step-by-Step Instructions: How to Make Naan Bread at Home
Alright, this is where the real fun starts! Making this **homemade naan recipe** is entirely manageable, even if you usually avoid yeast bread recipes. We’ve already activated the yeast, so now we bring everything together to create that dreamy, pliable dough. Don’t rush the kneading part; that’s what gives you the amazing texture you want when you’re making **naan bread at home**—it needs to be elastic so it can stretch thin without tearing. This process is super satisfying! If you’re experimenting with dough in the morning, remember that these techniques work great for almost any easy breakfast ideas too.
Preparing the Yeast Dough for Soft and Fluffy Bread
First things first: combine your flour and salt in a big bowl. Then, pour in that foamy yeast mixture and the yogurt. I usually start stirring with a wooden spoon until it just comes together in this sticky, shaggy mass. Resist the urge to add more flour right away! Turn it out onto a subtly floured surface and just go to work kneading it. You need about 5 to 7 full minutes of working that dough until it feels smooth and springy beneath your hands. That gluten development is what creates that wonderful, **chewy flatbread** quality we love so much.
The Crucial Rise and Dividing Your Naan Bread Dough
Once it’s smooth, pop it into an oiled bowl, cover it up tight, and let it sit in a warm spot. You’re looking for it to double, which usually takes between an hour and an hour and a half, depending on how warm your kitchen is. After the big rise, gently punch it down—it’s so therapeutic after waiting all that time! Divide that beautifully puffed dough into 8 equal pieces. Roll those into little balls, cover them again, and let them rest for just 10 minutes. This short rest relaxes the gluten you just worked so hard to develop, making the final rolling much easier for your **easy flatbread tutorial**!
Skillet Cooking: Achieving Puffed Naan Bread Without a Tandoor
Get your cast-iron skillet screaming hot over medium-high heat. I mean hot—no oil, nothing on the pan yet! Place one flattened piece of dough on the dry, hot surface. You should hear a lovely sizzle and see big bubbles start to form in about a minute. That’s the sign! Flip it quickly for another minute on the other side—this is your **stovetop bread making** success! If you really want those char marks, use tongs to carefully hold the puffed naan just above a low gas flame for a few quick seconds total. It gives it that authentic look! When it comes off the heat, you must brush it immediately with butter.
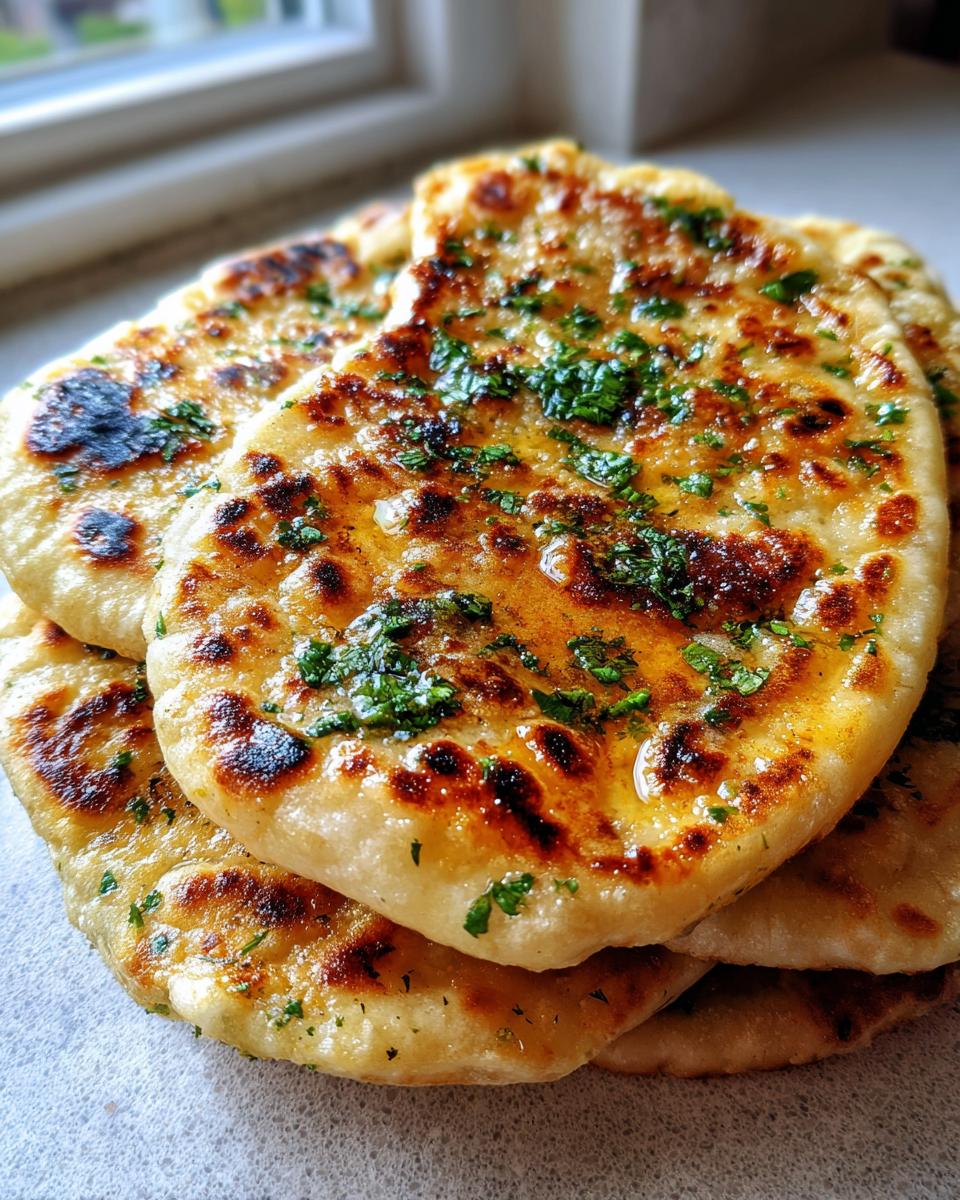
Creating the Flavorful Garlic Naan Recipe Finish
Now that you have these gorgeous, puffy rounds of homemade **naan bread**, the absolute best thing you can do is absolutely smother them in garlic butter. Honestly, this step takes it from a great homemade naan recipe to something you’d line up for at your favorite Indian restaurant. It’s optional because if you’re serving it with a richly flavored curry, maybe you just want plain butter. But if you want that classic punch, trust me, you need the garlic!
It’s ridiculously simple, which is my favorite kind of recipe detail. You just take your melted butter—and I used the two tablespoons called for in the main ingredients list—and stir in one minced clove of fresh garlic. If you’re feeling extra, a tiny sprinkle of chopped cilantro in that butter mix adds the perfect pop of color and freshness. Make sure you mix this combination together immediately before you start brushing the hot naan.
The key is getting the butter on while the bread is still steaming hot. That heat melts the butter right into those little pockets and pores you created while cooking on the skillet. Think about dipping that gorgeous bread into some garlic butter steak sauce—wait, wrong cuisine! But the concept holds: hot bread soaks up the flavored fat instantly. Brush it generously on both sides if you want maximum flavor. This step transforms your basic **skillet bread cooking** effort into a true showstopper **garlic naan recipe**.
Tips for Success When Making Homemade Naan Bread
I’ve made enough batches now to know exactly where things can go wrong, so let me pass along my best survival tips for this **homemade naan recipe**. We want maximum fluffiness and zero sticking! Remember, like any yeast bread, a little patience in the beginning pays off huge when you bite into that warm, fresh bread later on.
First up: Don’t try to rush the rise! Seriously, that hour to an hour-and-a-half rest time for the dough is non-negotiable if you want those big, beautiful pockets. If you try to cook under-proofed dough, it’s just going to turn into rubbery discs, and we don’t want tough bread here.
When you are actually rolling it out, work quickly and keep your floured surface light. If you flour too heavily, the excess flour burns on the hot skillet and makes spots taste bitter. If you don’t flour enough, the dough sticks immediately, and tearing it while transferring to the pan ruins those perfect air bubbles we worked so hard to create.
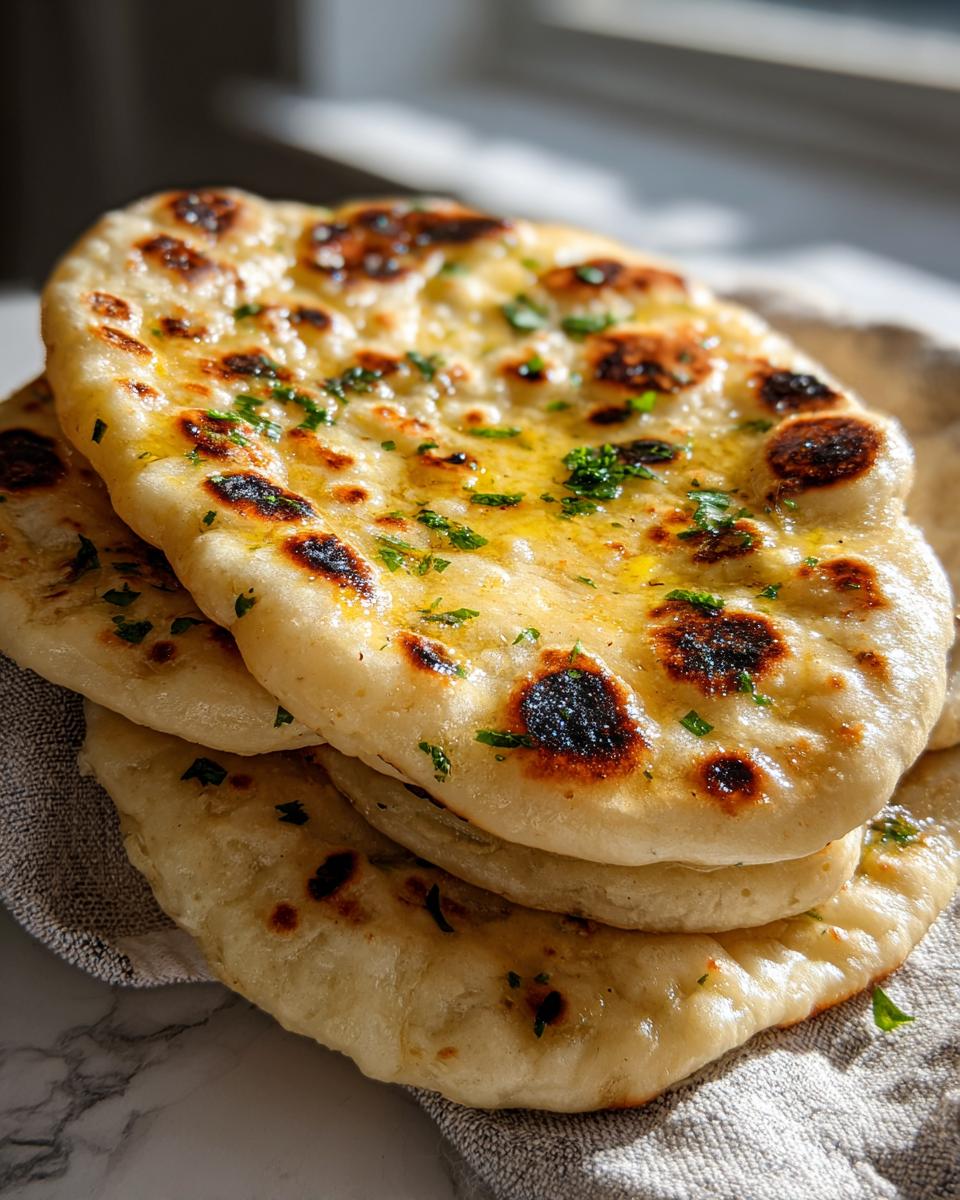
My biggest tip, though, is the transfer! Once you pull that bubbling naan off the skillet, you need to brush it with butter immediately and stack it under a clean kitchen towel while you work on the next piece. The steam trapped between the layers keeps the stack of **soft and fluffy bread** wonderfully pliable and warm. If you let them sit out, they start to dry out and stiffen up quickly. Work fast once they hit the heat!

Finally, the rolling detail: aim for an uneven shape, like a teardrop or just a slightly oblong oval. Perfect circles look nice, but the natural unevenness seems to encourage those perfect thick and thin spots that make the final **naan bread** feel so rustic and authentic!
Serving Suggestions for Your Freshly Made Naan Bread
So, you’ve got this glorious stack of warm, buttery **naan bread**! Awesome! What’s next? Well, for me, the only acceptable answer involves diving headfirst into a rich, savory curry. That beautiful, slightly chewy flatbread is just *begging* to be used as the ultimate scooping utensil. It’s basically mandatory.
If you’re planning a proper Indian feast, you absolutely have to try my creamy coconut chicken curry. The richness of that sauce requires something soft and absorbent, and this naan fits the bill perfectly. It’s so satisfying to tear off a piece and soak up every last drop of sauce from the bowl—no curry left behind!
But hey, don’t feel like you have to stick to just one cuisine, though Indian food is certainly the classic pairing. That delicious **butter naan recipe** we made? It’s fantastic for tearing up and serving alongside robust stews or thick soups when things get chilly outside. Think about using it instead of crackers for dipping into a hearty tomato bisque, or even spreading a little hummus on it for a quick snack.
And of course, the obvious answer: Garlic Naan! If you made the garlic version, it’s practically a standalone appetizer. Melted garlic butter and fresh cilantro? That’s a fantastic introduction to the meal on its own. Or, if you’re looking for something vegetarian-friendly but still deeply satisfying, my one-pot vegan lentil curry is amazing with this bread holding all those spices.
Basically, anything saucy or dippable needs this **soft and fluffy bread** on the side. It just elevates the entire dining experience from a simple weeknight meal to something genuinely special!
Storage and Reheating Instructions for Leftover Naan Bread
I always hope that we eat every single piece of this **naan bread** while it’s hot and fresh from the skillet, but let’s be real—sometimes life happens, and you end up with leftovers! The bad news is that, like most homemade yeast bread, it loses some of that heavenly, pillowy softness once it cools completely and sits for a day. But don’t you dare toss it! We can definitely bring that wonderful **chewy flatbread** back to life easily.
For short-term storage, my go-to method is keeping any leftover pieces stacked right inside a sealed Ziploc bag or an airtight container lined with a clean kitchen towel. The towel absorbs any moisture condensation so the naan doesn’t get soggy, and the bag keeps the air out so it doesn’t go stale too fast. This keeps them nicely soft for about two days.
If you know you won’t finish them within 48 hours, you absolutely must freeze them! Freezing is the best way to preserve the texture of this **stovetop bread making** masterpiece. Lay the cooled naan in a single layer on a baking sheet and freeze them solid for about an hour. Once they are hard little discs, stack them into a heavy-duty freezer bag, squeeze out as much air as you can, and freeze them for up to three months. They freeze beautifully!

Now, for the best reheating advice! You don’t want to use the microwave unless you have absolutely no time, because it tends to make the bread tough or dry quickly. The skillet is your best friend for bringing this back to life. Just heat that same cast-iron skillet (or any heavy pan) over medium heat—no oil needed this time. Place one or two pieces in the dry, warm pan for maybe 30 seconds per side. You are just warming them through until they get a little soft puffiness back. If you want that authentic look, you can briefly hold it over the open gas flame again, just like we did the first time!
If you have a whole batch to reheat from frozen, the oven is faster. Set your oven to 350°F (175°C). Wrap the frozen pieces loosely in foil and let them bake for about 8 to 10 minutes. This warms them evenly all the way through, making them soft again for dipping into your leftover curry. See? Nothing goes to waste in my kitchen!
Frequently Asked Questions About Making Naan Bread
I always get a ton of questions after people try this recipe for the first time—which I love because it means you’re actually making it! Home baking always brings up little questions, especially when dealing with yeast and flatbreads. Don’t worry if things aren’t textbook perfect the first time; that’s just part of learning **how to make naan at home**. Here are the ones I hear most often now that you’ve mastered the basic **skillet bread cooking** technique!
Can I make this homemade naan recipe without yeast?
Yes, you absolutely can! If you’re in a rush or don’t have yeast on hand, you can skip that step entirely. Just leave out the yeast, sugar, and warm water, and add an extra splash of warm water (maybe 2 tablespoons total) to compensate for the missing liquid, but don’t add too much! The texture will be different, though. That yeast is what gives you the light, pillowy airiness, so without it, you are making a much flatter, denser version of the bread. It will still be delicious for dipping—it just moves out of the ‘soft and fluffy bread’ category and more into a quick side dish territory, kind of like a thin pita. It’s great if you need something super quick for healthy lunch recipes!
How thick should I roll the easy flatbread tutorial pieces?
This is important for getting those perfect bubbles! You want to aim for rolling the dough out to about 1/8 of an inch thick in the very middle, maybe stretching slightly thinner toward the edges, which should look almost teardrop-shaped. If you roll it too thin—say, paper-thin—it cooks too fast and won’t have enough internal structure to puff up dramatically. If you leave it too thick, like a quarter-inch all the way across, it takes forever to bake through, and the outside can dry out before the middle cooks, resulting in a bready texture instead of that fluffy naan you want.
Remember, because the pan is so hot, the thickness directly determines how quickly the steam builds up inside the dough pouch. Aiming for that sweet spot between 1/8 and 1/4 inch gives you the best chance for a fully puffed, chewy flatbread!
Share Your Homemade Naan Bread Experience
Well, that’s it! You’ve done it! I’m so excited for you to have a warm stack of this amazing **naan bread** right there on your dinner table. I really hope you loved the process of turning simple flour and yogurt into something this soft, chewy, and utterly satisfying.
Now that you’ve conquered **how to make naan at home**, I truly want to hear about it! Did your skillet get hot enough to make those major bubbles? Did you go all out with the garlic butter finish? Please, don’t be shy!
Drop a comment down below and let me know how your first batch turned out. A simple star rating helps other home cooks feel confident about trying this **easy flatbread tutorial**, too. And if you took a picture of that beautiful **soft and fluffy bread**, tag me on social media! Seeing your successes is genuinely the best part of my day. Happy baking, friend!
PrintSoft and Fluffy Skillet Naan Bread Recipe

Make soft, chewy naan bread at home using a skillet. This easy recipe uses yogurt and yeast to create restaurant-quality flatbread without a tandoor, perfect for serving with curry.
- Prep Time: 20 min
- Cook Time: 15 min
- Total Time: 1 hour 35 min
- Yield: 8 servings 1x
- Category: Side Dish
- Method: Stovetop
- Cuisine: Indian
- Diet: Vegetarian
Ingredients
- 1 teaspoon active dry yeast
- 1 teaspoon sugar
- 1/2 cup warm water (about 105-115°F)
- 2 1/2 cups all-purpose flour, plus more for dusting
- 1 teaspoon salt
- 1/2 cup plain yogurt (full-fat recommended)
- 2 tablespoons olive oil, plus more for brushing
- 2 tablespoons melted butter, for brushing
- 1 clove garlic, minced (optional, for garlic naan)
- 1 tablespoon fresh cilantro, chopped (optional)
Instructions
- Activate the yeast: In a small bowl, combine the warm water, sugar, and yeast. Let it sit for 5 to 10 minutes until foamy.
- Mix dry ingredients: In a large bowl, whisk together the flour and salt.
- Combine wet and dry: Add the yogurt and the yeast mixture to the flour mixture. Mix until a shaggy dough forms.
- Knead the dough: Turn the dough out onto a lightly floured surface. Knead for 5 to 7 minutes until the dough is smooth and elastic.
- First rise: Lightly oil a clean bowl. Place the dough in the bowl, turning to coat. Cover the bowl with plastic wrap or a damp towel and let it rise in a warm place for 1 to 1.5 hours, or until doubled in size.
- Divide the dough: Gently punch down the risen dough. Divide it into 8 equal pieces. Roll each piece into a smooth ball. Let the balls rest, covered, for 10 minutes.
- Shape the naan: On a lightly floured surface, use a rolling pin to roll each ball into an oval or teardrop shape, about 1/8 to 1/4 inch thick.
- Cook the naan: Heat a cast-iron skillet or heavy-bottomed pan over medium-high heat until very hot. Do not add oil to the pan.
- Cook one side: Place one piece of rolled dough onto the hot, dry skillet. Cook for 1 to 2 minutes until large bubbles form on the surface and the underside has brown spots.
- Cook the second side: Flip the naan and cook the second side for about 1 minute until lightly browned and puffed. If you see good bubbling, you can briefly hold the naan directly over a low gas flame using tongs to get char spots, similar to a tandoor.
- Brush with butter: Immediately transfer the cooked naan to a plate. Brush the top generously with melted butter. If making garlic naan, mix the minced garlic and chopped cilantro into the melted butter before brushing.
- Repeat: Continue with the remaining dough pieces, stacking the cooked naan and keeping them covered to stay warm.
Notes
- For the softest texture, use full-fat Greek yogurt in the dough.
- If you skip the yeast, the naan will be flatter but still good; this is a quick side dish option.
- Serve immediately with your favorite curry or dip.
Nutrition
- Serving Size: 1 piece
- Calories: 180
- Sugar: 1
- Sodium: 250
- Fat: 4
- Saturated Fat: 2
- Unsaturated Fat: 2
- Trans Fat: 0
- Carbohydrates: 31
- Fiber: 1
- Protein: 5
- Cholesterol: 10