
Oh, that smell! If you’re reading this, I bet you’re already imagining the moment you pull that golden-brown beauty out of the oven—that unmistakable aroma of baked apples and warm cinnamon that just floods the whole house. That’s the essence of what we do here at MDLATDMM, bringing that deep comfort back into your busy life. We’re talking about the homemade apple pie that fills your kitchen with heritage and warmth, but honestly? It’s surprisingly easy to master. Trust me, I’ve taken all those confusing ancestral ‘pinches’ and turned them into a foolproof recipe for the absolute best, flaky, all-butter crust you’ll ever make. It’s time we bring those classic, comforting baked desserts right back to your modern table without the fuss! If you love warm spiced desserts, you’re going to adore the way this pairs with my apple cranberry cobbler recipe when you need something baked but slightly different.
- Why This Is the Best Homemade Apple Pie Recipe
- Gathering Ingredients for Your Homemade Apple Pie
- Step-by-Step Instructions for Homemade Apple Pie
- Tips for Success When Making Your Homemade Apple Pie
- Variations on the Classic Apple Pie Recipe
- Serving Suggestions for Your Spiced Apple Dessert
- Storage and Reheating Instructions for Homemade Apple Pie
- Frequently Asked Questions About Making Apple Pie
- Nutritional Estimates for This Classic Dessert
- Share Your Homemade Apple Pie Creations
Why This Is the Best Homemade Apple Pie Recipe
I know, everyone claims their recipe is the best, right? But this one truly stands out, especially if you want that glorious, shattering, flaky texture without driving yourself crazy. This isn’t just some ordinary dessert; it’s a classic apple pie recipe that delivers authentic, comforting baked desserts flavor every single time. We nailed the ratio between the crust fat and the sugar, which is the real secret sauce. It works great even if you’re nervous about making things completely from scratch!
We’ve designed this one to be simple enough for a weeknight baking session, but robust enough to anchor any holiday table, like Thanksgiving. If you want to explore other easy apple treats after this, my apple cinnamon muffins are a game-changer, or check out how simple apple pie dump cake is!
Achieving the Best Flaky Pie Crust
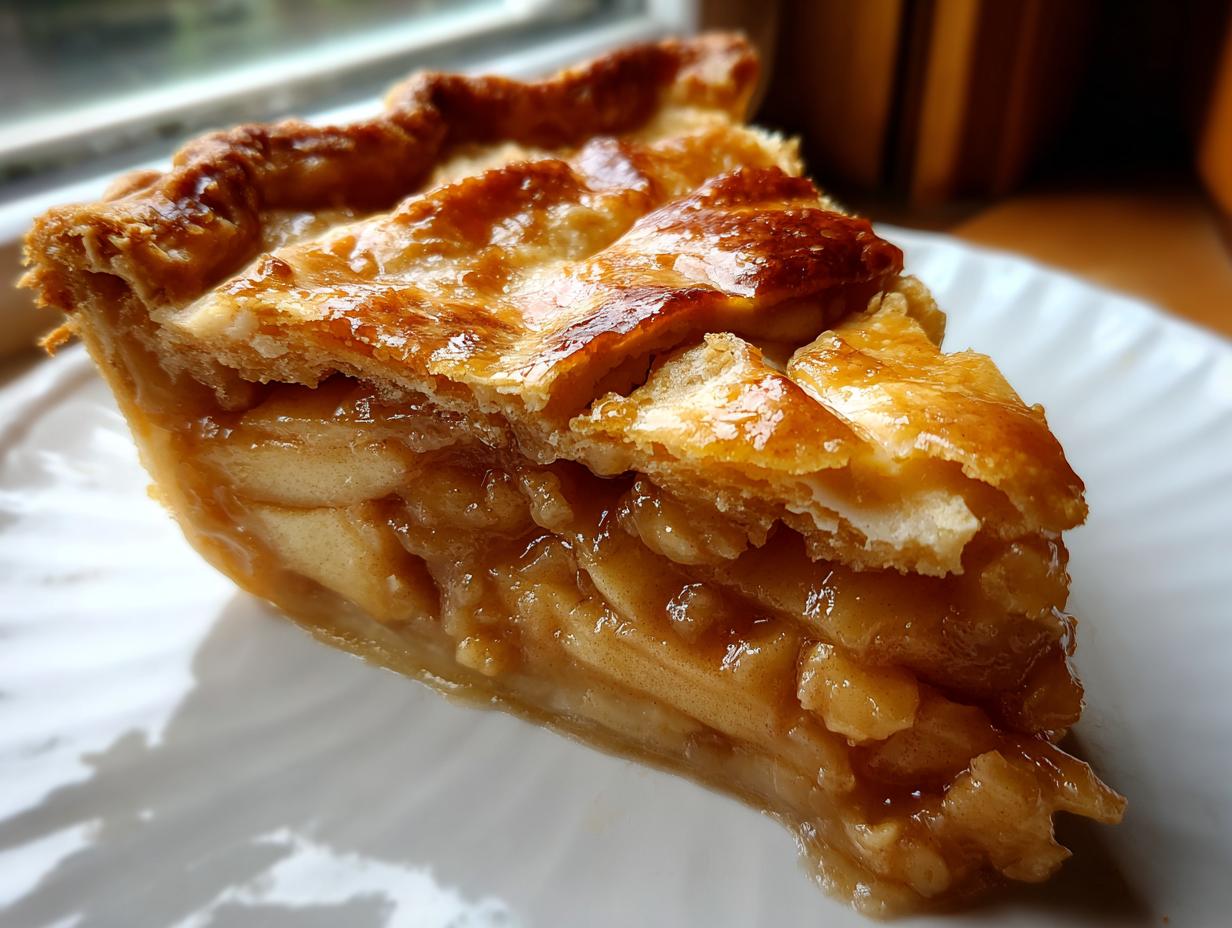
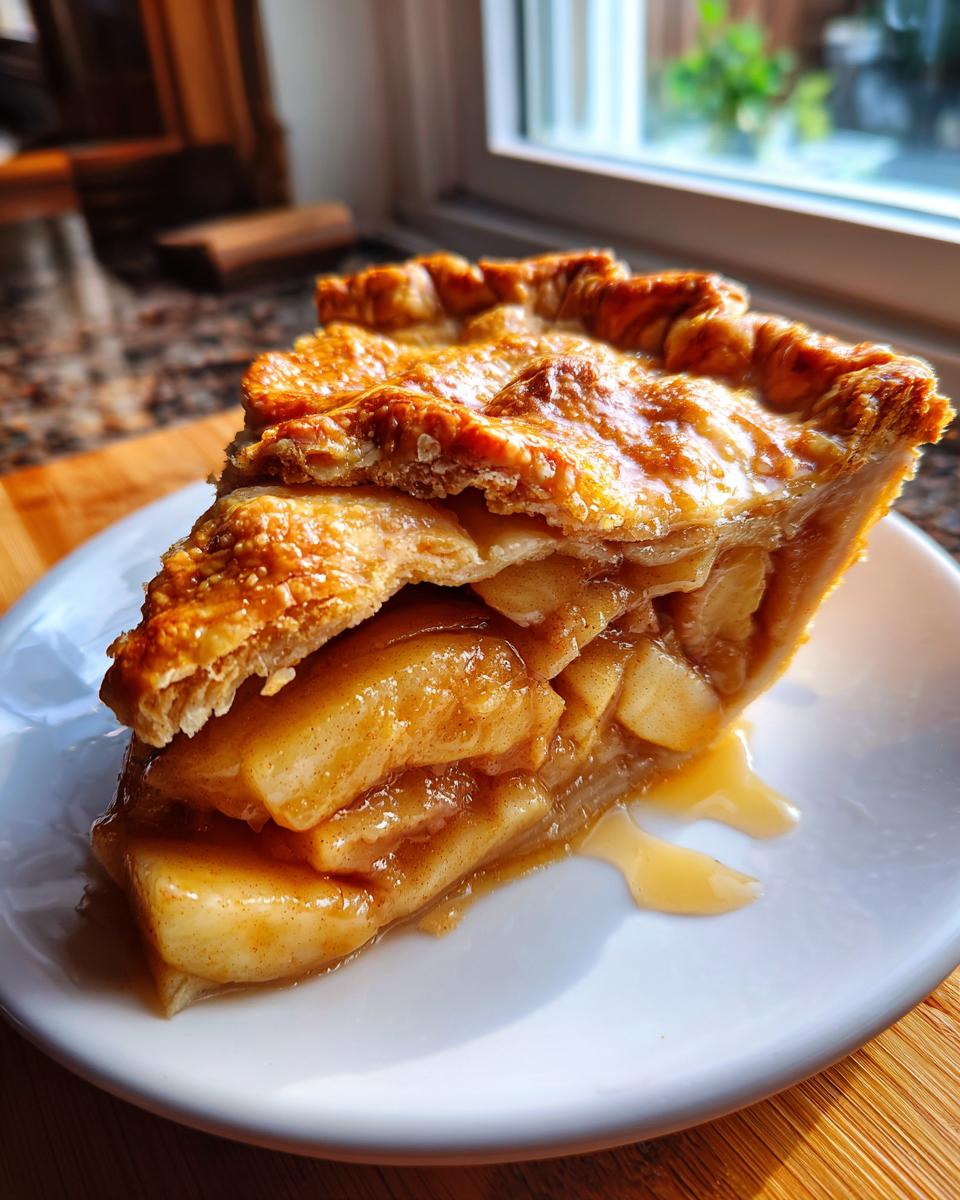
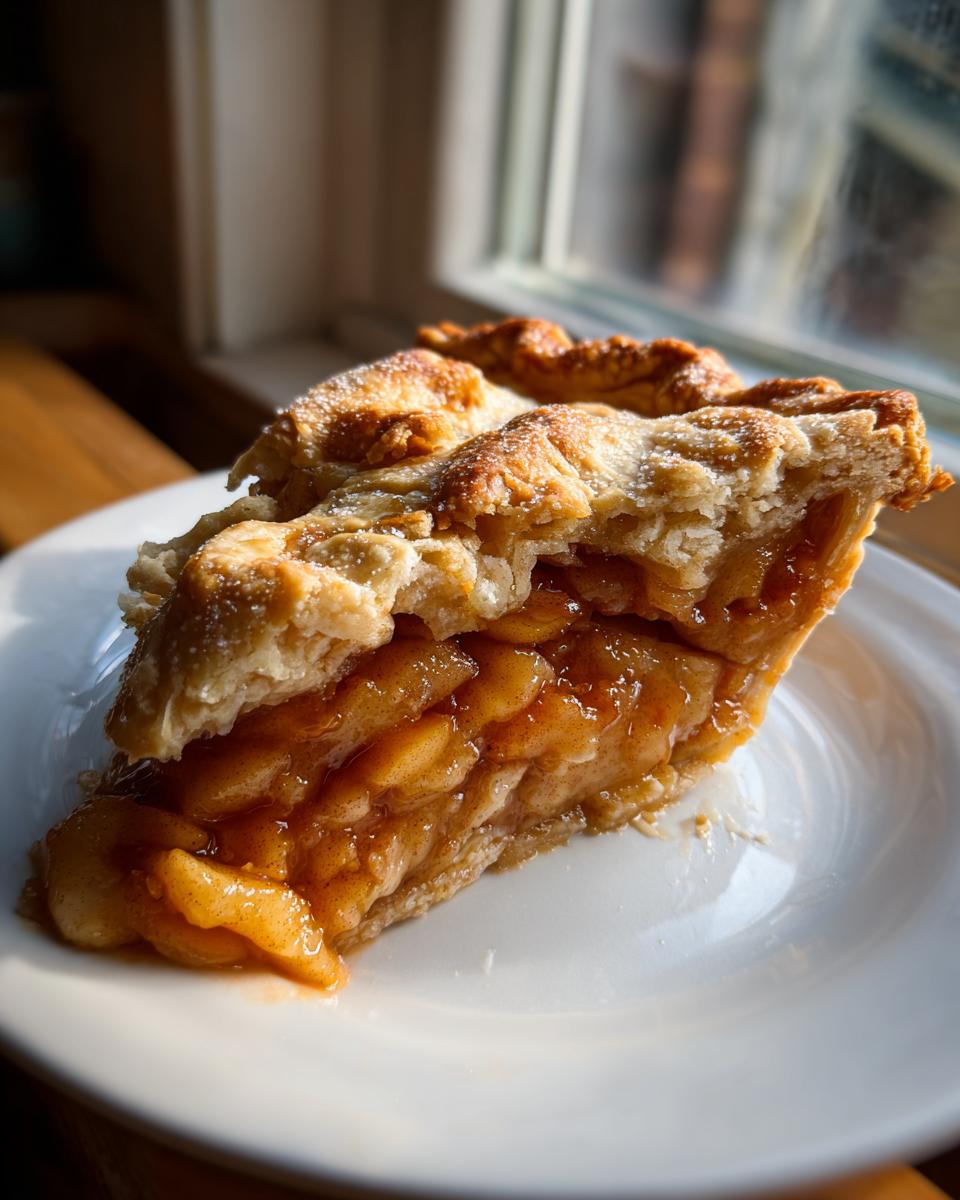
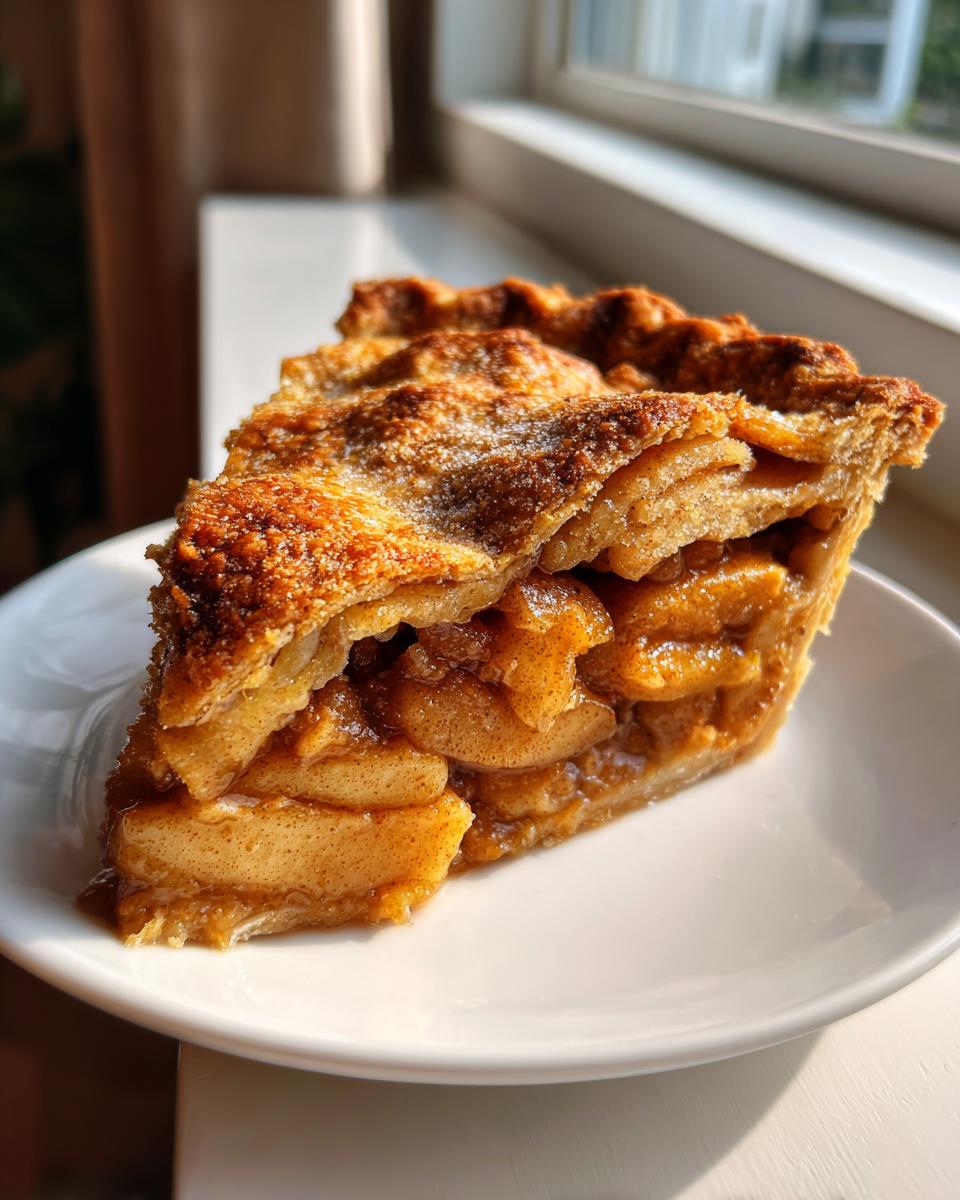
The whole show rests on this crust, and that’s why we use an all-butter recipe. The colder your butter and ice water are, the flakier the final texture will be. When you mix it, you want those pea-sized pieces of butter to stay visible—those pockets steam in the oven and create those beautiful, delicate layers. This is how you guarantee the best flaky pie crust you’ve ever made. Seriously, don’t rush the chiling step!
The Perfect Spiced Apple Pie Filling
My favorite part is mixing the filling because that’s where the aroma really starts to build! We use a blend of tart Granny Smith apples and sweeter Honeycrisp ones. This combination avoids that mushy, one-note sweet filling that plagues so many pies. By adding a good dose of cinnamon, nutmeg, and allspice, we create that incredible cinnamon apple pie profile that tastes exactly like comfort. It’s a balanced spiced apple dessert that lets the fruit shine through.
Gathering Ingredients for Your Homemade Apple Pie
See? This is where we prove that making an easy apple pie from scratch doesn’t need a specialty store run. Everything here is pretty standard, but the quality matters—that’s what keeps this recipe reliable! I put the full list below, broken down so you can easily grab what you need from the pantry or fridge. When you’re ready to bake, just have these simple, high-quality components waiting for you. You are going to love how accessible this all becomes! For quick breakfasts later in the week, don’t forget to grab the ingredients for my apple cinnamon overnight oats.
Ingredients for the All-Butter Crust
- 2 1/2 cups all-purpose flour
- 1 teaspoon salt
- 1 cup (2 sticks) cold, unsalted butter, cut into small cubes
- 1/2 cup ice water, plus more if needed
Ingredients for the Apple Pie Filling Recipe
- 6 large Granny Smith apples, peeled, cored, and sliced 1/4-inch thick
- 3 large Honeycrisp apples, peeled, cored, and sliced 1/4-inch thick
- 3/4 cup granulated sugar (adjust based on apple tartness)
- 1/4 cup packed light brown sugar
- 1/4 cup all-purpose flour
- 1 tablespoon ground cinnamon
- 1/2 teaspoon freshly grated nutmeg
- 1/4 teaspoon ground allspice
- 1 tablespoon lemon juice
- 2 tablespoons unsalted butter, cut into small pieces
- 1 large egg, beaten with 1 teaspoon water (for egg wash)
Step-by-Step Instructions for Homemade Apple Pie
Okay, now for the execution! This process might look long, but once you get into the rhythm, making a gorgeous homemade apple pie moves really quickly. I’ve noted all the essential timing bits below because that’s where home bakers sometimes trip up. Don’t worry about being perfect; just follow the steps, and you’ll have that amazing comfort food on your table in no time. If you want some more cozy baking ideas to pair with this, check out my recipe for Amish Cinnamon Bread!
Making the Best Flaky Pie Crust Dough
First things first: the crust needs to rest. In your big bowl, whisk the flour and salt together really well. Then, take your butter cubes—and remember, they need to be ice-cold—and use a pastry blender or your fingers to cut them in. You’re looking for a mixture that looks like coarse crumbs, honestly, with some definite pea-sized chunks of butter still hanging around. Those chunks are your flakiness insurance! Now, drizzle in that ice water one tablespoon at a time. Stop mixing the second the dough clumps together; no more! Divide that right away into two flat disks, wrap them tight, and chill them in the fridge for at least one full hour. Seriously, you can’t skip that hour of chill time.
Preparing the Sweet Tart Apple Pie Filling
While that gorgeous dough is chilling, we mix up the filling in a separate bowl. Toss all your pre-sliced Granny Smith and Honeycrisp apples together with both sugars, the flour, the cinnamon, the nutmeg, and the allspice. Add that tablespoon of lemon juice—it helps them keep their color and brightness! Gently toss everything until those apples are uniformly coated in that sugary, spiced mess. You want to be gentle here; we don’t want applesauce! Just enough coating to make sure everything is evenly distributed and ready to pour.
Assembling and Baking Your Homemade Apple Pie
Preheat your oven to a hot 425 degrees F (220 degrees C). Lightly flour your surface and roll out one dough disk into a nice 12-inch circle. Carefully drape that dough into your 9-inch pie plate. Trim the edges, leaving about an inch hanging over. Then, scoop all that glorious apple filling right in there, making sure it’s mounded a little in the center. Scatter those 2 tablespoons of small butter pieces right over the top of the apples—trust me on this addition! Roll out the second disk for the top crust. Cover the filling, trim the overhang, and really work those edges together—crimp them tight so none of that lovely juice escapes. Then, grab a sharp knife and cut several vents right in the top crust so the steam can escape. Give the whole top a nice brush with that egg wash and a light sprinkle of sugar. Bake at 425 degrees F for 15 minutes exactly. Then, drop that temperature down to 375 degrees F (190 degrees C) and bake for another 40 to 50 minutes until that crust is deep golden brown and you can see the filling bubbling happily in those vent slits!

Tips for Success When Making Your Homemade Apple Pie
Even though this is designed to be an easy apple pie from scratch, a couple of little techniques really make the difference between good and “Oh my gosh, I made this?!” When you’re figuring out how to make apple pie that really wows people, it always comes down to paying attention to the temperature and the patience afterward. Don’t skip these tiny steps; they are the bridge between a decent pie and the kind of pie people talk about for years!
Crust Temperature Control
I cannot stress this enough: keep everything for the crust crazy cold! If your butter feels soft at all during mixing, stop and pop the bowl into the freezer for five minutes. If your hands are getting warm while you’re working the dough, switch hands or take a break. Those little pockets of cold butter are what create that gorgeous flakiness when they hit the oven heat. Cold = layers, warm = tough crust. It’s simple physics in the baking world!
The Essential Cooling Period
After fighting off everyone trying to steal a slice while it’s hot, you absolutely have to let the pie cool for a solid three hours on a wire rack. I know—it’s the hardest part! But trust me, if you cut into it too soon, that beautiful apple filling you created will run right out into a soupy mess onto your plate. Those three hours are essential for the flour and the starches to set up properly. That cooling time is what turns your juicy filling into that perfect, sliceable texture.
If you’re looking for other simple comfort bakes that need time to set up later on, you have to try my pumpkin banana bread recipe—it’s great warm, but even better the next day once the moisture settles!
Variations on the Classic Apple Pie Recipe
While this double crust version is my go-to for that classic, old fashioned apple pie look, I totally get that sometimes you’re just in the mood for something a little different! We actually have a few favorite twists we play around with, depending on what we have in the pantry or what mood we’re in. You don’t have to stick to the traditional top crust, you know!
If you’re looking for something with a bit more crunch, you can ditch the top layer of pastry completely and swap it out for a satisfying streusel. This turns it into an apple crumble topping pie, which is fantastic because it gets all those crispy bits on top. If you want to see my favorite way to make that topping separate from the pie, check out my dedicated apple crumble recipe!
Another easy little swap inside the filling is adding flavor extracts. A teaspoon of pure vanilla extract or maybe even a half teaspoon of almond extract to the apple mixture seriously deepens that spiced apple dessert flavor. It just gives it an extra little punch that makes people ask what your secret is!
Serving Suggestions for Your Spiced Apple Dessert
Honestly, a slice of this pie standing alone is amazing, but let’s be real—it’s begging for a little something extra on top! This American classic pie absolutely demands a temperature contrast. My number one suggestion is always a big scoop of good quality vanilla ice cream. Watching it melt slowly over that warm slice? Perfection.
If you want to go truly old-fashioned, try serving it warmed up with a slice of sharp cheddar cheese alongside it. Don’t knock it until you try it; that salty bite is incredible with the sweet tart apple pie filling. If you’re feeling fancy, ditch the cheese and top it with fresh, lightly sweetened whipped cream. Maybe after pie, you’ll want something sweeter? Check out my recipe for chewy chocolate chip cookies—total opposite, total comfort!
Storage and Reheating Instructions for Homemade Apple Pie
So, you’ve successfully navigated the baking process and now you have this glorious homemade apple pie staring at you! How do you keep it perfect until you cut into it tomorrow? Because we use that all-butter crust, which is superior in flavor but less stable than shortening versions for storage, you should leave it on the counter. Keep it loosely covered with foil at room temperature for up to two days. Honestly, a pie gets drier stored in the fridge, and we want to keep preventing dryness!
If you happen to have leftovers past two days, then yes, wrap it tightly in plastic wrap and freeze it; it lasts great for about a month that way. When you want just one slice later, I swear by reheating it in the oven or an air fryer at about 350 degrees F for about ten minutes. That re-crisps the crust perfectly. Skip the microwave unless you absolutely have to!
Frequently Asked Questions About Making Apple Pie
I figured you might have a few questions swirling around after tackling a full homemade apple pie recipe. Don’t worry, that’s totally normal! I’ve gathered the ones I get asked the most about technique, ingredients, and how to save the day if something goes slightly sideways. We want every pie you make to be amazing.
Can I use pre-made pie dough for this homemade apple pie?
Oh, look, I get it—sometimes life throws curveballs and you just need a shortcut! If you absolutely have to use store-bought dough for speed, yes, you totally can. It will get you a dessert on the table faster. But, and this is a big but, it just won’t have that incredible, melt-in-your-mouth texture that comes from using our real, cold butter mixture. To get the best flaky pie crust, you really need to make the dough from scratch. That’s where all the magic layers come from!
What is the best way to prevent a soggy bottom crust?
That dreaded soggy bottom! It happens when the bottom dough sits soggy under the cooked filling steam. The trick I learned early on? Bottom rack baking! You need intense heat shooting up into the underside of that pie plate. So, when you first put the pie in the oven during the high-heat burst (the first 15 minutes at 425°F), make sure it’s on the very lowest rack in your oven. If you are a real worrier like me, you can even put a pizza stone or a heavy baking sheet in the oven on a rack below the pie while it preheats—it absorbs and radiates heat, cooking that bottom crust faster. It’s a great little trick for any heavy fruit pie!
Do I need to use both Granny Smith and Honeycrisp apples?
You really, really should! This is a key component to achieving that perfect sweet tart apple pie flavor we talked about. Granny Smiths give you that sharp tartness that cuts through the richness of the butter crust and the sugar. If you use only sweet apples, the pie ends up tasting flat and way too sweet. The Honeycrisp (or Fuji, if you prefer) brings the sweetness we need and gives a bit of structure back. Blending them gives you that complex, layered flavor that makes this classic apple pie recipe sing!
Oh, and since we are talking about saving time, if you ever decide pies aren’t your thing but still want an easy baking win, my pecan pie dump cake is the answer to your prayers. It’s ridiculously simple!
Nutritional Estimates for This Classic Dessert
Now, let’s talk just a quick second about the numbers. I’m Maddie, not a registered dietitian, so please remember that all the information below is just an estimate based on my best calculations for one slice of this incredible classic dessert. Since we use all that glorious butter in the crust, it’s certainly an indulgence, but it tastes like pure joy, so I say it’s worth every bite! We use straightforward ingredients, but amounts can easily shift based on the exact size of your apples or how thick you roll your dough.
If you’re looking for something lighter to start your day, maybe check out my lineup of easy breakfast ideas planned around whole foods before you dive into dessert!
Here is the breakdown for one serving (one slice):
- Calories: 450
- Fat: 25g
- Saturated Fat: 15g
- Trans Fat: 0g
- Unsaturated Fat: 10g
- Carbohydrates: 58g
- Fiber: 3g
- Protein: 5g
- Sugar: 35g
- Sodium: 250mg
- Cholesterol: 60mg
Remember, these figures are just estimates based on the recipe provided. Enjoy this slice of pure, honest, homemade comfort!
Share Your Homemade Apple Pie Creations
Now that you’ve conquered the crust and perfected your sweet tart apple pie filling, I truly want to see what you’ve made! This recipe is all about bringing that heritage comfort to your table, and knowing that you’ve baked something beautiful for your family means the world to me. Baking is a shared experience, and I love seeing your results!
If this classic apple pie recipe made your kitchen smell like heaven and you ended up with a delicious slice, please, please pop down below and give it a five-star rating. It helps other folks find this easy apple pie from scratch recipe when they’re looking for that perfect fall or holiday bake! And if you took a gorgeous photo—maybe you added a lattice top or that crumble topping—I’d absolutely love to see it! You can tag me on social media, or even reach out through my contact page. Don’t forget to save this recipe card now so you have it easy when you start planning your next big batch of apple dessert for holidays celebrations!
PrintThe Best Easy Homemade Apple Pie with Flaky, All-Butter Crust

Make the ultimate comfort dessert from scratch with this reliable recipe for homemade apple pie. You get a perfectly flaky, all-butter crust and a sweet-tart apple filling spiced just right.
- Prep Time: 45 min
- Cook Time: 65 min
- Total Time: 110 min
- Yield: 8 servings 1x
- Category: Dessert
- Method: Baking
- Cuisine: American
- Diet: Vegetarian
Ingredients
- 2 1/2 cups all-purpose flour
- 1 teaspoon salt
- 1 cup (2 sticks) cold, unsalted butter, cut into small cubes
- 1/2 cup ice water, plus more if needed
- 6 large Granny Smith apples, peeled, cored, and sliced 1/4-inch thick
- 3 large Honeycrisp apples, peeled, cored, and sliced 1/4-inch thick
- 3/4 cup granulated sugar (adjust based on apple tartness)
- 1/4 cup packed light brown sugar
- 1/4 cup all-purpose flour
- 1 tablespoon ground cinnamon
- 1/2 teaspoon freshly grated nutmeg
- 1/4 teaspoon ground allspice
- 1 tablespoon lemon juice
- 2 tablespoons unsalted butter, cut into small pieces
- 1 large egg, beaten with 1 teaspoon water (for egg wash)
Instructions
- Make the Crust: In a large bowl, whisk together the flour and salt. Cut in the cold butter using a pastry blender or your fingers until the mixture resembles coarse crumbs with some pea-sized pieces of butter remaining.
- Gradually add the ice water, one tablespoon at a time, mixing until the dough just comes together. Do not overmix. Divide the dough in half, form each half into a disk, wrap in plastic, and chill for at least 1 hour.
- Prepare the Filling: In a large bowl, combine the sliced apples, granulated sugar, brown sugar, flour, cinnamon, nutmeg, allspice, and lemon juice. Toss gently until the apples are evenly coated.
- Assemble the Pie: Preheat your oven to 425 degrees F (220 degrees C). On a lightly floured surface, roll out one dough disk into a 12-inch circle. Carefully transfer it to a 9-inch pie plate. Trim the edges, leaving a 1-inch overhang.
- Pour the apple filling into the crust. Dot the top of the filling with the small pieces of butter.
- Roll out the second dough disk for the top crust. Place it over the filling. Trim the top crust overhang to match the bottom. Crimp the edges to seal the pie. Cut several slits in the top crust to allow steam to escape.
- Brush the top crust evenly with the egg wash. Sprinkle lightly with a little extra granulated sugar if desired.
- Bake: Place the pie on a baking sheet to catch drips. Bake at 425 degrees F (220 degrees C) for 15 minutes.
- Reduce the oven temperature to 375 degrees F (190 degrees C) and continue baking for 40 to 50 minutes more, or until the crust is golden brown and the filling is bubbly. If the edges brown too quickly, cover them loosely with foil.
- Cool: Let the pie cool on a wire rack for at least 3 hours before slicing. This allows the filling to set properly.
Notes
- For the flakiest crust, keep your butter and water as cold as possible throughout the mixing process.
- Use a blend of tart apples (like Granny Smith) and sweet apples (like Honeycrisp or Fuji) for the best flavor balance in your apple pie filling.
- If you prefer a rustic look, you can make a lattice top instead of a full top crust.
Nutrition
- Serving Size: 1 slice
- Calories: 450
- Sugar: 35g
- Sodium: 250mg
- Fat: 25g
- Saturated Fat: 15g
- Unsaturated Fat: 10g
- Trans Fat: 0g
- Carbohydrates: 58g
- Fiber: 3g
- Protein: 5g
- Cholesterol: 60mg