
Oh, sometimes you just need a bite of something so deeply, unapologetically chocolate that it makes you close your eyes with every single forkful. That’s exactly what we’re talking about today! Forget those fluffy puddings; we are diving into the rich, melt-in-your-mouth magic of a true classic French silk pie. My goal, just like with all the heritage recipes I share here, is to give you foolproof steps so you achieve that signature velvety, silky smooth texture every single time.
When I was trying to recreate comfort foods from home, mastering this pie felt like finding a missing piece of my own story. This recipe delivers the ultimate chocolate dessert, marrying a crisp, buttery base with a filling so light, it honestly feels like eating sweetened air. It’s the kind of dessert that screams, “This is special!” without demanding a culinary degree. Trust me, we’re making the best chocolate silk pie you’ve ever encountered.
- Why This Classic French Silk Pie Recipe Works for You
- Gathering Ingredients for Your French Silk Pie
- Step-by-Step Instructions for a Foolproof French Silk Pie
- Tips for the Best Chocolate Silk Pie Texture
- Ingredient Notes and Substitutions for your French Silk Pie
- Serving Suggestions for this Decadent Chocolate Dessert
- Storage and Reheating Instructions for Your French Silk Pie
- Frequently Asked Questions About Making French Silk Pie
- Sharing Your Ultimate Chocolate Dessert Experience
Why This Classic French Silk Pie Recipe Works for You
I know what you’re thinking: French Silk Pie sounds fancy, maybe a little complicated, right? That’s why I spent so much time perfecting this version. I needed a reliable recipe that worked even when I was tired after a long week. This isn’t just another recipe; it’s your key to impressing guests without breaking a sweat!
Here’s why I know this will become your go-to recipe for a very special occasion:
- You get that amazing, silky smooth filling without any fuss. It’s truly unbelievable.
- It’s undeniably a rich dessert for holidays—it stands up beautifully next to heavy entrees.
- We’ve streamlined the steps so you get all that decadent flavor without a huge time commitment. This is totally an easy chocolate pie recipe in disguise.
- The texture is the star! It’s a genuine melt in your mouth dessert experience every single time.
Gathering Ingredients for Your French Silk Pie
Okay, let’s talk about the starring cast! Getting the ingredients ready is half the battle, and honestly, the quality of what you put in makes this creamy silk pie recipe so decadent. We need to make sure everything is at the right temperature before we start whipping things into submission.
A quick note from my kitchen to yours about those eggs: My original recipe calls for fresh eggs, but since I want everyone to feel safe making this, I always recommend using pasteurized eggs if you have any hesitation about using raw yolks and whites. Safety first, always!
For the Buttery Pie Crust
You need a base that can handle this rich filling! You’ll need one full, unbaked or pre-baked 9-inch pie crust. If you want to cheat a little—and honestly, who can blame you?—store-bought is fantastic. Or, if you’re feeling extra crunchy, whip up a quick no bake chocolate pie alternative using crushed Oreos mixed with melted butter. Easy peasy!
- 1 (9-inch) crust (buttery or Oreo)
For the Velvety Chocolate Filling
This is where the deep, dark magic happens. We are going for pure indulgence here, so use chocolate you truly love eating on its own. This makes for the absolute best decadent chocolate dessert flavor profile!
- 4 ounces unsweetened chocolate, melted and cooled slightly
- 1 cup granulated sugar
- 1/2 cup (1 stick) unsalted butter, softened—make sure it’s softened, not greasy!
- 2 large eggs, separated (remember the safety note!)
- 1 teaspoon vanilla extract
- 1/4 teaspoon salt
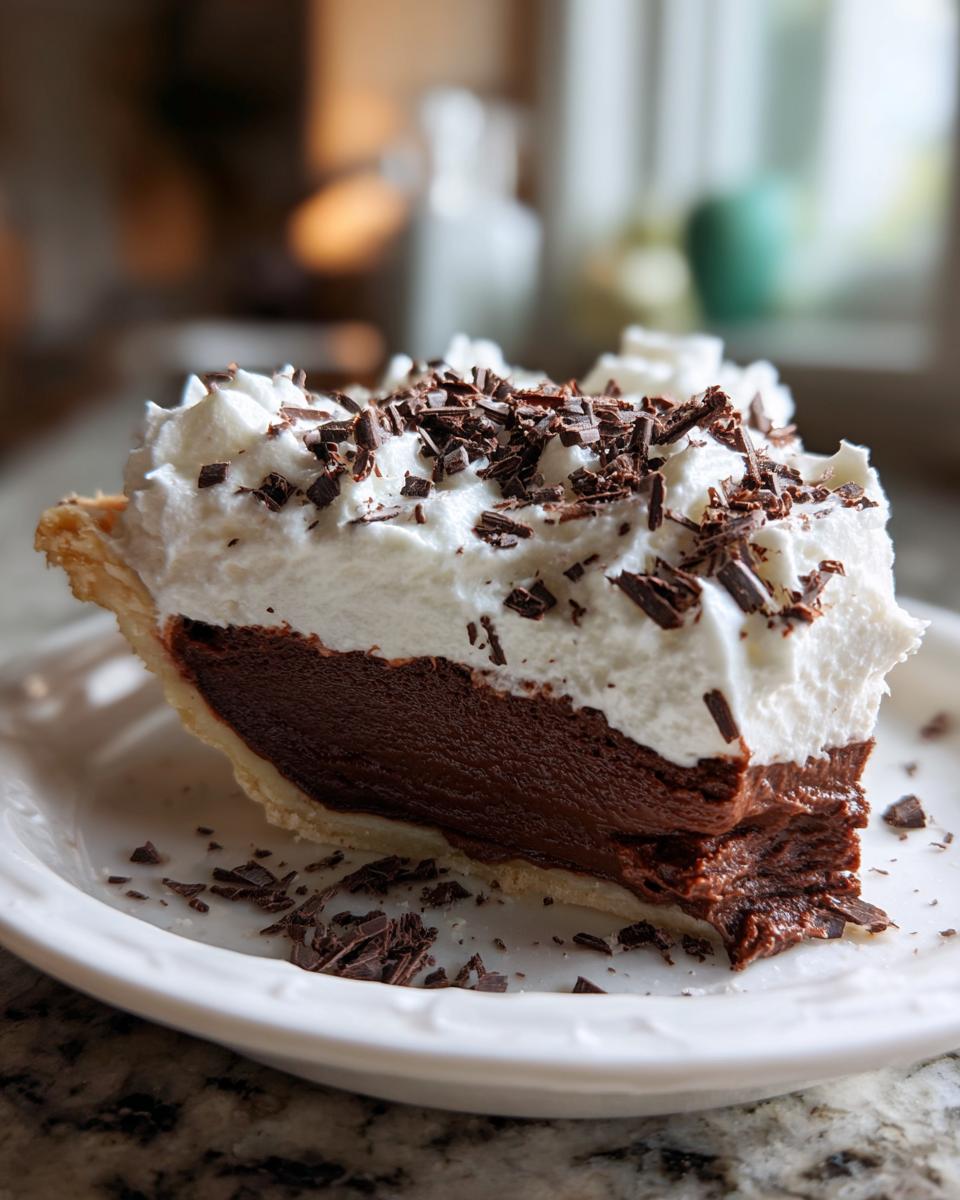
For the Homemade Whipped Cream Topping
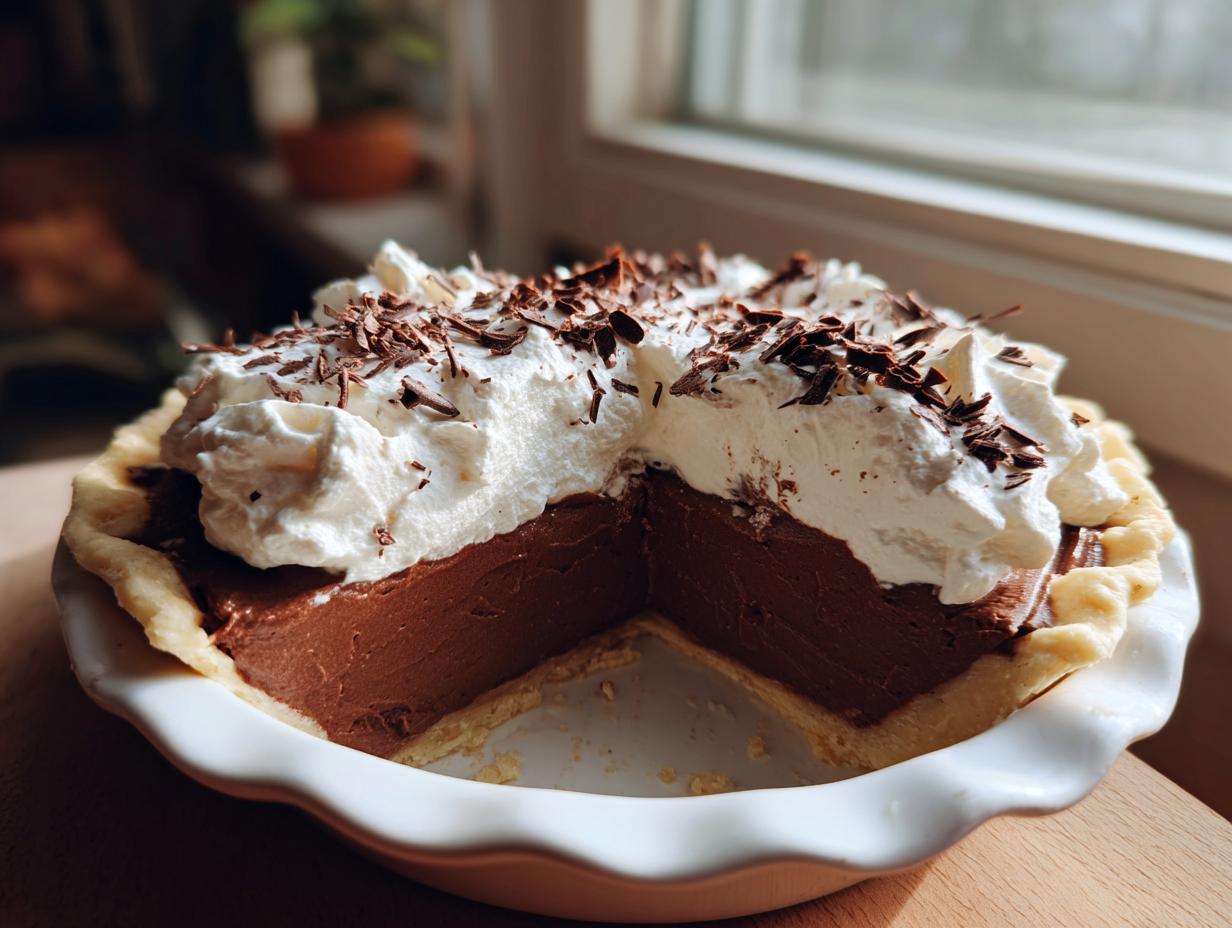
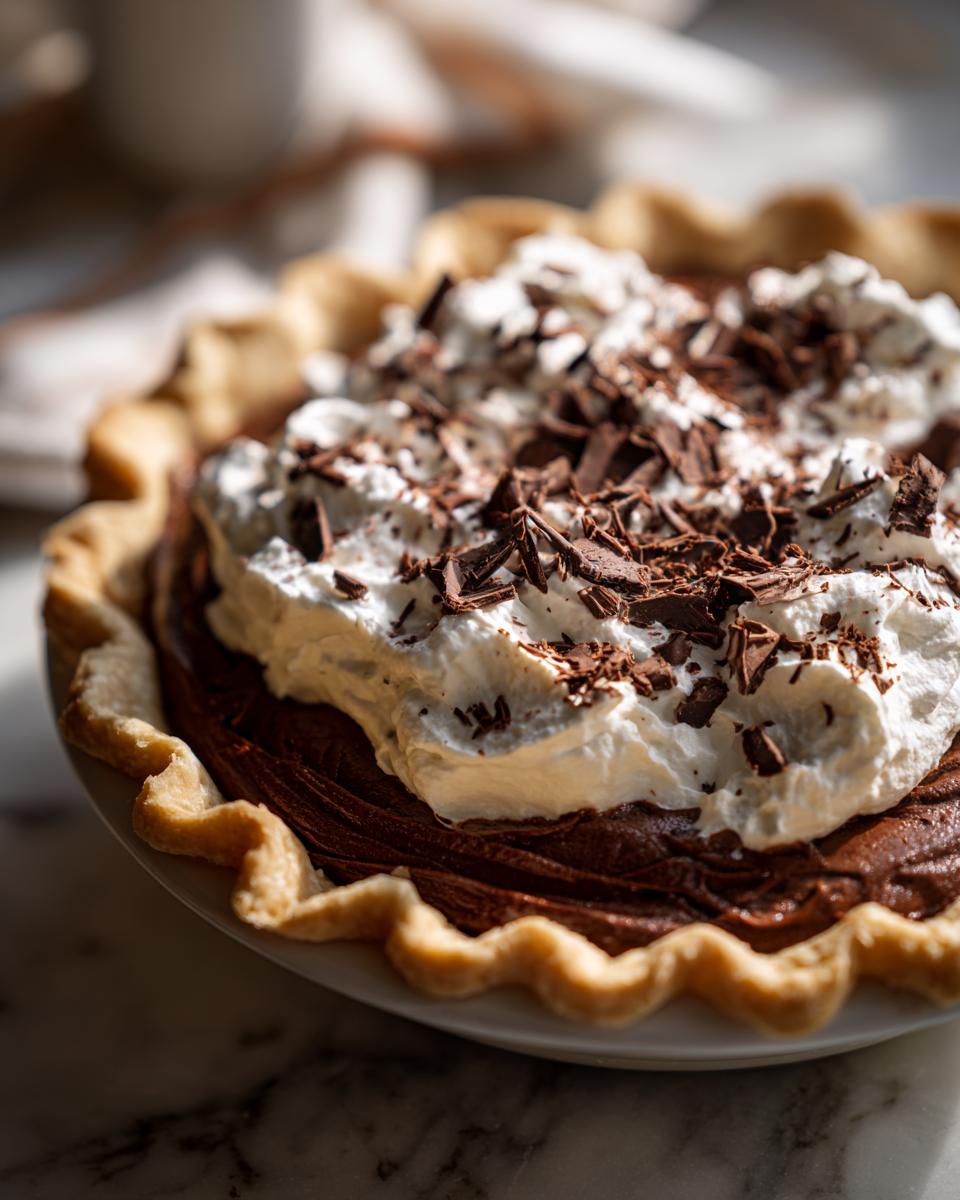
We aren’t using canned stuff here, no way! The contrast between the cold, fluffy topping and the rich filling is everything. This is definitely part of what makes it the best chocolate silk pie!
- 1 cup heavy whipping cream, chilled
- 2 tablespoons powdered sugar (for topping)
- Chocolate shavings, for garnish—go wild with these!
Step-by-Step Instructions for a Foolproof French Silk Pie
Now for the fun part! Making this French silk pie is much easier than the fancy name suggests. The key here is patience, especially when cooling that chocolate, and being gentle when we fold things in later. If you follow these steps closely, you’ll have that perfect, silky smooth filling that practically melts away. I found that when I followed the tips over at Women Recipe, my texture was even better!
I know what you’re thinking: French Silk Pie sounds fancy, maybe a little complicated, right? That’s why I spent so much time perfecting this version. I needed a reliable recipe that worked even when I was tired after a long week. This isn’t just another recipe; it’s your key to impressing guests without breaking a sweat!
Preparing the Crust Base
First things first, we need a solid foundation. Whether you used a store-bought shell or decided to go the Oreo route, make sure you bake that crust until it’s just lightly golden. Once it’s done, you must let it cool completely—and I mean *completely*—before we even think about pouring in the filling. A warm crust means a melted disaster, and we want thick, beautiful silk!
Creating the Creamy Silk Pie Recipe Base
Grab your soft butter and that granulated sugar. You need to beat these together until the mixture turns pale yellow and looks seriously fluffy. This creaming action is what gives us that ultimate creamy silk pie recipe texture later on, so don’t rush it! Next, beat in your egg yolks one by one, making sure each is fully incorporated. After that, stir in your vanilla and that all-important melted, slightly cooled chocolate.
Achieving the Mousse Pie Recipe Texture with Egg Whites
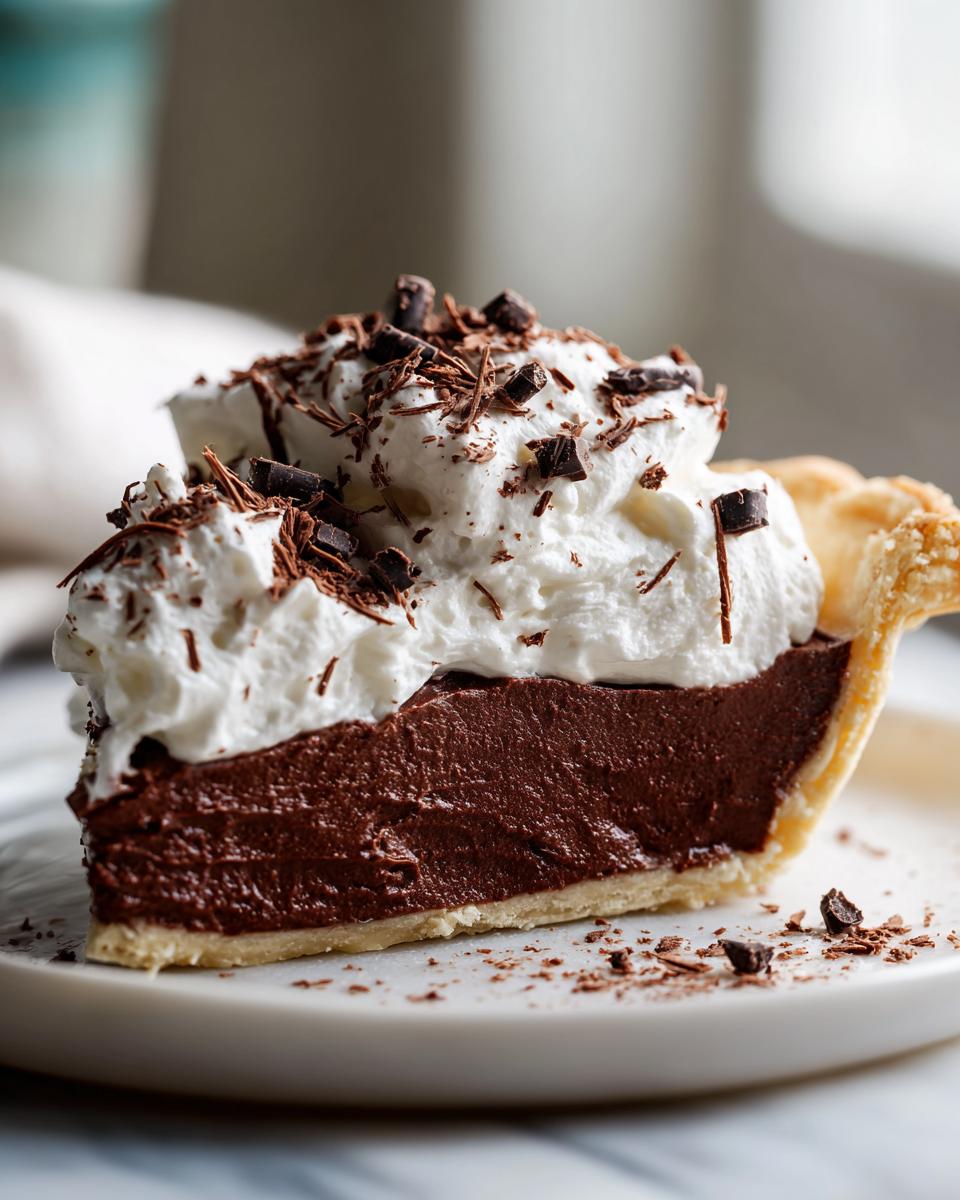
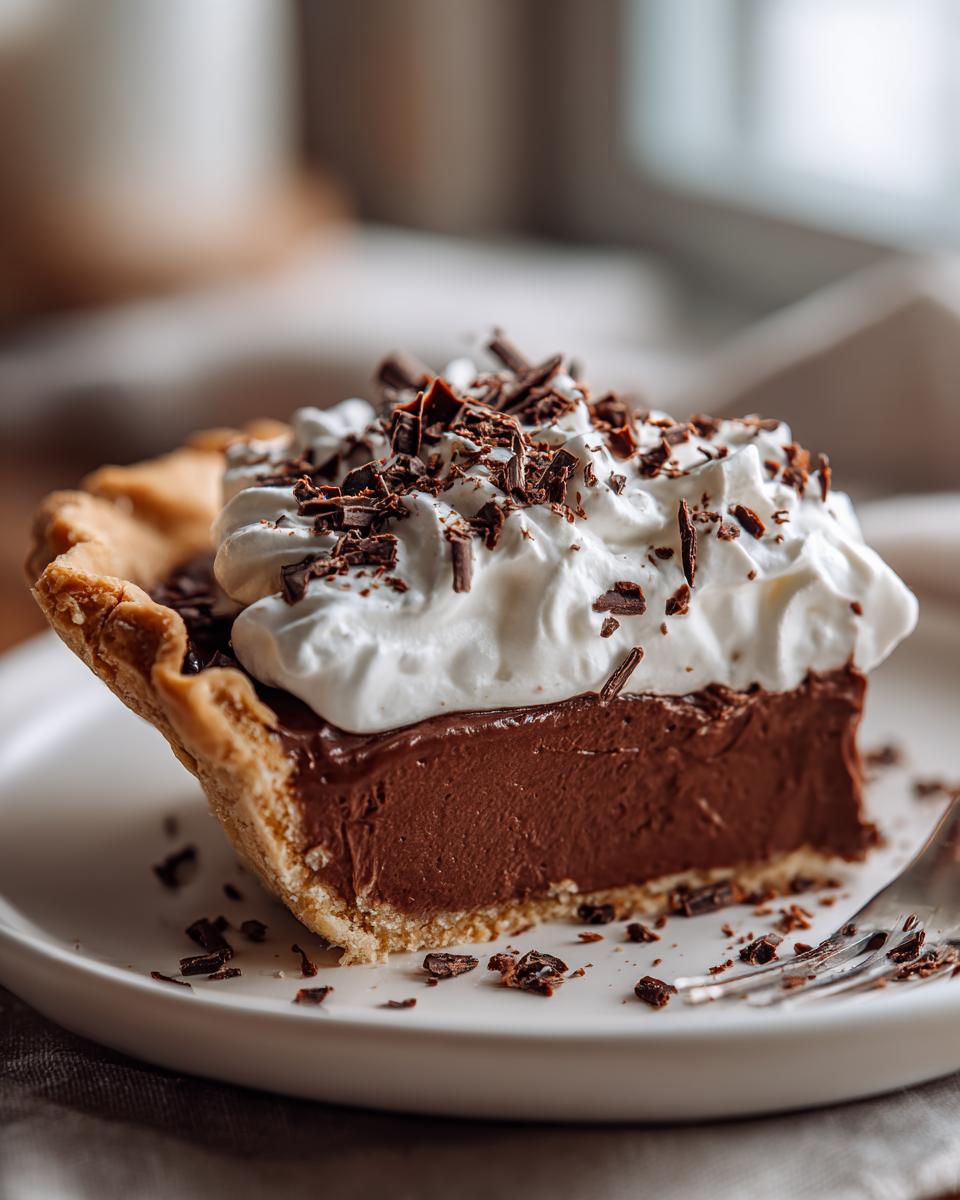
Time for the aeration step! In a separate, spotless bowl, beat those egg whites with the salt until they form stiff peaks—you know, when you lift the whisk and the peaks stand right up on their own. This is crucial for that light, airy mousse pie recipe feel. Now, take about a third of those fluffy whites and stir them right into the chocolate mixture—this lightens the base. Then, gently, gently fold in the rest of the whites until they disappear. We are not mixing here; we are *folding* to keep all that lovely air trapped!
Chilling and Finishing the French Silk Pie
Pour that gorgeous, fluffy filling right into your cooled crust. Then, slide the whole thing into the fridge. You need a minimum of four hours of chilling time for this to set up properly, but honestly, I think it’s best when made the day before. While it chills, take that heavy cream, whip it up with the powdered sugar until soft peaks form, and pile it high on top right before serving. A shower of chocolate shavings finishes this showstopper make ahead dessert perfectly.
Tips for the Best Chocolate Silk Pie Texture
Listen, making a French silk pie that collapses into a puddle or separates when you slice it is the absolute worst feeling! The whole point of this dessert, why people call it that heavenly velvet chocolate dessert, is that super smooth, almost ethereal mouthfeel. It’s all about controlling the temperature and respecting the air we work so hard to incorporate.
My biggest piece of advice, which I learned the hard way, is never add warm melted chocolate to the butter and egg mixture. If that chocolate isn’t fully cooled down—I mean, room temperature cool—it’s going to cook those yolks just slightly, and you’ll lose the fluffy structure fast. Be patient; let the chocolate rest!
Another texture secret involves those egg whites. You absolutely must make sure your bowl and whisk are spotless and grease-free when whipping them. Even a tiny drop of fat can stop those whites from ever reaching stiff peaks, and if they aren’t stiff, your pie will deflate while chilling. When you’re folding them in, use that figure-eight motion; don’t stir vigorously! It might take a minute longer, but that gentle folding preserves the air needed for that perfect melt in your mouth dessert finish.
And just a quick reminder about the raw egg concern—because this pie relies on those beautiful, airy whites for lift! If you’re worried about using them straight from the shell, a great modern solution is to buy pasteurized eggs at the store. They work perfectly in this recipe, giving you that gorgeous volume without any worry. No one needs that stress when they’re trying to create perfection!
Ingredient Notes and Substitutions for your French Silk Pie
I always preach using good ingredients because, honey, they do the heavy lifting in a simple dessert like this. Since we aren’t baking this French silk pie for long, the quality of the chocolate and the butter really shines through. You can’t hide behind complicated spices here!
The butter is probably the ingredient I get the most questions about. It needs to be truly softened when you start—like, you can press your finger into it easily, but it shouldn’t look shiny or oily. If your butter is too cold, you end up wrestling with it, and you won’t get that wonderful fluffiness when you cream it with the sugar. If it’s too warm, you’ll deflate the trapped air later when you add the chocolate. Give it a little time on the counter!
I mentioned the Oreo crust as a great option for a quicker, no bake chocolate pie alternative. It’s such a crowd-pleaser! Just crush up about 24 Oreos—filling and all—and mix that with about six tablespoons of melted butter until it resembles wet sand. Press that firmly into your pie plate and chill it really well while you focus on that silky filling. It gives you a completely different texture than the traditional flaky crust, but wow, is it decadent!
And finally, the chocolate! Please don’t use chocolate chips if you can help it—they have stabilizers that keep them from melting perfectly smooth. Stick to good quality unsweetened baking bars. They melt down to that beautiful, glossy liquid that blends seamlessly into the butter mixture, making sure there are absolutely no grainy spots left in your final creamy silk pie recipe.
Serving Suggestions for this Decadent Chocolate Dessert
This French silk pie is undeniably rich—it’s meant to be the grand finale of the meal, right? Because the filling is so intense and creamy, you don’t want to overpower it with heavy sides. We need things that offer a nice little lift or a complementary bitter note to cut through all that decadent chocolate.
This is my go-to way to serve it when I bring it out for holiday dinners or company gatherings:
- A Simple Coffee Companion: Honestly, a tiny cup of strong, freshly brewed coffee is my favorite partner for this pie. The bitterness of the coffee is the perfect counterpoint to the sweetness of the chocolate. If you aren’t a coffee drinker, a nice, dark roast tea works just as well.
- A Bright Fruit Accent: Because this is such a heavy, dark dessert, a little brightness goes a long way. Think fresh raspberries or sliced strawberries served on the side of the plate—not dumped on top! The little tart pop of fresh fruit cleanses the palate beautifully between bites of that decadent chocolate dessert.
- Keep the Topping Classic: I mentioned using extra homemade whipped cream, but sometimes I’ll add a tiny dusting of finely ground espresso powder right over the white topping. It enhances that luxurious chocolate flavor just a touch more without adding any extra texture or bulk.
Basically, when serving this, remember that the pie itself is the main event. Keep the plates looking elegant, and focus on simple accompaniments that let that silky smooth filling be the absolute star of the show. It really doesn’t need much dressing up!
Storage and Reheating Instructions for Your French Silk Pie
Since this is such a wonderful make ahead dessert, knowing how to store it properly is crucial! We put so much effort into getting that creamy, airy texture just right, and we definitely don’t want to ruin it by drying it out in the fridge or—heaven forbid—trying to microwave it!
The short answer about reheating is: don’t! This pie needs to stay cold to keep that mousse-like structure intact. Trying to warm it up will just melt the gorgeous filling into puddle-ville, and we worked way too hard for that sad outcome!
Here’s the best way to store your beautiful creation:
- Cover it Up: Once the pie is completely set and you’ve added your whipped cream topping, you need to cover it loosely with plastic wrap. I usually tent the plastic wrap over the topping so it doesn’t touch the delicate swirls of whipped cream. If you have a pie carrier, use it—that’s what I pull out every time!
- Chilling is Key: This pie must stay refrigerated. It keeps wonderfully well for up to three days in the fridge, though frankly, I doubt it ever lasts that long in my house! The filling firms up nicely after the first night, so if you bake it a day ahead, it often slices even cleaner the next day.
- Serving Temperature: Before you slice into it, pull the pie out of the fridge about 15 to 20 minutes before you plan to serve. This lets it soften up just slightly from rock-solid cold, really allowing that luxurious, velvet chocolate dessert quality to shine through when you take that first bite. It ensures that melt-in-your-mouth experience we are aiming for!
As long as it stays chilled and covered, your French silk pie will hold its dreamy texture perfectly. Just remember to pull it out of the cold just before serving, and you are golden!
Frequently Asked Questions About Making French Silk Pie
It’s totally normal to have questions when you’re tackling something this decadent, especially when raw ingredients—like eggs—are involved! I’ve gathered the questions I hear most often about making sure this French silk pie turns out perfectly both in taste and safety. Let’s clear up any confusion so you can serve up the most amazing classic chocolate pie!
Can I make a French Silk Pie without using raw eggs?
That’s a super important question, and yes, you can totally adapt it! If you’re anxious about raw eggs, the easiest and best solution is sourcing pasteurized eggs. They get slightly heated during processing, so they are safe to use raw in recipes like this where they are crucial for texture. If you can’t find pasteurized eggs, you can make a syrup by gently heating the sugar with a tiny bit of water until it dissolves, then tempering that into the yolks, or gently cooking the yolks and whites over a double boiler until they hit 160°F. That last option changes the texture slightly, making it less airy, but it guarantees that beautiful velvet chocolate dessert without the worry.
What is the secret to the silky smooth filling in a traditional french pie?
Oh, the secret isn’t just one thing; it’s a combination of three steps done exactly right! First, you must beat the softened butter and granulated sugar until they are truly light and fluffy—this traps the initial air. Second, make sure your melted chocolate has cooled down enough so it doesn’t scramble those yolks when added. But the *real* secret is the egg whites! They must be whipped to **stiff peaks**, and when you fold them into the chocolate mixture, you have to be incredibly gentle. Folding keeps the volume, which creates that signature silky smooth filling instead of a dense brick!
How far in advance can I prepare this rich dessert for holidays?
This is such a great make ahead dessert, which is why it’s fantastic for holidays! I strongly recommend preparing the whole thing—crust, filling, everything—the day before you plan to serve it. It needs a minimum of four hours to set firmly, but chilling it overnight allows the flavors to marry up nicely. If you’re making it more than 24 hours ahead, I’d suggest leaving the homemade whipped cream topping off until the day you serve it, as the cream can weep a tiny bit overnight, even under cover.
Sharing Your Ultimate Chocolate Dessert Experience
Whew! Now that you’ve successfully navigated making this gorgeous ultimate chocolate dessert, I just have to hear about it! Seriously, there is nothing better than knowing one of my tried-and-true recipes has made it onto your table for a special moment.
Did you manage to get that perfect velvety texture? Was the crust flaky enough to shatter beautifully against that rich chocolate? I want all the details! Don’t be shy about leaving a comment below letting me know how it went. Whether you added a pinch of espresso powder to the topping or stuck totally classic, your experience helps the next person planning to tackle this legendary pie.
If you were thrilled with how easily you mastered this French silk pie, please consider giving the recipe a rating up top! Happy baking, and I hope this rich, creamy treat becomes a cherished tradition in your own kitchen, just like it is in mine!
PrintClassic French Silk Pie: Rich, Velvety Chocolate Dessert

Make this classic French Silk Pie for a truly decadent dessert. You achieve a rich, velvety chocolate filling with a silky smooth texture, set in a buttery crust. This recipe works well for special occasions and holidays.
- Prep Time: 30 min
- Cook Time: 15 min
- Total Time: 4 hours 45 min
- Yield: 8 servings 1x
- Category: Dessert
- Method: Chilling
- Cuisine: French
- Diet: Vegetarian
Ingredients
- 1 (9-inch) unbaked, pre-baked pie crust (buttery or Oreo crust)
- 4 ounces unsweetened chocolate, melted and cooled slightly
- 1 cup granulated sugar
- 1/2 cup (1 stick) unsalted butter, softened
- 2 large eggs, separated (see note for safety)
- 1 teaspoon vanilla extract
- 1/4 teaspoon salt
- 1 cup heavy whipping cream, chilled
- 2 tablespoons powdered sugar (for topping)
- Chocolate shavings, for garnish
Instructions
- Prepare your pie crust according to your preferred recipe or use a store-bought crust. Bake the crust until lightly golden brown and let it cool completely.
- In a large bowl, beat the softened butter and granulated sugar together until the mixture is light and fluffy. This step helps create the smooth texture.
- Beat in the egg yolks one at a time, mixing well after each addition.
- Stir in the melted and cooled unsweetened chocolate and vanilla extract until fully combined.
- In a separate, clean bowl, beat the egg whites and salt until stiff peaks form. This whipping action is key to the mousse-like texture.
- Gently fold about one-third of the beaten egg whites into the chocolate mixture to lighten it. Then, gently fold in the remaining egg whites until just combined. Do not overmix.
- Pour the silky chocolate filling into the cooled pie crust.
- Chill the pie in the refrigerator for at least 4 hours, or until the filling is firm. This is a make ahead dessert.
- Just before serving, whip the heavy cream with the powdered sugar until soft peaks form. Spread or pipe the homemade whipped cream topping over the chilled pie.
- Garnish with chocolate shavings before slicing and serving your ultimate chocolate dessert.
Notes
- For food safety, if you are concerned about using raw eggs, you can use pasteurized eggs. Alternatively, you can gently cook the egg yolks and whites over a double boiler until they reach 160°F before incorporating them into the butter mixture, though this changes the traditional texture slightly.
- To achieve the best texture, ensure your butter is truly softened, not melted, and whip the egg whites until they hold stiff peaks.
- If you prefer an Oreo cookie crust, crush 24 Oreo cookies and mix with 6 tablespoons of melted butter. Press into the pie plate and chill while you prepare the filling.
Nutrition
- Serving Size: 1 slice
- Calories: 450
- Sugar: 35g
- Sodium: 150mg
- Fat: 32g
- Saturated Fat: 18g
- Unsaturated Fat: 14g
- Trans Fat: 0.5g
- Carbohydrates: 38g
- Fiber: 3g
- Protein: 6g
- Cholesterol: 120mg