
Oh, the nostalgia! There is just something about an old fashioned dessert that pulls you right back to your grandmother’s card table. Honestly, when I’m craving pure comfort, nothing beats a perfect, silky baked creation. That’s exactly why I spent so much time perfecting this egg custard recipe—I needed guaranteed results every single time, especially when making an egg custard pie from scratch. My goal, as always here at MDLATDMM, is to take those precious, vague family notes and turn them into a truly reliable guide. Trust me, you’re going to get that gorgeous, smooth texture that seems impossible.
- Why This Creamy Egg Custard Recipe Works Every Time
- Gathering Ingredients for Your Old Fashioned Egg Custard
- Step-by-Step Instructions for Perfect Egg Custard
- Tips for Achieving a Truly Heirloom Custard Recipe Texture
- Serving Suggestions for Your Classic Comfort Dessert
- Storage and Reheating Instructions for Your Egg Custard
- Frequently Asked Questions About Making Egg Custard
- Nutritional Snapshot of This Simple Vanilla Custard
- Share Your Fail-Proof Egg Custard Success
Why This Creamy Egg Custard Recipe Works Every Time
The biggest fear with custard is that dreaded curdling or cracking top, right? I hear you! That’s why this recipe is structured to be a true no fail custard filling. If you follow these steps, you’ll have the creamiest egg custard recipe imaginable. We are taking all the guesswork out of this classic for you.
- It creates that beautifully uniform, silky texture inside the pie or cups.
- The baking method keeps the heat gentle, so you never end up with scrambled bits.
- It’s the exact technique my family uses for their holiday treats!
The Secrets to Smooth Baked Custard Secrets
The smoothness you’re after—the kind that melts in your mouth—comes down to three small actions. First, always gently warm your milk; boiling is the enemy! Second, pour that warm milk into the eggs very slowly while whisking constantly. But the absolute game-changer, my expert tip for you, is straining the final mixture. Trust me on this one; straining removes every tiny bit that could possibly set unevenly.
Gathering Ingredients for Your Old Fashioned Egg Custard
When we are making an old fashioned dessert like this, the quality and type of ingredients really do make a difference in the final texture. You don’t need shelves stocked with fancy items; everything here is straightforward, but precision matters! Keep your mise en place ready—having everything measured out before you start mixing makes the process so much quicker and less stressful.
- 3 large eggs
- 1/2 cup granulated sugar
- 2-2/3 cups whole milk (Yes, whole milk is key for that richness!)
- 1 teaspoon pure vanilla extract
- 1/4 teaspoon salt
- Freshly grated nutmeg for topping (Don’t skip this, it’s lovely!)
Ingredient Notes and Simple Vanilla Custard Swaps
Whole milk gives us the best richness for this sweet egg dessert, but if you’re in a pinch, 2% milk works fine—it just won’t be quite as deeply creamy. A little salt seems strange in a sweet dish, but it really wakes up the natural flavors! And please, if you can, use freshly grated nutmeg. Jarred, pre-ground nutmeg just doesn’t have that bright, warm spice that makes the top layer sing.
Step-by-Step Instructions for Perfect Egg Custard
Okay, now for the fun part! This is where we turn simple ingredients into that incredible egg custard. First things first: get your oven preheating to 325 degrees F, and put whatever you are baking in—your pie dish or those cute little cups—onto a baking sheet. We aren’t baking this directly on the rack, honey, we need that water bath! If you’ve loved my pecan cream pie, you’ll appreciate the patience needed here for this dessert.
Lightly whisk your eggs; I mean *lightly*. We don’t want foam, because foam makes cracks, and we are aiming for a beautiful creamy egg custard recipe! Then gently whisk in the sugar and salt. Slowly pour that warm milk into your egg mixture while whisking steadily. This slow pour is crucial if you want that smooth texture! Think of it like making my cherry pie—slow incorporation is everything.
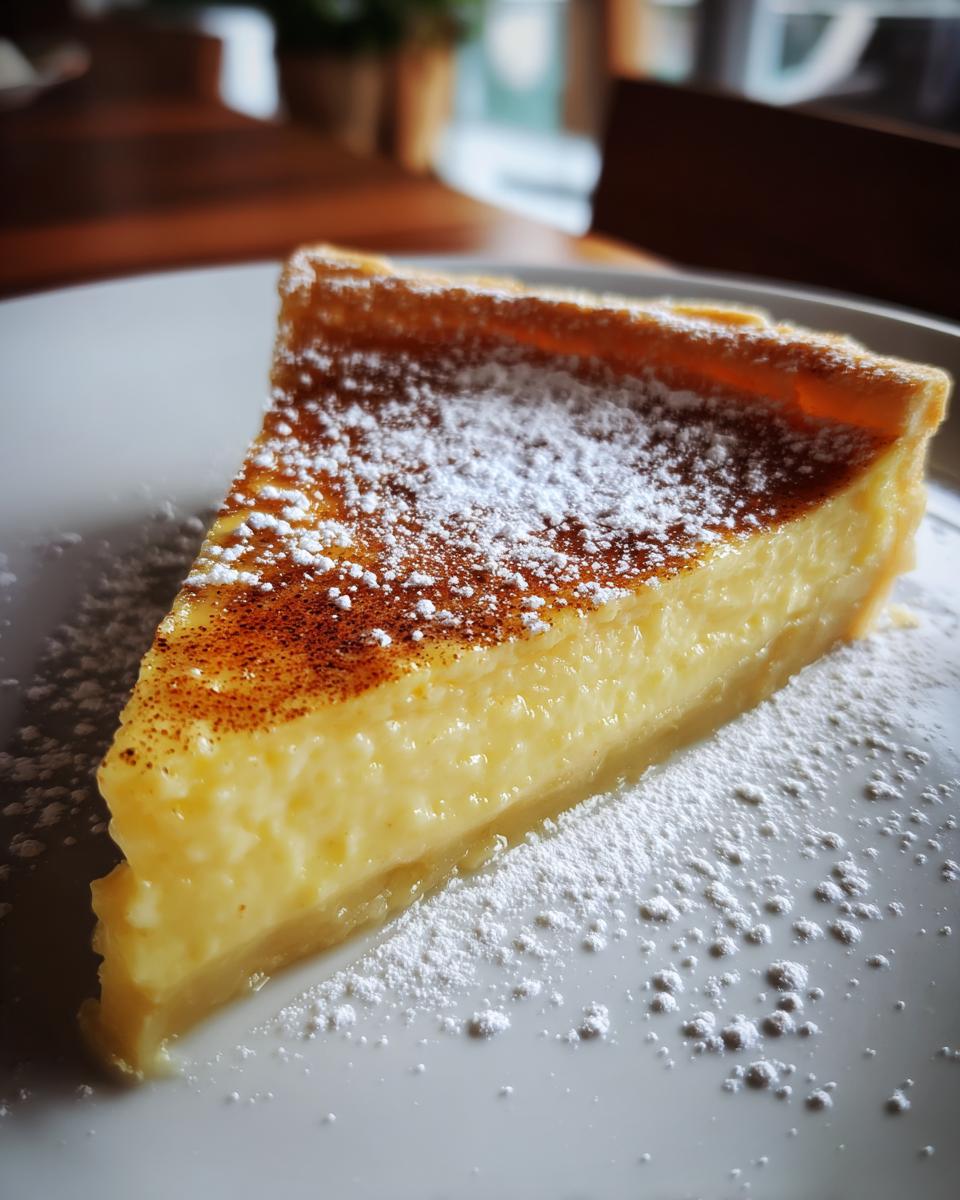
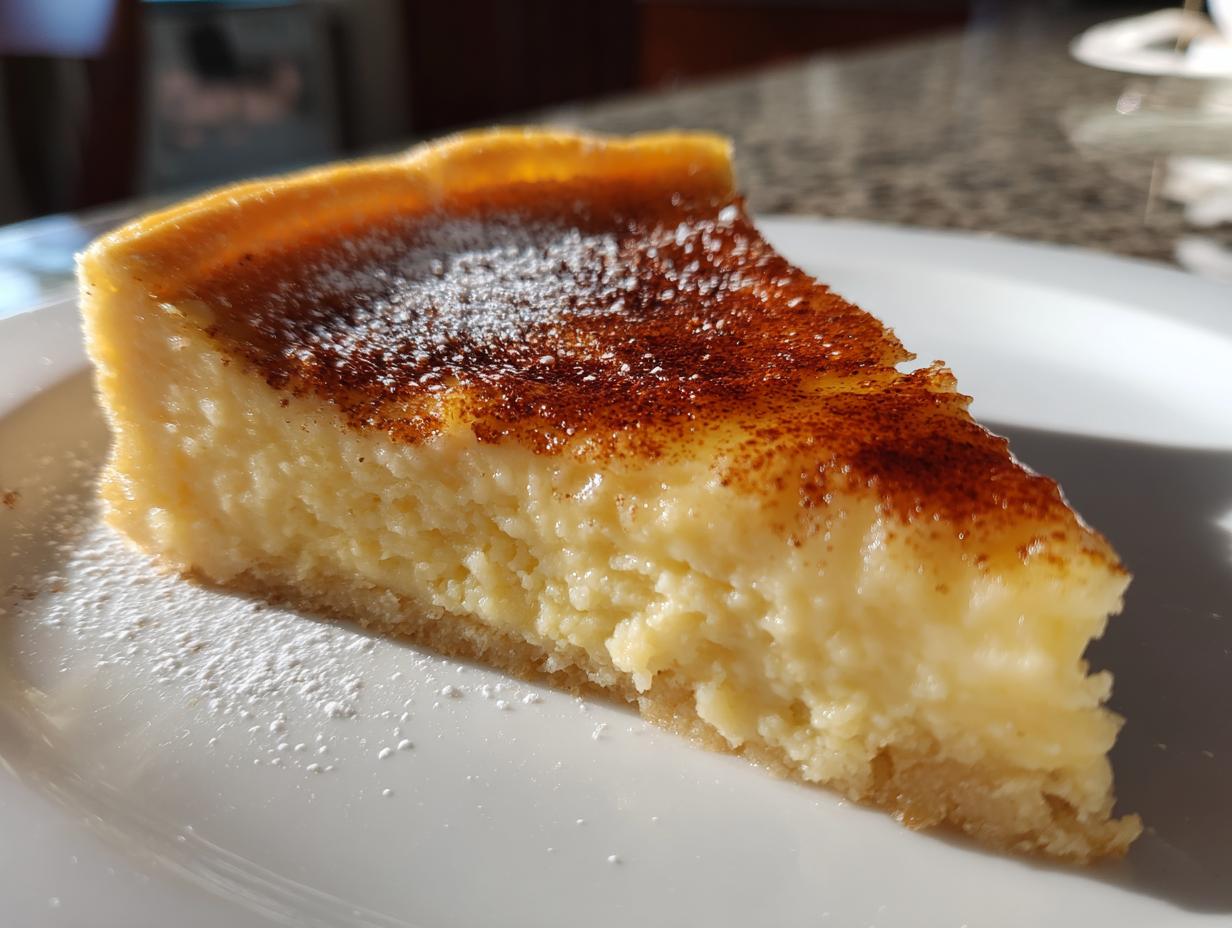
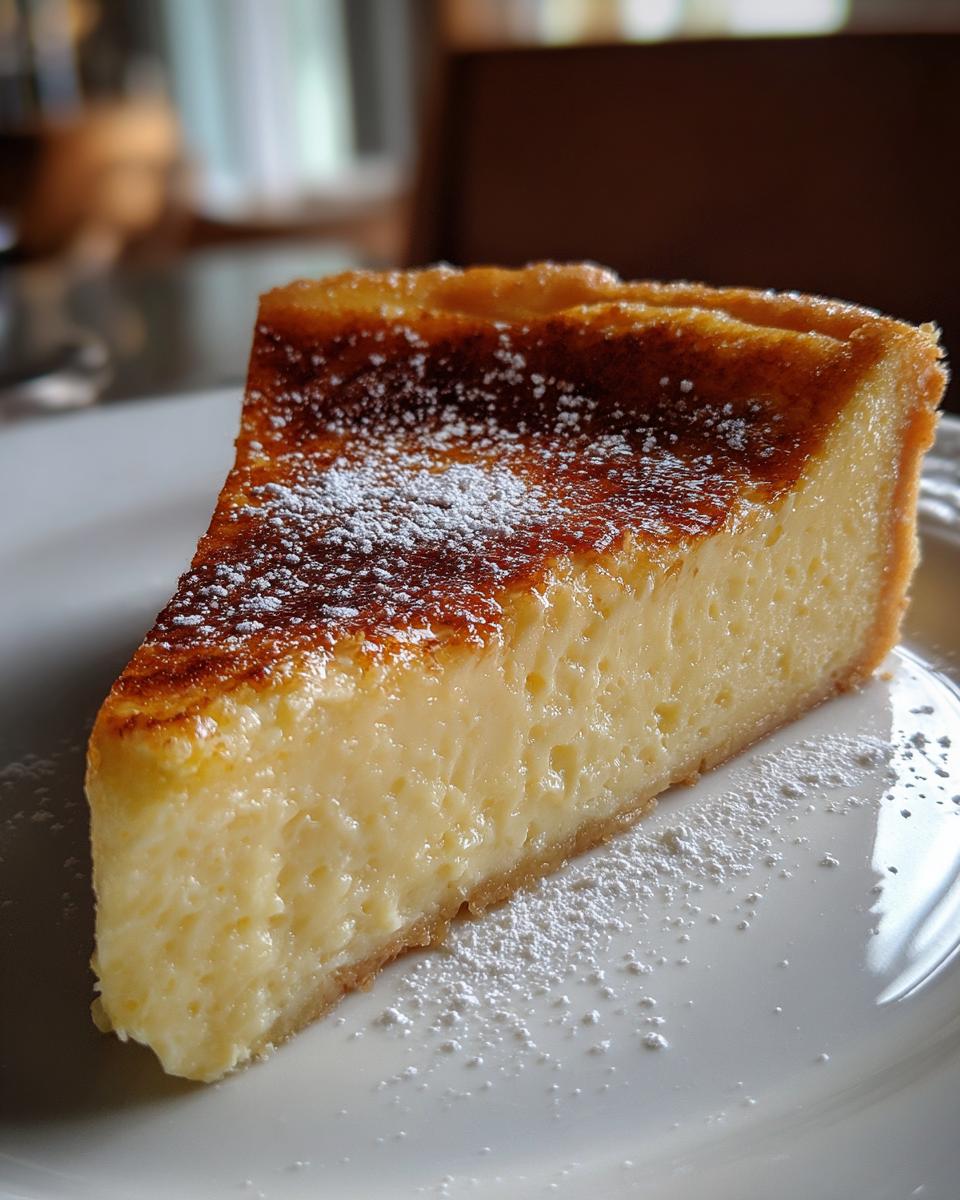
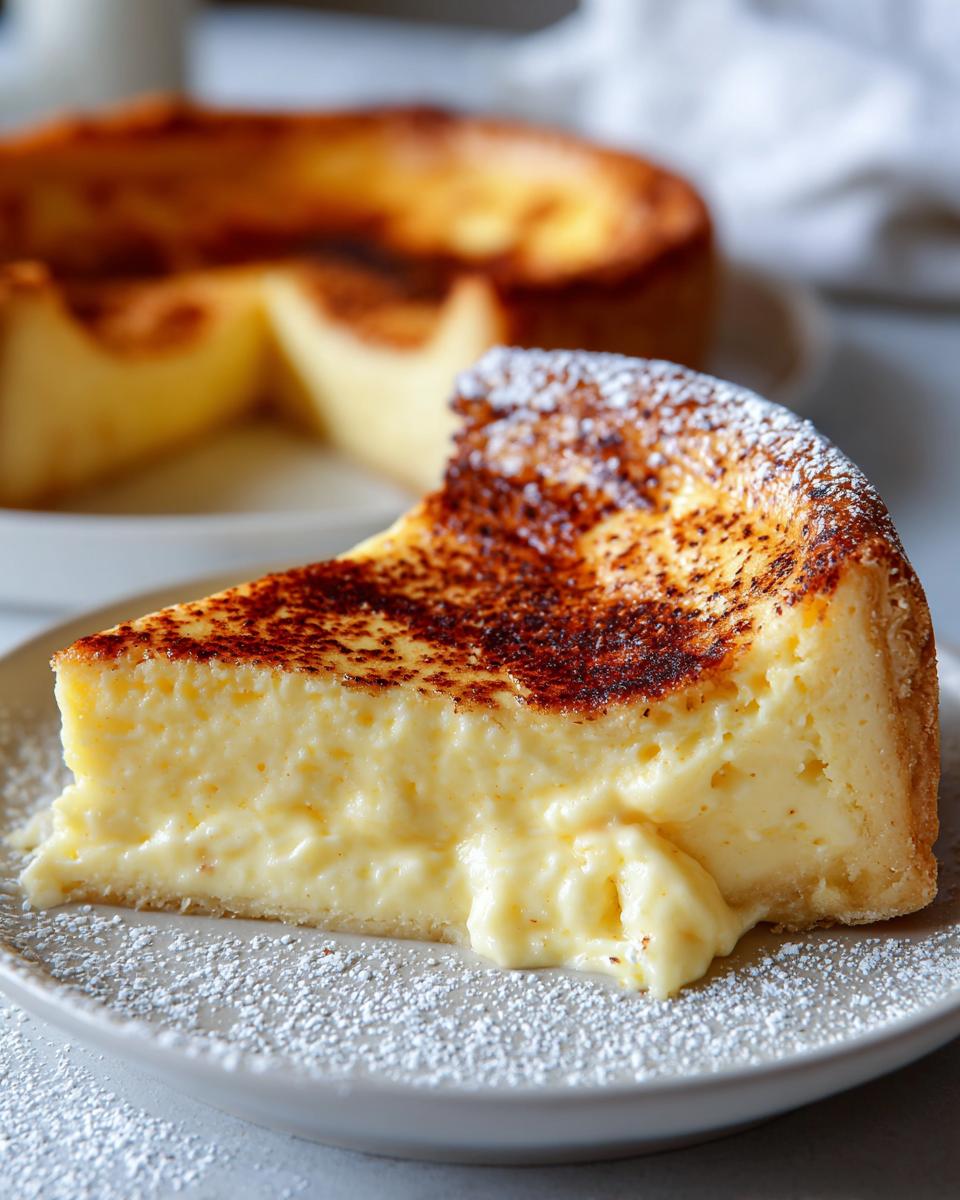
Once everything is combined, use a fine-mesh sieve. I know, I know, one more dish to wash, but straining the completed liquid is what guarantees that melt-in-your-mouth finish. After straining, pour it into your prepared dish and sprinkle generously with nutmeg. Check out this lovely classic egg custard pie recipe for inspiration on presentation!
Mastering the Water Bath for Baked Custard Easy
This part is non-negotiable if you want truly baked custard easy results. The water bath, or *bain-marie*, is your safety net. Carefully slide that baking sheet with your custard into the oven, and *then* pour hot water around the base until it comes halfway up the sides of your dish. This traps the heat and makes sure the custard cooks gently and evenly from all sides. No direct oven heat means no nasty cracks forming on the top. It’s the secret to keeping things smooth and achieving that perfect set!
Tips for Achieving a Truly Heirloom Custard Recipe Texture
We’ve covered the basics of making this heirloom custard recipe, but let’s talk about those tiny details that elevate it from good to absolutely unforgettable. Remember how I said not to over-beat the eggs when we whisked them? I need to stress that again! When you incorporate too much air, that air tries to escape during baking, and guess what happens? Cracks appear all over your beautiful egg custard surface.
When you are mixing the warm milk into the egg mixture, take your time. I use a slow, steady figure-eight pattern with my wrist, not a frantic whipping motion. That slow, careful blending keeps everything combined without creating a foamy mess. If you want to explore other slow-fermentation methods that rely on patience, you might enjoy my thoughts on my sourdough starter process—it’s about respecting the process!
Also, after baking, resist the urge to touch it or move it aggressively! Let it cool down slowly on the wire rack outside of the water bath. This gradual cooling lets the final structure set perfectly. For an ultimate success story that feels just as treasured, you should definitely check out this wonderful Grandma’s Fail-Proof Egg Custard idea for comparison!
Serving Suggestions for Your Classic Comfort Dessert
Part of the joy of making a classic comfort dessert is figuring out how to present it beautifully! Honestly, this simple vanilla custard sings all on its own, especially with that fresh nutmeg sprinkle. If you made it in individual cups, I love serving them slightly chilled with a small dollop of fresh, lightly sweetened whipped cream on top.
If you baked a full pie, keep it simple! A light dusting of cinnamon works too, or you can go for some bright, fresh berries—raspberries or sliced strawberries always look gorgeous against the pale yellow. If I serve this for dessert after a big dinner, like after I make my apple cider braised pork shoulder, a small cup of strong black coffee alongside the chilled custard is just perfection. It’s elegant without any fuss!
Storage and Reheating Instructions for Your Egg Custard
Once your beautiful egg custard is baked and set, you simply cannot rush the chilling process. You absolutely need a minimum of four hours in the refrigerator before slicing or scooping. Honestly, overnight is even better for that ultimate silky texture!
Store any leftovers tightly covered in the fridge to keep out any strange smells. Because this is such a delicate, sweet egg dessert, I really don’t recommend reheating it. If you try to warm it up, you risk losing that smooth set we worked so hard for. It’s truly magical served cold!
Frequently Asked Questions About Making Egg Custard
I always get questions about custard because everyone wants that perfect result! Since this is often one of the first beginner baking recipes custard folks try, let’s tackle the issues people run into most often. Don’t worry if something seems tricky; we’ll figure it out together!
Why did my egg custard crack when I pulled it out of the oven?
This is the number one complaint, and usually, it means two things. Either your oven temperature was too high, or you over-beaten your eggs, introducing too much air! Remember, the smooth baked custard secrets rely on slow, gentle heat. If you want to see a great explanation on how others tackle this, check out this resource on fail-proof egg custard tips. It might point to you needing that water bath like we discussed!
Can I use heavy cream instead of whole milk for richness?
You absolutely can! Using heavy cream instead of whole milk will make your creamy egg custard recipe even richer and denser, almost like a crème brûlée base but softer. Just know that if you use all cream, you might need to reduce the baking time slightly, as the higher fat content changes how it sets. I prefer the whole milk because it balances the sweetness perfectly, but heavy cream is a decadent treat!
Can I completely skip the water bath (bain-marie)?
Oh, please don’t! If you’re aiming for a no fail custard filling, the water bath is your best friend. Skipping it exposes the custard to direct, harsh heat on the bottom and sides, making the outer layer cook much faster than the middle. That creates cracks and a tough edge texture. The water protects the delicate eggs. It’s the one step I insist new bakers never skip for their easy and creamy egg custard recipe.
How far in advance can I make this Old Fashioned Egg Custard?
This is a fantastic make-ahead option, especially leading up to a holiday! Once fully chilled (remember, at least four hours), this custard is great for up to three days in the fridge. It actually lets those vanilla and nutmeg flavors settle in even more. For more great ideas on food you can prep ahead, take a look at my suggestions for easy breakfast ideas—planning ahead is half the battle in the kitchen!
Is this recipe suitable for serving in small ramekins?
Yes! I love making them in individual ramekins because it makes for such a charming presentation of this classic comfort dessert. Just aim for about 10-15 minutes less baking time compared to a full pie dish, but use your jiggle test! If you’re looking for other fun dessert formats, I have a few ideas on my page featuring delicious dessert recipes.
Nutritional Snapshot of This Simple Vanilla Custard
Now, while I’m certainly not tracking macros when I’m whipping up this simple vanilla custard, I know some of you like to know what you’re eating! Keep in mind these figures are just an estimate based on the standard ingredients we used. If you use skim milk or a different sweetener, the numbers will change slightly, so always take figures like these as a happy guideline!
- Calories: 180
- Sugar: 18g
- Fat: 7g
- Protein: 9g
This is a wonderful, traditional sweet treat, so enjoy that sugar guilt-free knowing you made it yourself with real, honest ingredients like those beautiful eggs!
Share Your Fail-Proof Egg Custard Success
And there you have it! We’ve navigated the waters of gentle heating, straining, and perfecting that water bath to bring you what I truly believe is the best egg custard you’ll ever make at home. Now, the best part of sharing these heritage recipes is hearing from you!
I genuinely want to know how it turned out in your own kitchen. Did you use it for an egg custard pie from scratch, or did you bake them in little cups? Please leave a rating below so others know this recipe is truly a keeper. And if you went wild with that fresh nutmeg—tell me how much you sprinkled on top!
If you have any lingering questions or just want to share a picture of your perfectly smooth creation, please don’t hesitate to reach out to me directly through my contact page! Happy baking, friends!
PrintThe Ultimate Fail-Proof Creamy Egg Custard (Old Fashioned & Oven-Baked)

This recipe delivers a smooth, velvety egg custard, perfect for beginners. We use simple ingredients to create a classic comfort dessert that sets perfectly every time, avoiding curdling or cracking.
- Prep Time: 15 min
- Cook Time: 50 min
- Total Time: 65 min
- Yield: 6 servings 1x
- Category: Dessert
- Method: Baking
- Cuisine: American
- Diet: Vegetarian
Ingredients
- 3 large eggs
- 1/2 cup granulated sugar
- 2–2/3 cups whole milk
- 1 teaspoon pure vanilla extract
- 1/4 teaspoon salt
- Freshly grated nutmeg for topping
Instructions
- Preheat your oven to 325 degrees Fahrenheit (160 degrees Celsius). Place a 9-inch pie dish or individual custard cups on a baking sheet.
- In a medium bowl, whisk the eggs lightly. Do not over-beat the eggs, as this incorporates too much air and can cause cracking.
- Whisk in the sugar and salt until just combined.
- Gently warm the milk in a saucepan over medium heat until small bubbles form around the edges. Do not boil the milk. Remove from heat and stir in the vanilla extract.
- Slowly pour the warm milk mixture into the egg mixture while constantly whisking slowly. This slow addition prevents the eggs from scrambling.
- Strain the custard mixture through a fine-mesh sieve into a clean bowl or measuring cup. This step removes any chalazae or unmixed bits, which is key for a smooth texture.
- Pour the strained mixture into your pie dish or cups.
- Carefully sprinkle the top evenly with freshly grated nutmeg.
- Place the baking sheet with the custard into the oven. Pour hot water into the baking sheet until it reaches halfway up the sides of your custard dish, creating a water bath (bain-marie). This controls the heat and ensures even, gentle baking.
- Bake for 40 to 50 minutes, or until the edges are set but the center still has a slight jiggle when gently shaken.
- Carefully remove the baking sheet from the oven. Let the custard cool completely on a wire rack before chilling in the refrigerator for at least 4 hours, or until fully set.
Notes
- For the smoothest texture, use whole milk and do not skip straining the mixture.
- The water bath is essential for a fail-proof, creamy egg custard; it prevents the edges from overcooking before the center sets.
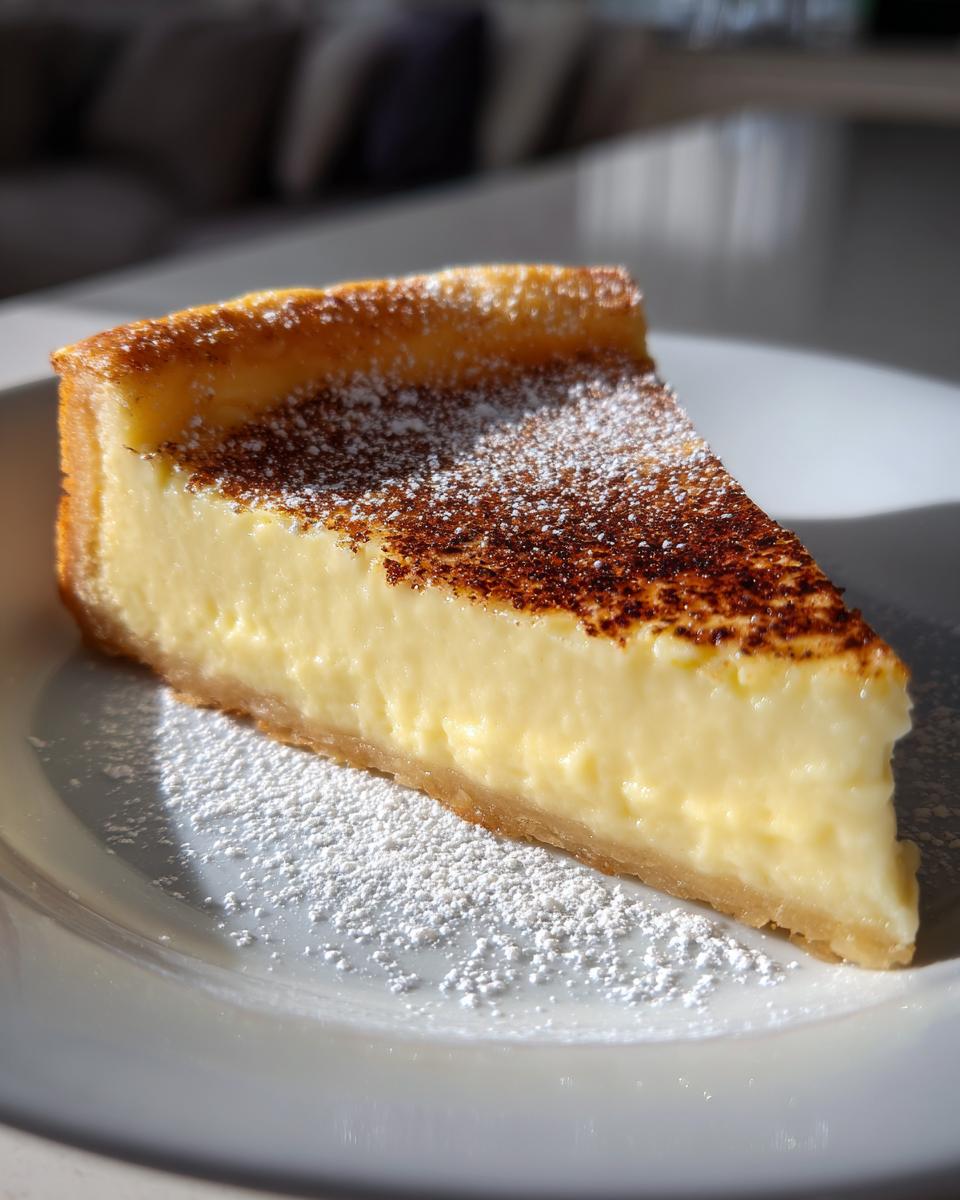
- If you are making an egg custard pie, you can use a pre-made or homemade pie crust, but do not pre-bake the crust for this recipe.
- This recipe is an heirloom custard recipe that works well for beginners seeking a classic comfort dessert.
Nutrition
- Serving Size: 1 serving
- Calories: 180
- Sugar: 18
- Sodium: 110
- Fat: 7
- Saturated Fat: 4
- Unsaturated Fat: 3
- Trans Fat: 0
- Carbohydrates: 17
- Fiber: 0
- Protein: 9
- Cholesterol: 115