

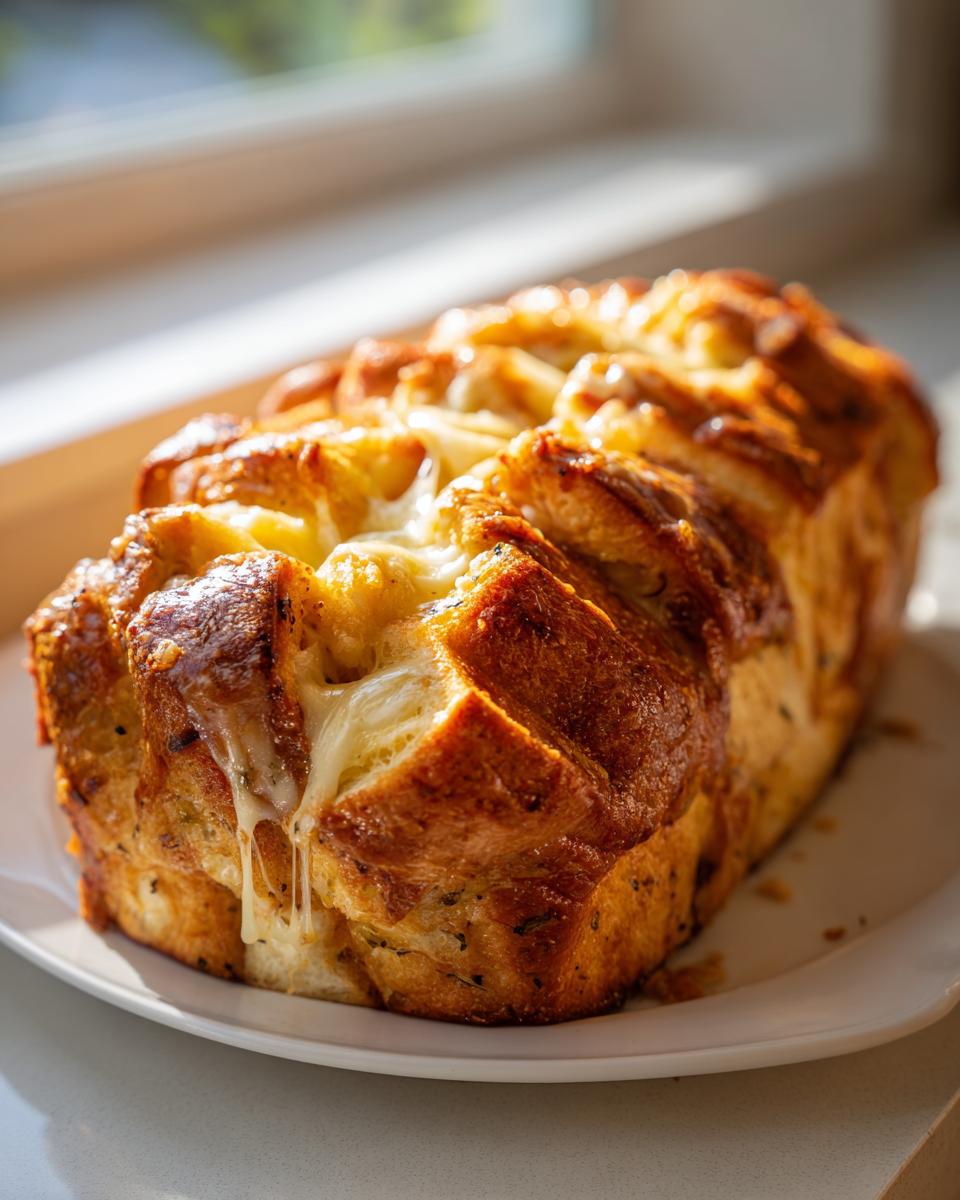
Oh my gosh, if you’re anything like me, some days you just need that warm, pure comfort food hug in the form of bread, right? Forget complicated dinners; sometimes all you need is something soft, buttery, and loaded with cheese. That’s exactly where this Ultimate Easy Cheesy Garlic Pull-Apart Bread comes in! It’s seriously the quickest way to get that incredible cheese bread flavor into your hands. We’re talking about gooey cheese perfection using just a few pantry staples—it truly vanishes as soon as it hits the table.
It might seem simple, but getting that perfect salty-garlic crust right took me a few tries when I first started recreating these classic flavors, bridging that gap from my grandmother’s kitchen to my modern countertop. Trust me, this recipe works every single time, giving you restaurant-style flavor without any fuss!
- Why You Will Make This Ultimate Easy Cheese Bread Recipe Again and Again
- Gathering Ingredients for Your Homemade Cheesy Bread
- Step-by-Step Instructions for Pull Apart Cheese Bread
- Tips for Making the Best Cheese Bread Appetizer
- Variations on Classic Cheese Bread
- Serving Suggestions for This Savory Quick Bread
- Storage and Reheating Instructions for Leftover Cheese Bread
- Frequently Asked Questions About Making Cheese Bread
- Estimated Nutritional Information for This Cheese Bread
- Share Your Homemade Cheesy Bread Creations
Why You Will Make This Ultimate Easy Cheese Bread Recipe Again and Again
Honestly, this isn’t just another side dish; it’s the show-stopper you didn’t have to spend hours making! I keep coming back to this recipe because it solves that classic weeknight dilemma: wanting something deeply satisfying but needing it fast. It works whether you’re feeding a hungry family or bringing a delicious snack to a gathering. It uses such straightforward ingredients, which I love, and it’s a quick way to get a win in the kitchen.
- It’s the definition of our Easy Baking Recipes—prep time is unbelievably short!
- It pulls apart perfectly, meaning zero need for knives or fussy plating.
- It turns plain bread into a fantastic Comfort Food Bread everyone devours immediately.
Perfect for Parties and Simple Bread Sides
If you’re hosting, this is your secret weapon. Think of it as the ultimate party appetizer bread. Because you cut the loaf entirely before baking, everyone just grabs their own buttery, cheesy segment. It’s amazing alongside a big bowl of soup or pasta—it genuinely elevates even the simplest meal into something special, fulfilling that role of a great simple bread side.
Achieving Gooey Melted Cheese Bread Texture Fast
The technique here is smart, and it’s all about the foil! Baking it wrapped first traps the steam, making sure that cheese gets fully molten and creates that incredible gooey melted cheese bread texture without burning the butter on top. Once you unwrap it for those last few minutes, you get just the right crispness on the exterior. It’s the best of both worlds in under 25 minutes total!

Gathering Ingredients for Your Homemade Cheesy Bread
Before we get into the magic of slicing and stuffing, let’s talk ingredients! Because this recipe is so simple, the quality of what you choose really shines through. If you want the absolute best cheese bread, start with a really good loaf—something crusty on the outside but tender enough to soak up all that buttery goodness.
You’ll need a stick of softened butter, four cloves of fresh garlic, some Italian herbs, salt, loads of shredded cheese—a mix of mozzarella and cheddar is my favorite—and of course, that beautiful loaf of bread. Seriously, don’t skimp on the bread here!
Ingredient Notes and Cheese Bread Substitutions
When it comes to making this cheesy garlic bread perfect, a few small choices make a big difference. Please, please use fresh garlic! Those little jarred minced bits just don’t give you the punch you need here. For the cheese, while I love the melt and flavor of mixing mozzarella and cheddar, feel free to swap out the mozzarella for Monterey Jack if you want maximum stretchiness.
Have run out of Italian herbs? No sweat. I often just use dried oregano and maybe a tiny pinch of dried basil. The main goal is getting that savory, herby warmth throughout the loaf!
Step-by-Step Instructions for Pull Apart Cheese Bread
Okay, now that we have the perfect ingredients assembled, let’s put this beauty together. This process is so much fun, and honestly, it moves fast—you can have this cheese bread assembled in about ten minutes flat. Remember, we’re preheating our oven to 350 degrees Fahrenheit right away so it’s ready when we are! Don’t forget to line that baking sheet with parchment paper; it’s a lifesaver when dealing with all that melted cheese!
Preparing the Garlic Butter for Your Cheese Bread
You need to start by making that amazing garlic butter mixture. Grab a small bowl—I usually use the one I mashed the garlic in earlier to save dishes, oops! Mix that softened butter, your minced fresh garlic, the Italian herbs, and salt together. You want to stir it really well until it’s completely smooth and everything is evenly distributed. You want every single bite of this cheesy garlic bread to have that same buttery, herby punch!
Cutting and Stuffing the Loaf for Maximum Cheese Bread Flavor
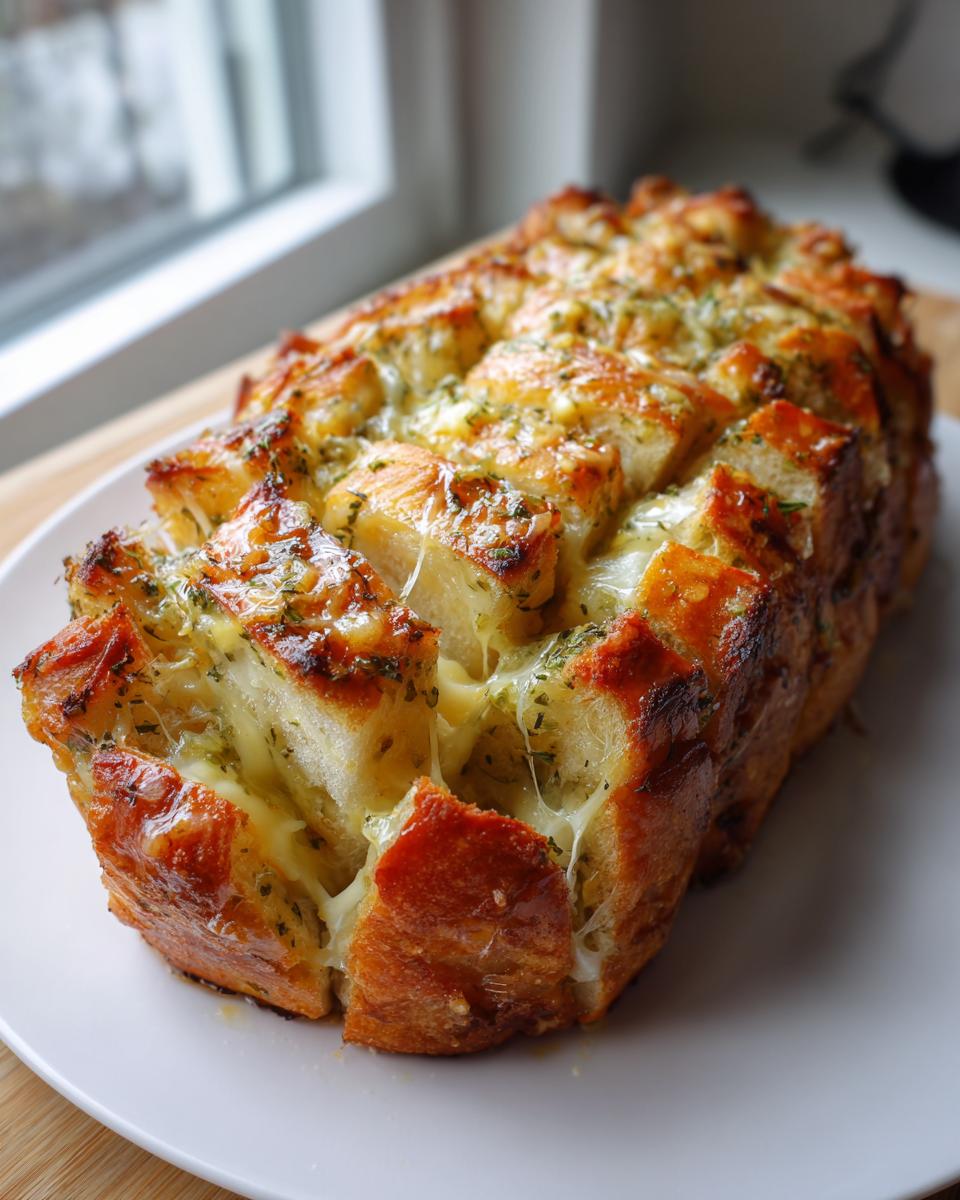
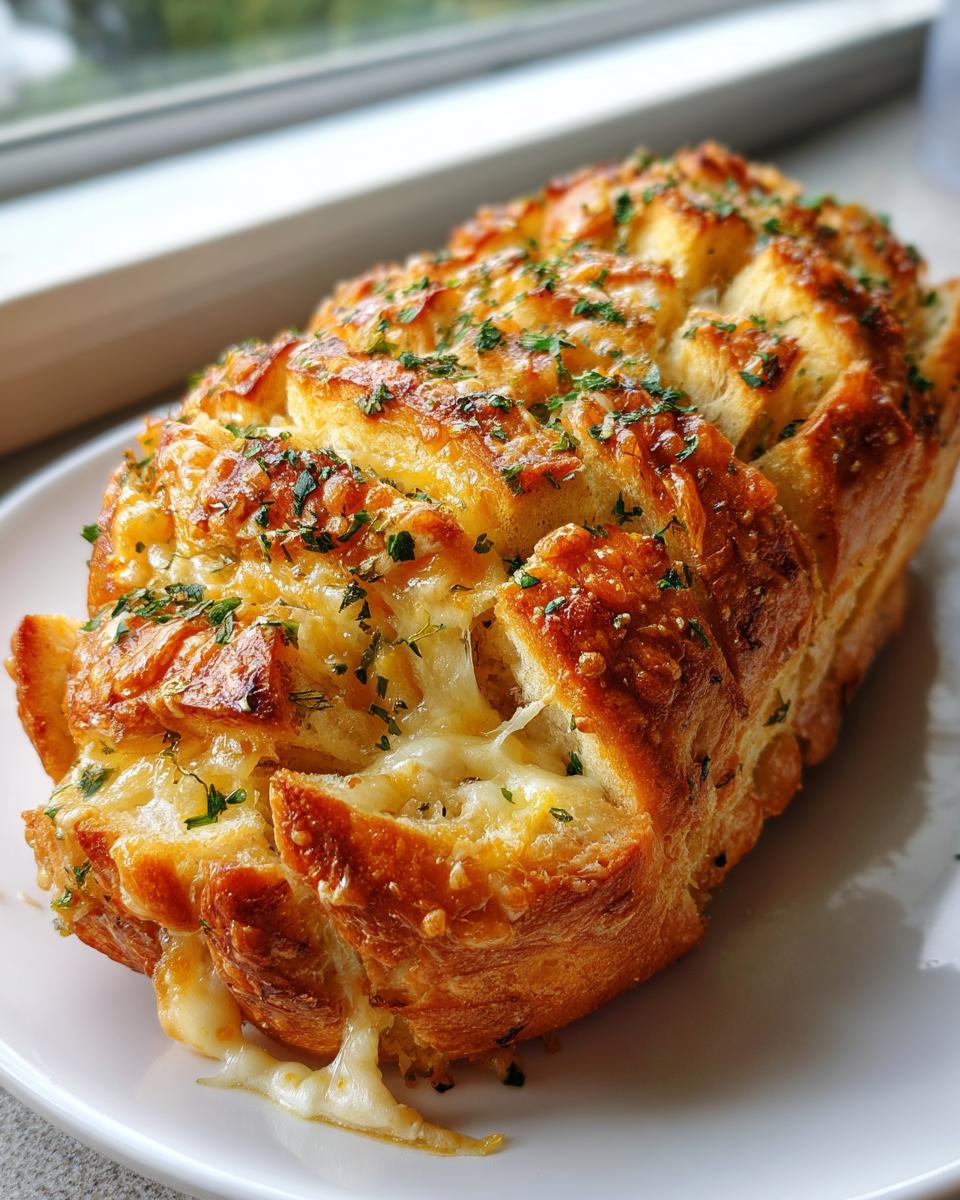
This is the fun, slightly nerve-wracking part, but trust me, you can’t mess this up! Start by slicing the bread across the width, cutting deep but *stop* about half an inch before you hit the bottom crust. The loaf has to stay together! Then, turn the loaf ninety degrees and cut across the length for a diamond or crisscross pattern. Now, gently pry open those cuts and push that shredded cheese deep down into every single crevice you just made. Get that cheese everywhere!
Baking Techniques for Perfect Cheese Bread
Once stuffed, drizzle and spread that glorious garlic butter all over the top and down into the cuts. Then, tightly wrap the whole thing in aluminum foil. This traps the steam, which is our secret to making it truly gooey melted cheese bread. Bake it wrapped for 15 minutes at 350°F. After that, carefully unwrap it and let it bake for another 5 to 7 minutes out in the open. That final blast of heat melts the cheese on top and gives the crust a perfect little crisp before it cools just enough to serve. If you love ideas for baked appetizers like this, you should check out my other easy baking recipes, or see how other bakers manage their crack bread over at Berry Borough!
Tips for Making the Best Cheese Bread Appetizer
Okay, you’ve got the basic instructions down, but if you want this to stop being just “good” and start being the absolute best cheese bread everyone raves about, you need a couple of extra little tricks. These little insights are what I picked up after making this mistake a dozen times when I was figuring out the perfect version of this dish!
My biggest early mistake? Trying to use soft, cheap white bread. Wrong move! That bread just turned mushy under the butter and cheese steam. You need structure to hold up to all that delicious gooey filling.
Choosing the Right Bread for Your Cheese Bread
For this pull apart cheese bread style, you need a bread with integrity, something that can act like a lattice to hold in the butter and cheese. A crusty French baguette or an Italian loaf is what you’re looking for. The crust gets wonderfully crisp when unwrapped, giving you that great textural contrast to the soft interior.
The interior needs to be soft enough so that when you pull it apart later, it stretches nicely, but it shouldn’t dissolve into goo halfway through baking. That’s why you avoid that fluffy sandwich loaf stuff. If you want crusty, savory satisfaction like the versions they make over at RecipeTin Eats, you have to choose a sturdy base. It makes all the difference when you’re serving it up as a crowd-pleasing appetizer!
If you’re looking for other simple, reliable recipes that deliver huge flavor payoff with minimal fuss, I always point people back to my collection of easy baking recipes!
Variations on Classic Cheese Bread
You know, what I love most about a recipe like this—something so fundamental—is how easily you can tweak it to make it *exactly* what you’re craving that day. We nailed the basic garlic and Italian herb version, but feel free to treat this loaf like your own personal canvas! We are definitely keeping that gooey, warm interior, but we can change the flavor profile completely just by swapping out the cheese or what we mix into that beautiful garlic butter.
Making a Cheddar Cheese Bread Version
If you want something bolder than the mild mozzarella, leaning into a straight-up Cheddar Cheese Bread is fantastic. Cheddar brings such a sharp, tangy flavor that stands up really nicely to the garlic. Be warned, though: sharp cheddar has a slightly different melting structure than mozzarella. If you use only sharp cheddar, you might get a little less of that long, stretchy pull, but you gain tons of flavor complexity. I usually do half sharp cheddar and half mozzarella; that way, I get the flavor *and* the stretch! It’s the perfect compromise.
Adding Spice to Your Cheese Bread
Sometimes savory just isn’t enough, right? Sometimes you need a little happy little zing! I love stirring in about a quarter teaspoon of red pepper flakes directly into my garlic butter right before I stuff the loaf. It gives the whole cheese bread a gentle heat that builds perfectly as you eat it. It’s subtle enough that kids won’t notice, but adults definitely appreciate the extra warmth.
If you want to see how other folks use herbs, I highly recommend checking out the approach used in this lovely Italian Herbs and Cheese Bread recipe—they really know how to marry savory flavor profiles together!
Serving Suggestions for This Savory Quick Bread
Seriously, once this cheese bread comes out of the oven, you’re going to want to smother everything in it! It’s so rich and buttery that it feels like the ultimate indulgence, making it a powerful addition to any meal. Because it’s sturdy yet tender, it holds up beautifully against wetter dishes, which is why I consider it a top-tier comfort food bread.
My favorite application, hands down, is serving it alongside soups. Think about it: You have this decadent, warm loaf perfect for dipping. It works incredibly well with anything tomato-based, like a simple marinara, but it absolutely shines when paired with a deep, savory broth.
If you’re making a chilly night meal, I highly recommend pairing a loaf with my recipe for Crockpot French Onion Soup. Dipping those cheesy pockets right into that rich, caramelized onion broth? It’s truly next level comfort. It’s decadent, yes, but that’s the point of a treat like this, right?
It also functions perfectly as a side for pasta nights instead of standard garlic bread. Since it’s already loaded with cheese, you don’t need to add much else. Just pull a piece off, maybe dip it in a little extra olive oil if you’re feeling fancy, and eat it alongside your spaghetti!
Storage and Reheating Instructions for Leftover Cheese Bread
Now, I say this is the best cheese bread recipe, but that’s usually a bit of a joke because it *never* lasts long enough to need storage! Truly, if you can eat it all fresh from the oven when the cheese is still practically lava, you should. But life happens, and sometimes you end up with a slice or two the next day. We don’t want dry, sad bread, so let’s talk about keeping this homemade cheesy bread at its peak.
If you absolutely must save some, wrap the loaf tightly—and I mean TIGHTLY—in plastic wrap first, and then slip that whole package into a zip-top bag or an airtight container. This keeps the moisture trapped inside. It should stay good on the counter for about a day, maybe a day and a half max, because of all that butter and cheese content.
The Best Way to Reheat for Gooey Goodness
Forget the microwave! A quick zap in the microwave will turn your beautiful, crusty bread into a rubbery mess, and the cheese will get greasy instead of gooey. No, thank you!
The oven is your best friend for reheating this pull apart cheese bread. Wrap the leftover portion loosely back up in aluminum foil—just like we did for the initial bake. Pop it into a 300°F oven for about 8 to 10 minutes. The foil traps the moisture and gently heats the cheese through until it’s stretchy again.
If you have an air fryer (which I adore, by the way!), you can get an even crispier result! Place a slice or two in the basket and cook it at 325°F for just 3 to 4 minutes. Keep a close eye on it, though, because those edges can brown fast once the cheese is hot!
Frequently Asked Questions About Making Cheese Bread
I always get so many questions when people try this recipe for the first time—it’s always the best indicator of a truly great, fuss-free dish! I gathered up the ones I hear the most often for you here. Don’t hesitate to drop your own questions in the comments if you can’t find what you’re looking for!
Can I use frozen bread for this Easy Cheese Bread Recipe?
Oh, I get this one a lot, especially when people decide last minute they need a quick cheesy bread! You can absolutely use frozen bread, but you MUST thaw it completely first. If you try to cut or stuff the bread while it’s frozen solid, you’ll end up shattering the loaf, and it won’t hold the cheese properly. Once it’s fully thawed, proceed with the recipe just as written—the baking time should be the same since the butter and cheese are going in cold anyway.
What is the best cheese blend for Gooey Melted Cheese Bread?
For that spectacular, stretchy, gooey melted cheese bread effect we are aiming for, you need cheeses known for their melt factor. My personal ticket is a 50/50 mix of good quality low-moisture mozzarella (for the stretch) and mild or medium cheddar (for that classic orange color and tang). You can also throw in Monterey Jack for extra creaminess! A quick word of warning: if you use pre-shredded cheese, it often has anti-caking agents on it, which can sometimes prevent a perfectly smooth melt. If you can, grate it fresh—it makes a noticeable difference in the final texture!
Can I make this Pull Apart Cheese Bread ahead of time?
Yes, you absolutely can get ahead of the game! This is a fantastic trick for hosts. You can assemble everything—cut the bread, stuff it with cheese, and slather it with garlic butter—and then wrap it tightly in foil. Pop it into the refrigerator for up to 24 hours. You will just need to add about 10 minutes to the initial wrapped baking time since the bread will be cold. Alternatively, you can freeze the assembled loaf (wrapped really well!) for up to a month. Just thaw it in the fridge overnight before baking as directed. It’s great knowing you have a future batch of fantastic easy baking recipes ready to go!
Estimated Nutritional Information for This Cheese Bread
Listen, I’m Maddie, not a registered dietitian, so please take this information with a grain of salt and a big slather of butter! This is just an estimate based on the ingredients listed in the recipe card. Since this cheese bread is often made with a hefty loaf and shared around, these numbers are based on dividing the whole recipe into eight generous servings, which is how I usually see it disappear at parties!
Because we’re using homemade garlic butter and lots of cheese, it is definitely a comfort food treat! If you’re tracking things closely, know that the amount of fat is the highest component, mostly coming from that rich butter and cheese topping. It’s worth every single, delicious, cheesy bite, though!
- Serving Size: 1 slice
- Calories: 250
- Fat: 15g
- Saturated Fat: 9g
- Carbohydrates: 22g
- Protein: 9g
- Sugar: 1g
- Sodium: 450mg
These figures are just a guideline for labeling purposes, especially since the exact bread loaf size and cheese brand can make things vary. Don’t worry too much about the numbers, though; focus on how the kitchen smells while this homemade cheesy bread is baking! That’s the real measure of success around here.
Share Your Homemade Cheesy Bread Creations
I truly hope you loved making this cheese bread just as much as I love developing these reliable, comforting recipes for you all. When a truly simple dish like this comes together so perfectly, it just warms my heart—it’s the essence of what MDLATDMM is all about: bringing my family’s connection back to your kitchen table.
So, if you whipped up a batch of this Ultimate Easy Cheesy Garlic Pull-Apart Bread, I would absolutely love to hear about it! Did you go heavy on the cheddar? Did you dip it in soup? Don’t be shy!
Please take a second to leave a star rating right here on the recipe card—it helps me know which recipes are hitting the spot for folks like you. And if you snap a picture of your beautiful, gooey creation, please tag me on social media! Seeing your loaves looking golden and ready to be pulled apart lets me know I’m doing my job right.
- Rate the recipe below! Every star helps.
- Share your photos and tag me—I love seeing your baking successes!
- If you have questions or want to swap ideas, drop them in the comments below.
If you want to learn a little more about my mission to keep classic American flavors approachable for the busy modern cook, feel free to check out the About Page. Happy baking, my friends! Remember, the best kitchen is always an approachable one.
PrintUltimate Easy Cheesy Garlic Pull-Apart Bread
Make this warm, buttery pull-apart bread stuffed with gooey cheese and seasoned with garlic. It is a simple appetizer or side dish that disappears fast.
- Prep Time: 10 min
- Cook Time: 22 min
- Total Time: 32 min
- Yield: 8 servings 1x
- Category: Appetizer
- Method: Baking
- Cuisine: American
- Diet: Vegetarian
Ingredients
- 1 loaf (16 ounces) crusty bread or French bread
- 1/2 cup (1 stick) unsalted butter, softened
- 4 cloves garlic, minced
- 1 teaspoon dried Italian herbs
- 1/4 teaspoon salt
- 1 1/2 cups shredded cheese (a mix of mozzarella and cheddar works well)
Instructions
- Preheat your oven to 350 degrees Fahrenheit. Prepare a baking sheet with parchment paper.
- In a small bowl, mix the softened butter, minced garlic, Italian herbs, and salt until combined. This is your garlic butter.
- Take the loaf of bread and cut deep, even slices across the width, stopping about half an inch from the bottom crust so the loaf stays intact.
- Turn the loaf 90 degrees and cut slices across the length, creating a crisscross or diamond pattern. Do not cut all the way through.
- Gently open the cuts in the bread and stuff the shredded cheese deep into the crevices. Distribute the cheese evenly throughout the loaf.
- Spread the prepared garlic butter mixture generously over the entire loaf, making sure some butter gets down into the cuts.
- Wrap the entire loaf tightly in aluminum foil.
- Bake for 15 minutes wrapped in foil.
- Unwrap the bread carefully and bake for an additional 5 to 7 minutes, or until the cheese is fully melted and bubbly.
- Let the bread cool for 5 minutes before serving warm as a pull-apart appetizer.
Notes
- For extra flavor, use freshly grated cheese instead of pre-shredded cheese.
- You can substitute the Italian herbs with dried oregano or parsley.
- This bread is excellent served with marinara sauce for dipping.
Nutrition
- Serving Size: 1 slice
- Calories: 250
- Sugar: 1
- Sodium: 450
- Fat: 15
- Saturated Fat: 9
- Unsaturated Fat: 6
- Trans Fat: 0
- Carbohydrates: 22
- Fiber: 1
- Protein: 9
- Cholesterol: 40