
Oh my gosh, you have to try this! If you love apple pie but dread wrestling with a full pie crust, then this apple galette is about to change your life. Seriously, this free-form, rustic tart is pure autumn magic with zero fuss. When I started MDLATDMM Recipes, my whole goal—just like founder Maddie Thompson showed us in her kitchen—was to make heritage food accessible, and this recipe is the absolute perfect example of that philosophy! It tastes deeply comforting, like something passed down for generations, but it comes together in a snap. It’s everything you want in a simple apple dessert without any of the panic. You can read more about our commitment to approachable cooking over on our About Page!
- Why This Easy Apple Galette Recipe is Your New Favorite Fall Apple Baking Staple
- Essential Ingredients for Your Homemade Apple Galette
- Step-by-Step Instructions for the Perfect Apple Galette
- Tips for Success with Your Cinnamon Apple Galette
- Serving Suggestions: Apple Galette with Ice Cream and More
- Storage & Reheating Instructions for Leftover Apple Galette
- Variations: Caramel Apple Galette Ideas and Flavor Twists
- Frequently Asked Questions About This No Fuss Apple Pie Alternative
- Share Your Homemade Apple Galette Creation
Why This Easy Apple Galette Recipe is Your New Favorite Fall Apple Baking Staple
Honestly, you’ll pull this out of the oven and think, “Wow, I made that?” It looks fancy, but it’s deceivingly simple. This Easy Apple Galette Recipe is my go-to whenever I need a showstopper without the stress of a full pie preparation. It really captures that cozy feeling of Fall Apple Baking better than anything else, and it’s quickly taking over my holiday lineup!
Here are the major reasons this Homemade Apple Galette beats everything else:
- It’s super forgiving, which means no worries about perfectly crimped edges.
- The flavor profile is spot-on: sweet apples balanced perfectly with warm spices.
- It comes together faster than most scratch cakes, making it an amazing Quick Dessert Idea.
If you love spiced baked goods, you’ll definitely want to check out my Apple Cinnamon Muffins, or perhaps my spiced Apple Cranberry Cobbler for another easy option!
The Beauty of a Rustic Apple Tart: No Pie Dish Needed
Forget hunting down that perfect pie plate, because this is a true Rustic Apple Tart! The whole magic of a galette is that it’s free-form. You roll the dough right out onto parchment paper, pile up those gorgeous apples, and just fold the edges however they land. If your folds aren’t neat, honestly, it just looks more authentic. This forgiving nature makes it the ultimate No Fuss Apple Pie Alternative and a dream for beginner bakers!
Achieving the Perfect Flaky Crust Galette Every Time
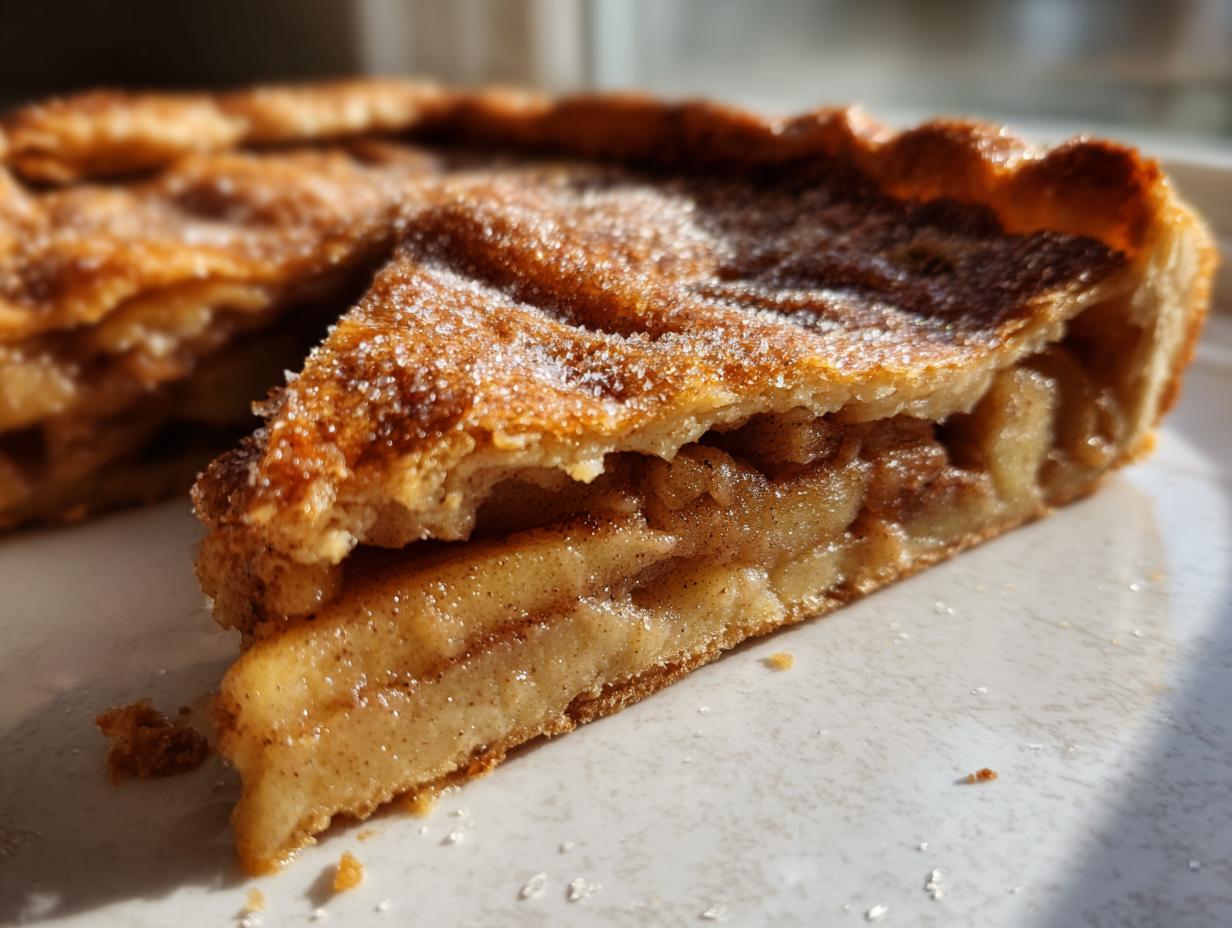
The crust! Oh, the crust is the star here. We are going for that amazing Flaky Crust Galette texture—all buttery layers that shatter when you cut into them. The secret to that flaky pastry? Keep everything cold! I mean ice-cold water and cold butter straight from the fridge—that’s what creates those steam pockets that burst open while baking. Don’t let your dough get warm while you work; if it feels sticky, pop the whole thing back in the fridge for ten minutes. Trust me; cold dough equals flaky gold!
Essential Ingredients for Your Homemade Apple Galette
Okay, you’re ready to bake! Even though this is an Easy Apple Galette Recipe, using quality ingredients really makes the difference between “good” and “I need to make this every week.” We’re keeping the ingredient list short and sweet, but remember that every component plays a vital role in achieving that perfect sweet-tart filling and that buttery, ready-in-a-second crust.
You’ll see 4 main components: the pastry (which I hope you’re making from scratch!), the apples, the spices, and a tiny bit of butter for topping. If you’ve ever made homemade applesauce, you know how much better fresh fruit tastes! For the spices, we’re sticking to the classics: cinnamon and nutmeg—nothing too wild, just pure comfort.
Best Apple Varieties for Galette Filling
This is where I spent way too much time experimenting so you don’t have to! You absolutely cannot just grab any old apple for this! If you use only sweet apples, the filling turns mushy and boring. If you use only tart ones, well, your teeth might hurt! The secret to a truly balanced Rustic Apple Tart flavor is mixing them up.
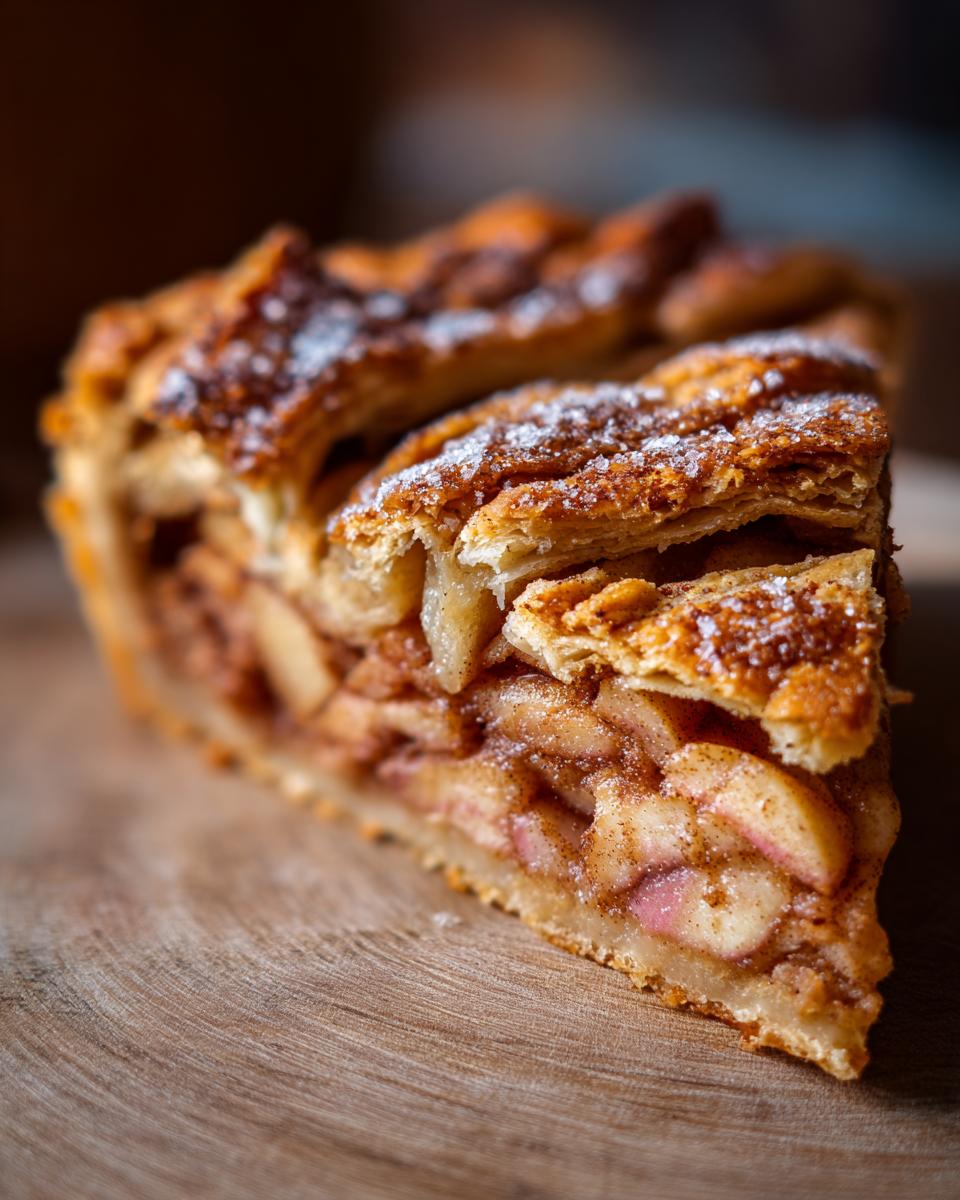
I always use a 50/50 split. Granny Smith brings that essential tartness and holds its shape nicely under the heat, so you get some chew. Then, I mix in something sweeter and crisp like Honeycrisp. That combination gives you the perfect texture profile and complex flavor that makes people ask for the recipe right away!
Step-by-Step Instructions for the Perfect Apple Galette
Okay, deep breath! This is the final push! Even though it’s a complete Homemade Apple Galette, the steps move really fast once you get going. Just remember the oven needs to be hot—preheat it to 400 degrees Fahrenheit right before you start assembling. We want everything ready to go so the pastry doesn’t get soft sitting around waiting for heat.
This is where you really see that rustic magic happen. Don’t worry about perfection here; think messy, casual, and delicious! If you’ve ever struggled with yeast, don’t worry, this is much easier than attempting a long-proof sourdough starter, which I save for my lazy weekends only!
Preparing the Apple Mixture for Your Rustic Apple Tart
First things first, grab that medium bowl. Dump in all your prepped apple slices. Now add your sugar, flour (that helps soak up the juices!), cinnamon, and nutmeg—make sure those spices look totally even. The lemon juice is absolutely key here, not just for balancing the sweetness, but it keeps those pretty white apples from turning yucky brown before they even hit the oven. Toss everything thoroughly until every single apple slice is glossy and coated. It should smell amazingly fragrant!
Assembling and Folding the Buttery Pastry Galette
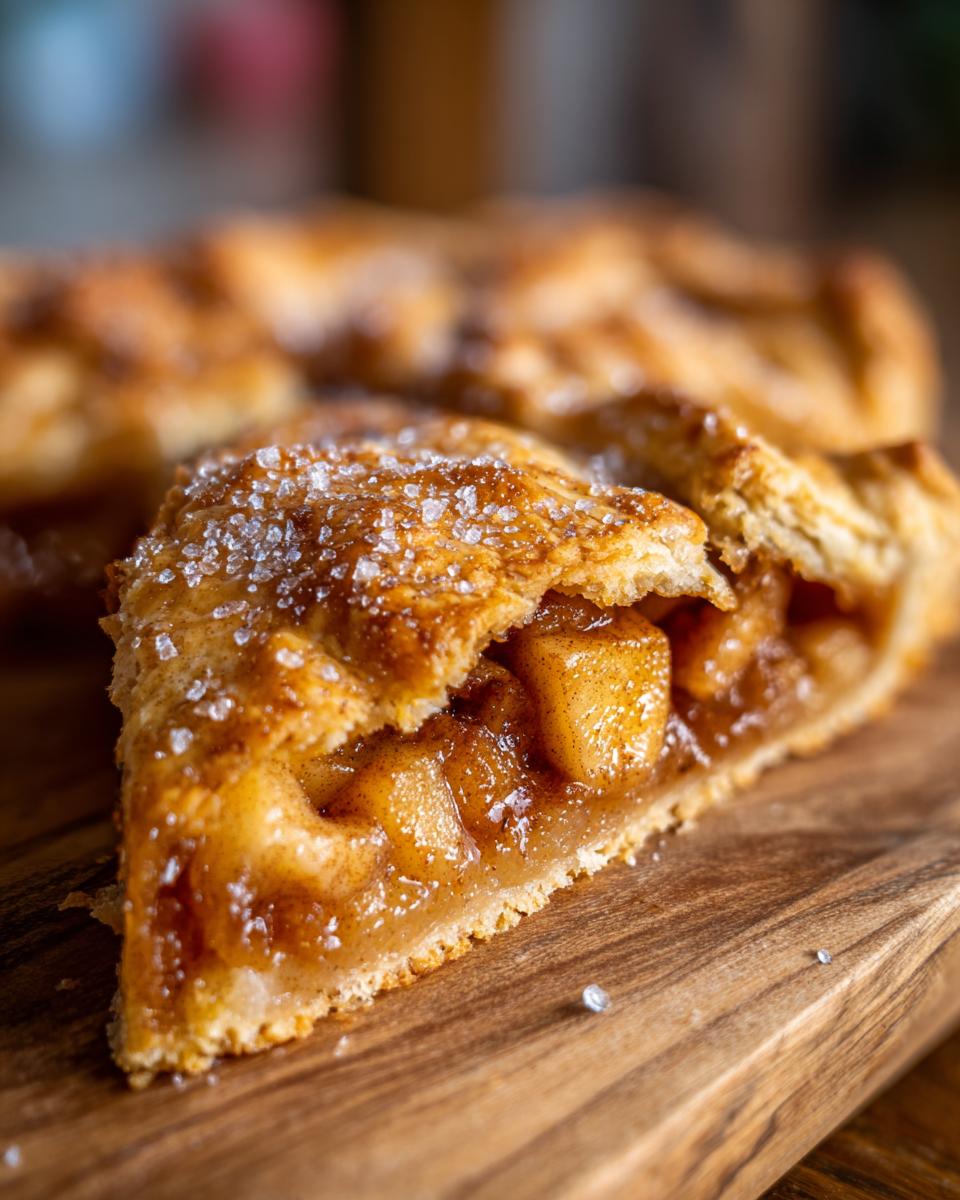
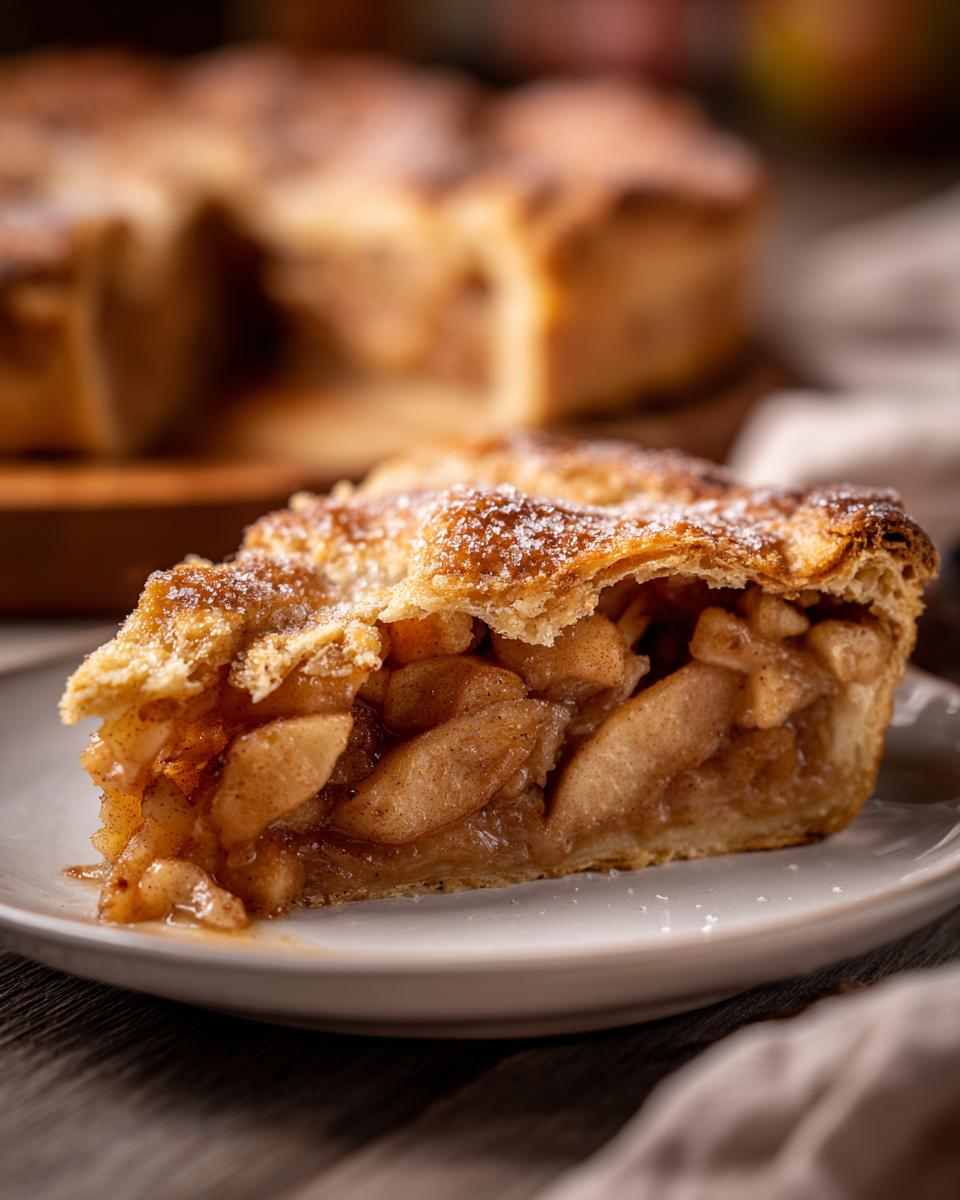
Time to roll! Lightly flour your counter and roll that chilled dough out into a rough 14-inch circle. It doesn’t have to be perfectly round; that’s the point of a Rustic Apple Tart! Carefully transfer that big circle onto a baking sheet lined with parchment paper—this is our safety net. Pile those coated apples right in the very middle, leaving a solid 2-inch border all the way around the edges. See those edges? Dot the apples on top with those tiny cubes of cold butter. Now, gently start folding the dough edges up and over the apples, overlapping the dough as you go around the circle. You’re aiming for a beautiful, exposed center! Brush the folded crust only with that beaten egg wash and sprinkle on your coarse sugar for that crucial crunch.
Pop that beauty into the hot oven and let it bake for about 35 to 45 minutes. You are looking for a beautifully golden-brown crust and apples that are bubbling happily in the center! Remember, let it cool on the sheet for at least 15 minutes before you dare try to slide a piece out!
Tips for Success with Your Cinnamon Apple Galette
Baking is supposed to be fun, not frustrating, so let’s talk about a couple of things that can trip people up when they make their first Cinnamon Apple Galette. I’ve included the best advice from the test notes, plus one trick I learned the hard way regarding soggy bottoms. We want that buttery crust to be crisp against the tender filling, right?
First, remember what the instructions said about apple variety: use a mix! Don’t skip using both sweet and tart apples. That combination isn’t just for flavor; the tart apples tend to hold their shape better, meaning you won’t end up with apple sauce in the middle of your lovely tart. That was one of my early mistakes when I first started playing with this Rustic Apple Tart!

Also, if you notice your edges browning way too fast before the apples look done—and this happens often—just grab a piece of aluminum foil and loosely tent it over the edges of the galette. It shields that delicate pastry from the direct heat while letting the center keep cooking. Easy fix!
Troubleshooting Common Apple Galette Issues
So, let’s tackle the big one: the dreaded soggy bottom. This happens because the apples release a ton of juice, and it seeps right into the dough before it has a chance to bake through. Here is my home cook secret for keeping that base dry! Before you put your apple mixture down on the dough, sprinkle a thin layer of that 2 tablespoons of flour (mixed with the sugar) directly onto the dough circle itself. Think of it as a tiny moisture barrier! This helps absorb the initial juices right where the filling meets the crust. It works wonders every single time, allowing you to have that perfect Flaky Crust Galette we are aiming for!
Another thing people worry about is that raw, floury look on the crust before baking. That egg wash we brush on? It’s not just about making it shiny; it helps the coarse sugar stick beautifully! If you want to explore more spice mixes in the future, maybe try adding a tiny pinch of cardamom next time while you’re whipping up your next pumpkin banana bread!
Serving Suggestions: Apple Galette with Ice Cream and More
Once your apple galette has cooled just enough so it won’t melt your topping instantly, it’s time for the best part! While I love getting rave reviews on my chewy chocolate chip cookies, serving this warm is non-negotiable. The absolute classic pairing—and your must-try winner—is a huge scoop of vanilla ice cream right on top. The contrast between the warm, spicy apples and the cold, creamy vanilla is just heavenly!
But it doesn’t stop there! If you aren’t feeling the ice cream, you can keep it elegant with a homemade dollop of lightly sweetened whipped cream. Or, go super simple like my grandma used to do: just a light dusting of powdered sugar over the exposed apples. Either way, this Rustic Apple Tart is the perfect end to any meal!
Storage & Reheating Instructions for Leftover Apple Galette
Don’t worry if you have leftovers! Honestly, they are almost as good the next day, but you need to treat that beautiful crust right. For short storage, room temperature is fine for one night, covered loosely. If you need it to last longer than that, wrap the whole galette tightly in plastic wrap and put it in the fridge—it’ll be good for about three days total. Don’t try the microwave for reheating, or you’ll end up with a soggy mess! Pop a slice into a 350-degree oven for about 8 minutes to crisp that bottom back up again.
Variations: Caramel Apple Galette Ideas and Flavor Twists
Once you’ve mastered the basic apple galette, it is so much fun to start playing around with the filling! We talked about this a little bit in the notes, but let’s expand on those tasty options now. If you are ready for something truly decadent, look no further than a Caramel Apple Galette Ideas experiment! Before you fold up your dough edges, take about two tablespoons of your favorite caramel sauce—the kind you might drizzle over a pecan cream pie—and just drizzle it right over the spiced apples. It bakes right in and gets wonderfully sticky and gooey!
But if caramel feels like too much, how about switching up the spices? That classic cinnamon and nutmeg blend is fantastic, but try adding a tiny pinch of ground cardamom. Wow! Cardamom gives whatever you bake such a warm, sophisticated lift. You can even substitute out some of the sugar for maple syrup if you want deeper, earthier notes in your Rustic Apple Tart. You see? Baking should never be boring. Have fun with it!
Frequently Asked Questions About This No Fuss Apple Pie Alternative
I get so many questions about this dessert because it seems too easy to be true! Like, “Is this really a proper Apple Galette Recipe or just a sad pie?” Absolutely not! It’s totally legit, elegant, and wonderfully honest. I’ve pulled the most common questions I get from folks who are ready to dive into making their first Rustic Apple Tart!
Can I use store-bought dough for this apple galette?
Yes, you totally can! That’s one of the main reasons this counts as an Easy Apple Galette Recipe. My preference is always homemade for that ultimate buttery flavor, but if you’re short on time, grab a high-quality, all-butter pie dough from the store. Just let it sit on the counter for about 10 minutes so it rolls out nicely. It’s still miles easier than making a double-crust pie, I promise!
How do I prevent the bottom of my apple galette from getting soggy?
That notorious soggy bottom, ugh! It’s awful when you’ve got a perfect filling stuck to a damp crust. You want that crisp base! If you’re worried about extra juice, here’s an extra tip beyond just using the flour/sugar mix in the apples. Before you place the apples onto your rolled dough circle, take an extra teaspoon of flour and sprinkle it lightly over the area where only the filling will sit. That little dusting acts like insurance against extra moisture. Also, making sure your oven is fully heated—400 degrees sharp—helps the bottom crust set instantly before the juices soak in too much.
Is this recipe suitable for Thanksgiving Apple Desserts?
Oh, it’s perfect for Thanksgiving! It’s one of my top Thanksgiving Apple Desserts now. It looks gorgeous on the dessert table, it frees up an oven rack because you aren’t fussing with multiple pie shells, and it slices beautifully for serving a crowd. It brings that classic, hearty apple flavor without adding more stress to your big meal prep day. It’s rustic, it’s comforting, and it means less work for you!
Share Your Homemade Apple Galette Creation
Now that you’ve got the secrets to that perfect, easy, buttery pastry and those tender spiced apples, I really, really want to see what you made! Baking is always better when you share the results, right? When you try out this Easy Apple Galette Recipe, please come back here and leave me a star rating. It helps other home cooks know that this recipe is a trustworthy favorite!
If you made any of those fun twists we talked about—maybe you added a drizzle of caramel or used maple syrup instead of some of the sugar—tell me all about it in the comments below! Did you serve your Apple Galette with Ice Cream? What apples did you choose? I love hearing how you adapt these heritage recipes in your own modern kitchens.
And hey, if you snapped a picture because your Rustic Apple Tart looked too stunning to forget, tag me on social media! Seeing your creations is seriously the best part of running this little kitchen corner. If you ever need to reach out about a baking question or just want to say hello, the Contact Page is always open!
PrintEasy Homemade Apple Galette: Rustic Fall Dessert

Make this easy apple galette, a simple, free-form tart that is a perfect, no-fuss alternative to apple pie. It features a buttery, flaky crust filled with tender, cinnamon-spiced apples.
- Prep Time: 25 min
- Cook Time: 40 min
- Total Time: 65 min
- Yield: 6 servings 1x
- Category: Dessert
- Method: Baking
- Cuisine: French
- Diet: Vegetarian
Ingredients
- 1 recipe for flaky pastry dough (enough for a single 12-inch crust)
- 4 large apples (like Honeycrisp or Granny Smith), peeled, cored, and thinly sliced
- 1/4 cup granulated sugar
- 2 tablespoons all-purpose flour
- 1 teaspoon ground cinnamon
- 1/4 teaspoon ground nutmeg
- 1 tablespoon lemon juice
- 1 tablespoon cold unsalted butter, cut into small pieces
- 1 large egg, beaten (for egg wash)
- 1 tablespoon coarse sugar, for sprinkling
Instructions
- Prepare your pastry dough. If homemade, chill it until firm. If using store-bought, let it sit at room temperature for 10 minutes.
- In a medium bowl, combine the sliced apples, granulated sugar, flour, cinnamon, nutmeg, and lemon juice. Toss gently until the apples are evenly coated.
- Preheat your oven to 400 degrees Fahrenheit (200 degrees Celsius). Line a baking sheet with parchment paper.
- On a lightly floured surface, roll the pastry dough into a rough 14-inch circle. Transfer the dough carefully to the prepared baking sheet.
- Arrange the apple mixture in the center of the dough, leaving a 2-inch border around the edge. Dot the top of the apples with the small pieces of cold butter.
- Fold the edges of the dough up and over the apples, overlapping slightly to create a rustic, free-form crust. The center of the filling will remain exposed.
- Brush the folded pastry edges with the beaten egg wash and sprinkle the coarse sugar over the crust.
- Bake for 35 to 45 minutes, or until the crust is golden brown and the apples are tender and bubbling.
- Let the galette cool on the baking sheet for at least 15 minutes before slicing and serving. Serve warm, perhaps with vanilla ice cream.
Notes
- For the best flaky crust, keep your butter and water very cold when making the dough.
- Use a mix of apple varieties for complex flavor. Honeycrisp provides sweetness, while Granny Smith adds necessary tartness.
- If you want a caramel apple galette, drizzle 2 tablespoons of caramel sauce over the apples before folding the edges.
Nutrition
- Serving Size: 1 slice
- Calories: 350
- Sugar: 25g
- Sodium: 250mg
- Fat: 18g
- Saturated Fat: 10g
- Unsaturated Fat: 8g
- Trans Fat: 0g
- Carbohydrates: 45g
- Fiber: 3g
- Protein: 5g
- Cholesterol: 50mg