

Oh, fall baking—nothing beats that warm, spiced aroma filling the kitchen, does it? When I smell cinnamon mingling with hot butter, I’m instantly transported back to my grandmother’s kitchen, even though we were usually working on something other than pie back then! But when it comes to apples, there is one king, and that king wears a crunchy, buttery crown: The crumb topping. Forget flimsy, plain pastry tops; we want texture! That’s why I’m sharing what I truly believe is the ultimate homemade dutch apple pie recipe you will ever need. This recipe zeroes in on creating that signature, shatteringly crisp streusel that makes every slice of this Dutch Apple Pie a complete celebration. Thinking about how good this is makes me want to whip up a batch of that spiced pumpkin banana bread right after. Trust me, once you master this topping, you’ll never go back!
- Why This is the Best dutch apple pie recipe You Will Make
- Gathering Ingredients for Your dutch apple pie recipe
- Step-by-Step Instructions for the Homemade dutch apple pie recipe
- Tips for Success with Your dutch apple pie recipe
- Variations for This Apple Dessert Ideas
- Storage and Reheating Instructions for the dutch apple pie recipe
- Serving Suggestions for Your Crumb Topping Pie
- Frequently Asked Questions About the dutch apple pie recipe
- Estimated Nutritional Data for This dutch apple pie recipe
- Share Your Baking Success
- Estimated Nutritional Data for This dutch apple pie recipe
- Share Your Baking Success
Why This is the Best dutch apple pie recipe You Will Make
You’ve looked high and low for the Best Apple Pie Recipe, right? I get it. My version takes everything wonderful about fall baking and cranks it up a notch. What sets this apart from just a regular pie is absolute focus on texture. We’re aiming for layered perfection. You get that fantastic, flaky bottom crust, but the star is always the topping that makes this a true Comfort Food Baking masterpiece.
When you bake this, you’re making a real statement. Everything is built around two core elements that work together beautifully.
The Secret to the Perfect Buttery Crumb Topping
This isn’t just a sprinkle; it’s the soul of the dutch apple pie recipe! The secret here is simple geometry and temperature. You need that perfect ratio of flour, sugar (both brown and white for depth!), and crucially, very cold butter cut into cubes. When you mix it, don’t work it until it’s smooth—we want coarse crumbs, some pea-sized, some slightly smaller. That variation is what gives you that incredible crunch after baking.
Balancing the Spiced Apple Filling
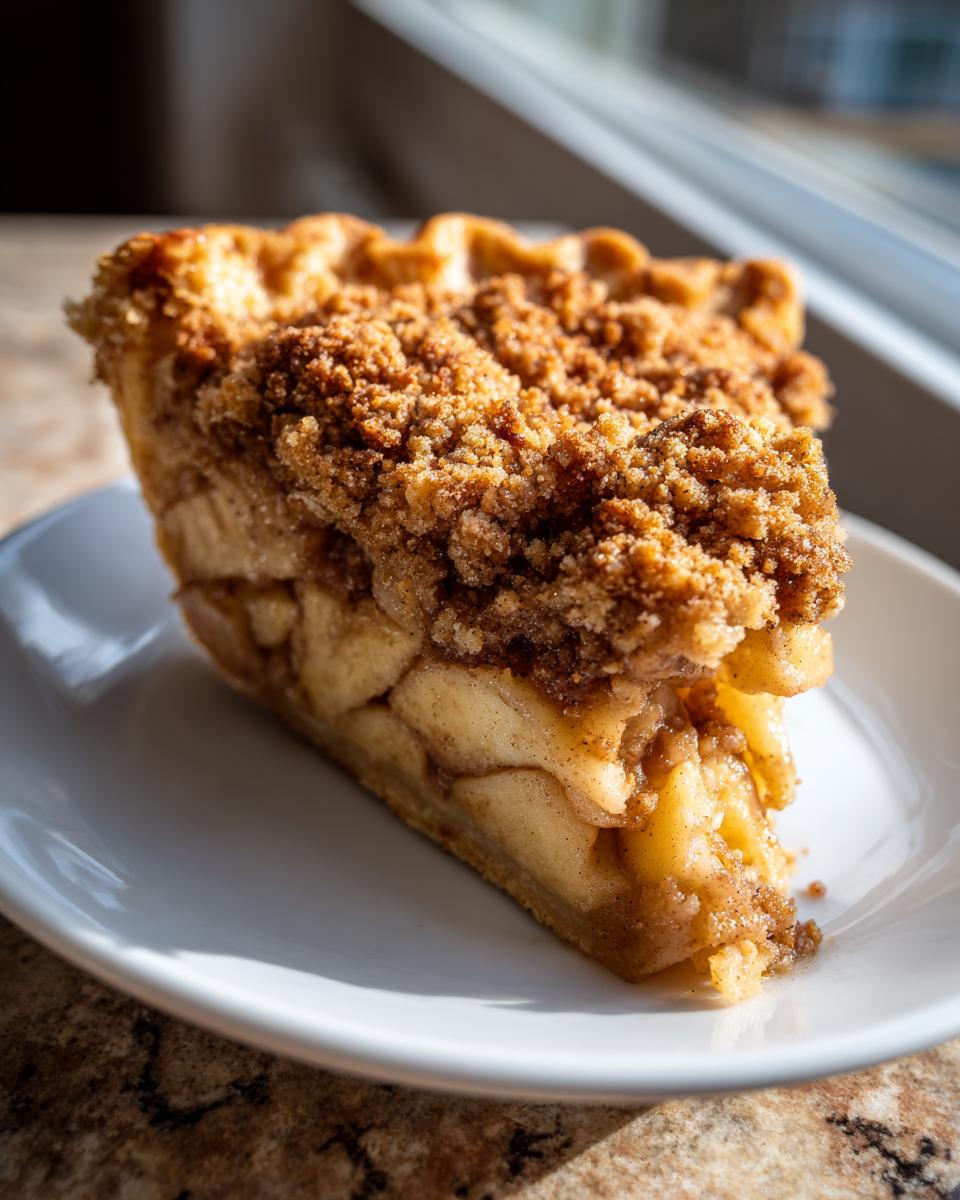
For the filling, you need apples that hold up to the heat. I always grab Granny Smiths because their tartness cuts right through the sweetness of the crumb. We spice it intentionally—cinnamon is central, sure, but don’t skip the nutmeg and allspice! That little whisper of spice elevates the entire Spiced Apple Filling from just ‘sweet’ to wonderfully complex. The lemon juice gives it that necessary brightness, too.
If you’re looking for another great apple bake, check out my apple cinnamon muffins for a grab-and-go treat!
Gathering Ingredients for Your dutch apple pie recipe
Alright, now that we know why this pie is the absolute best, we need to talk about the toolkit. Getting the ingredients right is non-negotiable if we want that signature crispness and flavor that truly defines a dutch apple pie recipe. I’ve broken this down so there’s no confusion about what goes where—especially since the topping uses similar components to the filling, but in very different forms!
We’re assuming you have a favorite recipe for a double pie crust ready to go, which is crucial because this beauty needs a solid base. For everything else, pull out your measuring cups! If you’re looking for another comforting apple bake, my apple cranberry cobbler is fantastic when you want something simpler.
For the Pie Crust and Spiced Apple Filling
This is where we build the foundation and create that fragrant, tender fruit medley. Remember, everything needs to be ready before the oven gets hot!
- You’ll need your existing recipe for a double pie crust. We only use one half for the bottom dish, but having the second ready is smart.
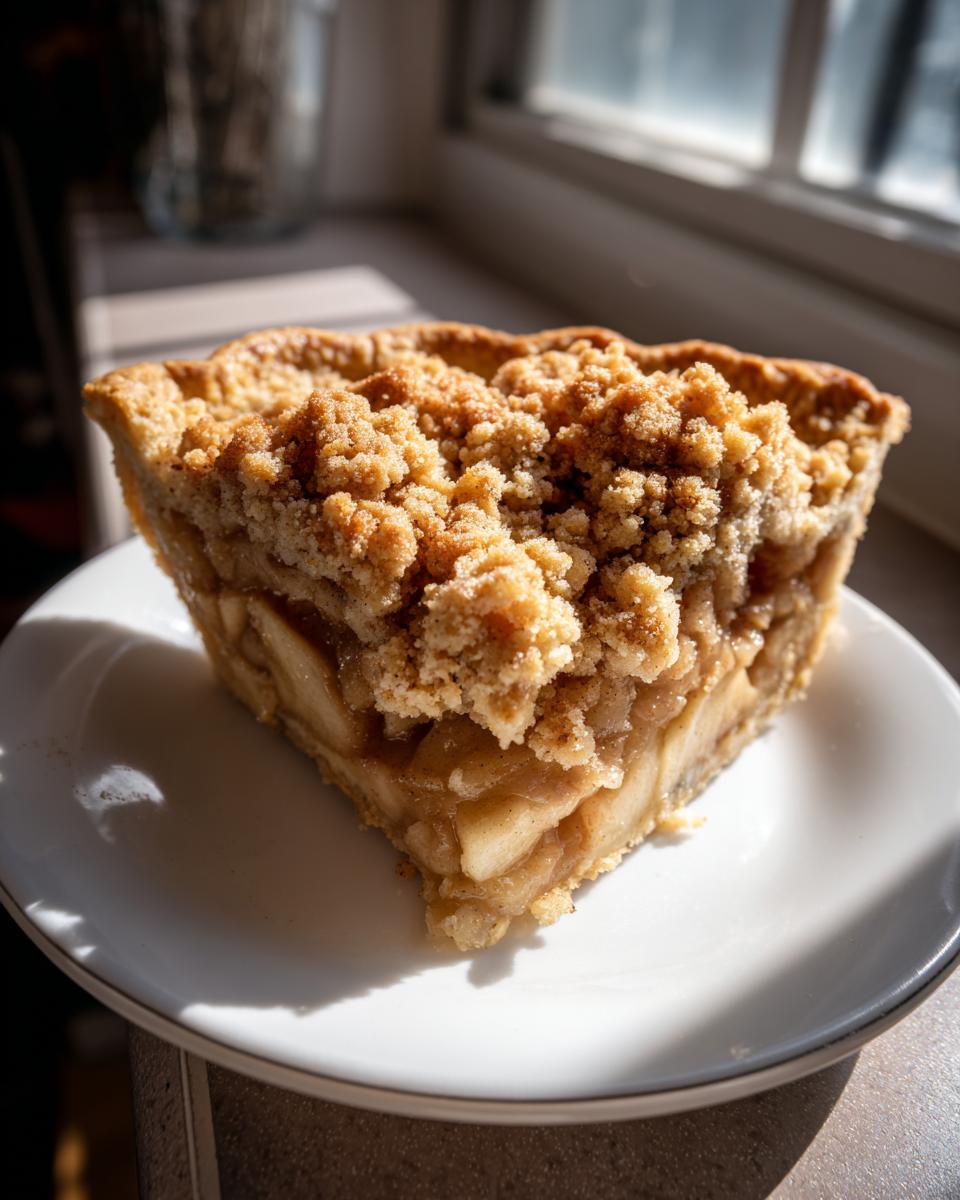
- Apples: 6 large Granny Smith apples, peeled, cored, and—this is important—sliced exactly 1/4 inch thick. We don’t want mush!
- 1/2 cup granulated sugar
- 1/4 cup packed light brown sugar (get those molasses notes in there!)
- 2 tablespoons all-purpose flour to help thicken the juices.
- 1 teaspoon ground cinnamon
- 1/4 teaspoon ground nutmeg
- 1/8 teaspoon ground allspice
- 1 tablespoon fresh lemon juice
- 1 tablespoon unsalted butter, cut into those little pea-sized pieces to dot the top.
- 1 large egg, beaten with 1 teaspoon water for the egg wash on those exposed crust edges.
For the Buttery Crumb Topping
This is the real showstopper! Remember what I said about temperature? The butter here *must* be cold. We are cutting it in, not melting it. If it’s warm, you might as well be making cake batter, and we want crumbs!
- 1 1/2 cups all-purpose flour
- 1 cup packed light brown sugar
- 1/2 cup granulated sugar
- 1/2 teaspoon ground cinnamon (yes, more cinnamon!)
- 1/4 teaspoon salt to balance the sweetness beautifully.
- 1 cup (that’s 2 full sticks) of very cold unsalted butter, cut into small cubes. Seriously, check that butter is chilled right before you start mixing this part.
Step-by-Step Instructions for the Homemade dutch apple pie recipe
Okay, let’s do this! Baking a perfect dutch apple pie recipe involves teamwork between the chilling stage and the two-temperature bake. I’ve mapped out the instructions exactly as they need to happen so you get that gorgeous crispy topping and a filling that sets up beautifully. When you’re working with a deep dish pie like this, timing really matters, so don’t rush the cooling phase! If you’re looking for a simpler apple bake after this marathon, try out my apple pie dump cake.
Preparing the Crust and Apple Filling
We start cold and gentle here. You want your pie crust dough chilling when you begin this stage. Remember, happy crust equals flaky crust!
- Take half of your double pie crust dough and roll it out gently. Fit it beautifully into your 9-inch pie dish. Trim the edges so they look tidy, and pop it right back into the fridge while you tackle the apples. Keeping that bottom crust cold prevents shrinkage in the oven.
- Now for the flavor layer! In a really big bowl—we don’t want to bruise those apples—combine your 1/4 inch thick apple slices with the granulated sugar, brown sugar, flour, and all those lovely spices: cinnamon, nutmeg, and allspice. Add the lemon juice last and toss everything together super gently. I use my hands for this, just a quick lift-and-fold motion, until every slice has a light coat of spice mix.
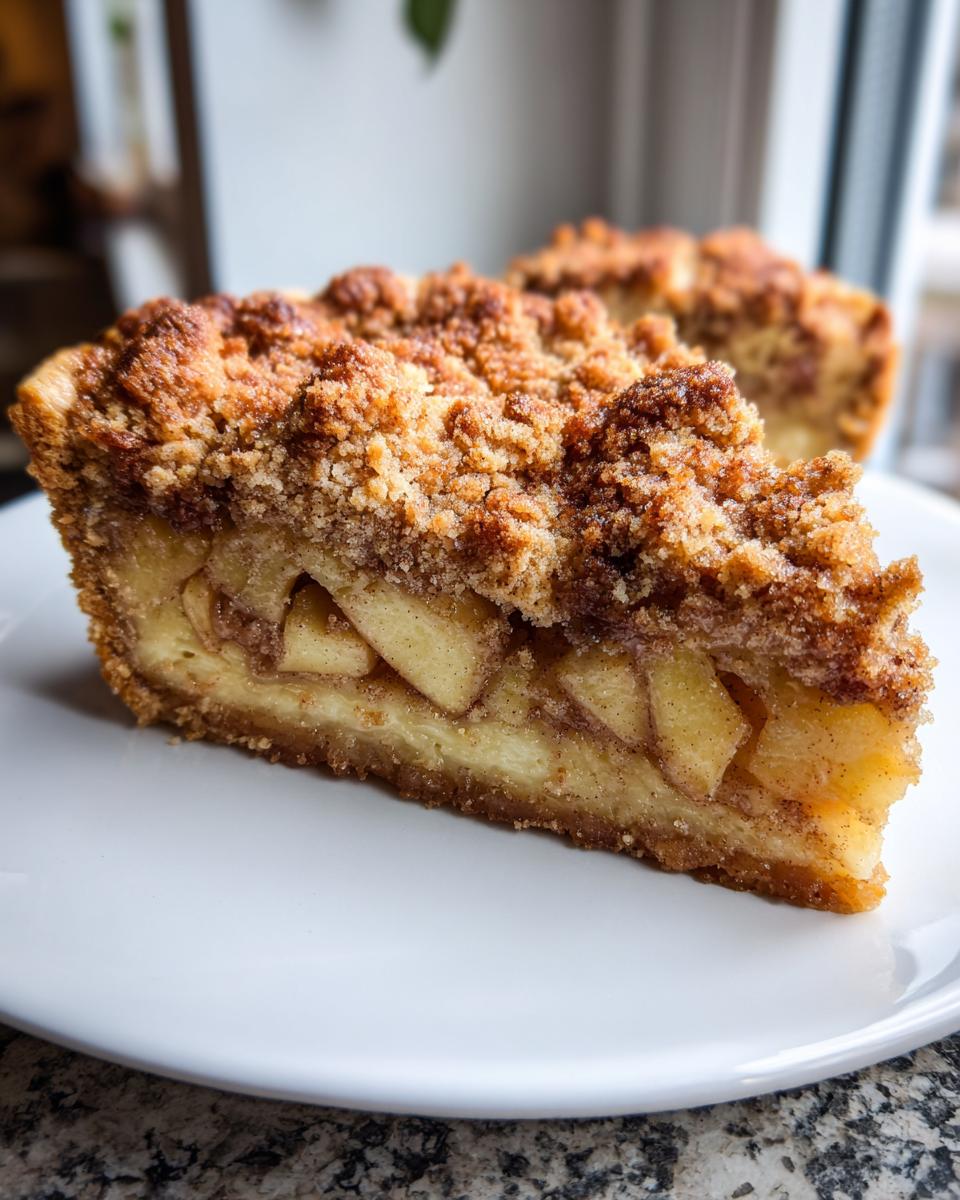
Creating the Signature Streusel Apple Pie Topping
This is the fun part where we make the magic happen for your Crumb Topping Pie. Remember our rule: cold, cold, cold butter! If your hands get warm during this process, just dip them in icy sink water for a quick second before diving back in.
- In a separate bowl—not the one with the apples, we keep things separate here—whisk the topping ingredients: flour, both sugars, cinnamon, and salt.
- Now for the cutting in. Take your cubed, cold butter and drop it into the mixture. Use a pastry blender if you have one, or just your fingertips! Work the butter into the dry mix until you have coarse crumbs. We’re looking for varied sizes, some like lentils, some like little peas. If you overwork it and it becomes sandy, it will melt right in, and that defeats the purpose!
Baking and Setting the dutch apple pie recipe
We use a two-stage baking method here. This is vital! That initial high blast gets the bottom crust cooking before the filling releases all its steam, and the lower temperature finishes everything off perfectly without burning that beautiful streusel.
- Get your oven preheated to 425 degrees Fahrenheit. Place that chilled pie dish (with the bottom crust) onto a sturdy baking sheet—this catches any drips, which is a lifesaver, honestly.
- Pour that glorious apple filling right into the cold crust so it piles up nicely. Dot the very top of the apples with those small pieces of butter we prepped earlier.
- Take your prepared crumb topping and sprinkle it evenly and generously over the apples. Don’t pack it down! I like to see peaks and valleys.
- Now, take that egg wash you mixed up and brush it lightly only onto the exposed edges of the bottom pie crust. This helps it brown nicely and seals it a little.
- Bake at 425 degrees Fahrenheit for exactly 15 minutes. Set a timer!
- After 15 minutes, turn the oven down immediately to 375 degrees Fahrenheit. Continue baking for another 40 to 50 minutes. If you see the topping getting too dark before the apples are done, just loosely drape a sheet of aluminum foil over the top.
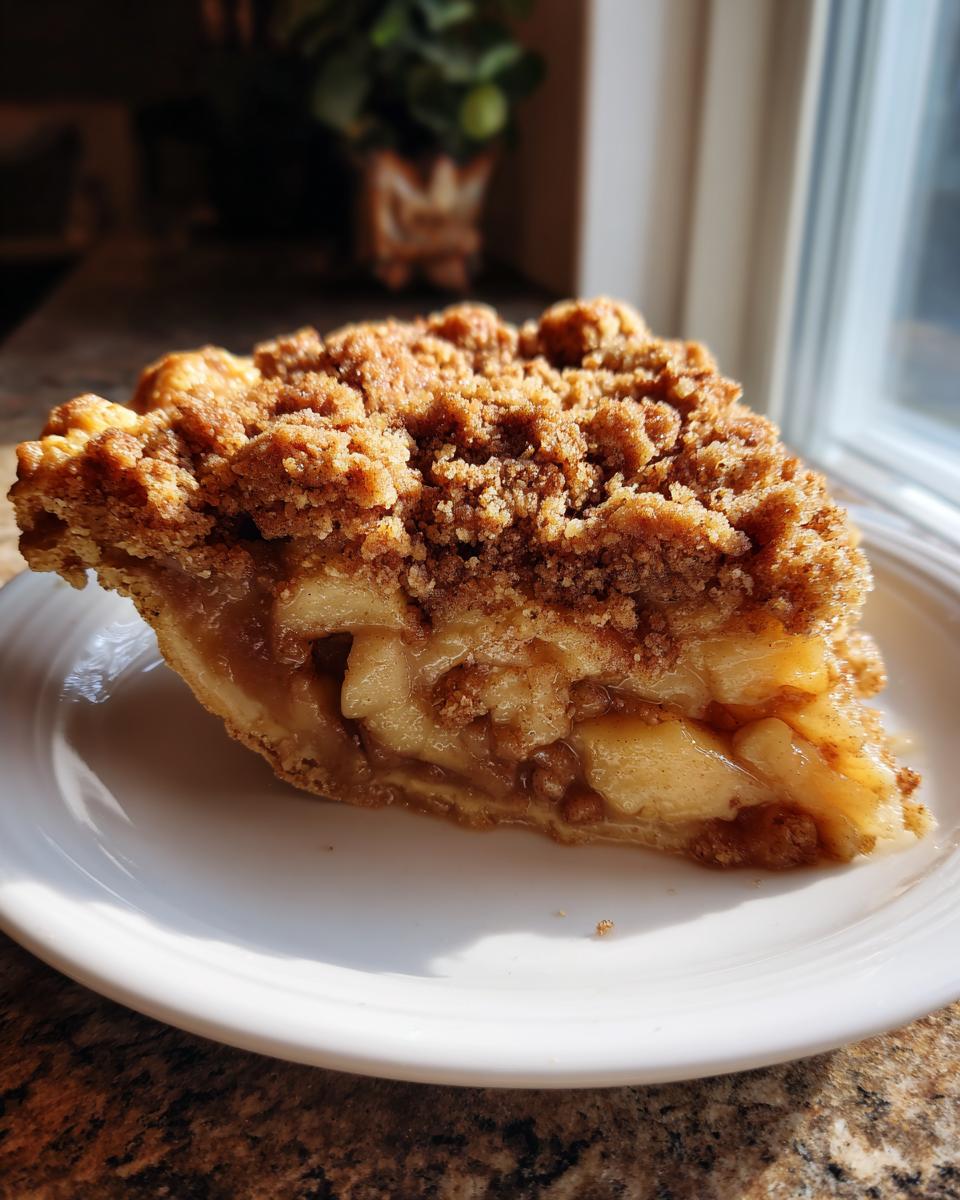
- When it’s done, the filling should be thick and bubbling up nicely between the crumbs. But here’s the hardest part: Let the dutch apple pie recipe cool on a wire rack for a minimum of 3 hours. Seriously, don’t slice it early! If you cut it too soon, all those wonderful juices will run right out, and you’ll end up with a plate of soup instead of a slice of pie.
While you wait for it to set, maybe check out this amazing apple cider braised pork shoulder for dinner tonight. Keep that apple theme going!
Tips for Success with Your dutch apple pie recipe
It took me years of baking to truly nail this recipe, and I mean *years*. My biggest early struggle with any dutch apple pie recipe was the dreaded soggy bottom. You spend all that time making the perfect, crisp streusel, only to cut into a beautiful slice and find a wet, raw crust underneath. Ugh, it’s heartbreaking!
The first time I made a pie that ended up soggy, I blamed the apples, then the oven. Then I remembered my kitchen mentor—my Aunt Carol—telling me, “Maddie, the heat needs to hit the bottom first!” So, here are the real game-changers that ensure your Homemade Dutch Apple Pie comes out perfect, just like mine (finally!) started coming out.
Combatting the Soggy Bottom
This is vital for any deep-dish pie, but especially for a heavily filled one like ours. You need to create a barrier against that gorgeous apple juice!
- Use a Glass or Ceramic Dish: These materials retain heat better than metal pans, which helps cook the bottom crust more evenly. Metal often cooks too fast on the sides and edges before the center bottom is done.
- The Egg Wash Trick: I brush the egg wash not just around the rim, but also lightly paint the bottom crust once it’s in the chilled dish. It seals those little pores in the dough!
- The Baking Sheet: Never, ever skip placing your pie on a sheet pan before putting it in the oven! It directs heat right up into the bottom of the crust. If you look at the instructions, you see that high initial temperature blast—that’s key for setting that bottom crust fast.
Keeping the Streusel Crunchy
On the flip side, we’ve already talked about cold butter for the topping, but I wanted to share a trick I learned from checking out other great bakers like those at The Food Charlatan—sometimes even perfect toppings need a little defense against over-browning while the apples cook through.
If you’re baking on a humid day, or if your apples were extra juicy, you might notice the topping getting dark too fast. Don’t be afraid to shield it! Loosely tenting that pie with aluminum foil is totally acceptable. It lets the heat circulate enough to finish cooking the apples without turning your beautiful golden brown topping into charcoal. It’s all about balance, right? Speaking of balance, if you’re getting into baking fundamentals, my tips for making a great sourdough starter might interest you!
The Importance of That Cooling Time
I know, three hours sounds like an eternity when you smell hot cinnamon and sugar, but this is where the pie sets its structure. If you cut early, the sugars haven’t reorganized, the flour in the filling hasn’t fully gelled—and you get soup. Patience is the final ingredient in this dutch apple pie recipe!
Variations for This Apple Dessert Ideas
While I think this version is the absolute pinnacle of Fall Desserts, I know every kitchen is a laboratory! Baking is so much fun because you can totally tweak things based on what you have or what mood you’re in. If you feel like experimenting beyond the classic spiced apples, I have a few favorite adjustments that keep this delightful as one of our go-to Apple Dessert Ideas.
Don’t feel chained to Granny Smith, either! Variety in apples is fantastic, though you have to respect their texture. If you use softer apples, like McIntosh, you absolutely need to increase the flour or the cornstarch in the filling because they break down much faster.
Switch up Your Spice Profile
Cinnamon, nutmeg, and allspice are the holy trinity, but sometimes you need a little something extra, especially if you’re serving this as a cozy treat on a chilly evening. Think beyond the basic spice rack!
- Cardamom Kick: Try substituting a quarter teaspoon of the cinnamon with ground cardamom. It gives a more floral, slightly citrusy lift that is just heavenly with the brown sugar.
- Ginger Heat: If you love a little bite, add a half teaspoon of ground ginger, or even better, add a tablespoon of finely minced fresh ginger to the apple mixture. It feels so wonderfully warming!
- Depth with Tonka or Vanilla: If you happen to have vanilla bean paste, add a generous teaspoon to the apple filling. It won’t change the look, but the flavor deepens immediately.
Mix Up the Topping Texture
The crumb topping is where you can go truly wild and turn this into something new, almost like an apple crisp! It still functions much the same way, but the mix-ins make all the difference.
- Nutty Crunch: Fold in about a cup of chopped pecans or walnuts right before you sprinkle the topping onto the pie. Toasting them lightly beforehand will really bring out their flavor, making it a perfect holiday addition.
- Oatmeal Streusel: Swap out a half cup of the flour in the topping for rolled oats—quick-cooking or old-fashioned work well. This gives your topping an incredible chewy-crunch that folks just go nuts for. It definitely leans into that pumpkin dip with cool whip level of comfort!
- Citrus Zest Magic: Before you cut the butter into the crumb mixture, add the zest of one whole lemon or orange. As the topping bakes, the oil from the zest releases, giving the crunch a bright, almost candied flavor. It contrasts beautifully with the rich brown sugar base.
Remember, every small change creates a slightly different experience, but as long as you keep that butter cold for the topping, you’re doing great!
Storage and Reheating Instructions for the dutch apple pie recipe
So, you managed to have leftovers? That is a rare and wonderful thing with this dutch apple pie recipe! Since the streusel topping is the star, our main goal in storage is protecting that buttery crunch. Trust me, dealing with a soft, soggy topping is the great tragedy of any leftover fruit pie.
We need to give the pie time to firm up completely before wrapping, too. Never try to wrap it warm, or you’re just trapping steam, and that equals instant sogginess. If you need to store or reheat this beauty later, here’s how I manage it in my own kitchen.
Room Temperature Storage Secrets
If you baked this pie yesterday and you know you’ll eat it today—maybe within 12 hours or so—you can absolutely leave it on the counter. Just cover it loosely with a cake dome or even a very large bowl turned upside down. You want air circulation so the moisture doesn’t get trapped right against that lovely crumb topping.
However, because we packed this with so much delicious fruit, I generally don’t recommend leaving it out longer than 24 hours, especially if your kitchen is warm. For longer storage, we have to chill it down.
Keeping Your Pie Fresh in the Fridge
For anything longer than a day, the refrigerator is your friend. Again, the key here is air management. I used to just wrap the whole thing, but now I know better. If you wrap it tightly right away, condensation forms, and *poof*—the topping is soft.
Here’s what I do for the fridge: Let the pie cool completely—and I mean stone cold—on the counter first. Once it’s cold, I take a piece of parchment paper or wax paper and lay it directly *over* the crumb topping to protect it from sticking to the wrap. Then, I loosely cover the whole pie with plastic wrap or foil. This keeps the crust from getting tough while still allowing a little breathability.
It keeps great for about four days this way. If you are saving those slices for tomorrow’s breakfast, you might want to check out my recipe for moist date nut bread too, just for variety!
Reheating to Maximize That Crispness
When you pull a slice out of the fridge, it’s going to be firm, and honestly, the streusel will have softened a bit. Don’t microwave it! Microwaving fruit pies is the quickest way to turn that perfect crumb topping into dense, warm mush. We need dry heat!
Here’s my preferred method for bringing a slice of this dutch apple pie recipe back to life:
- Preheat your oven or toaster oven to about 350 degrees Fahrenheit.
- Place the slice directly on a small baking sheet or a piece of foil.
- Bake for about 10 to 12 minutes. This gentle heat warms the apples right through, melts the butter content in the crumb topping just enough to make it aromatic, and dries out any surface moisture that accumulated while chilling.
When it comes out, the edges of that crumb layer will be beautifully crisp again, and the whole thing will taste like it just came out of the oven. If you like, serve it warm with a scoop of vanilla ice cream for the ultimate comforting treat!
Serving Suggestions for Your Crumb Topping Pie
You’ve done the hard work. You’ve mastered the spices, you nailed that flaky bottom, and triumphantly, you created that spectacular, crisp Crumb Topping Pie. Now comes the best part: deciding how to serve this masterpiece! Honestly, a perfect slice stands beautifully on its own, but we are home cooks, and that means piling on the extras! Serving this pie properly is like giving it the perfect bow on top of a wonderful gift. It just elevates the whole dessert experience, especially when you move into dinner party territory.
When I bring this pie to gatherings, people always ask what I’m serving it with. My favorites are simple, classic accompaniments that don’t fight with the layered spices we worked so hard to create. If you enjoy this, you absolutely have to check out my recipe for brown butter peach cobbler next time you need another incredible fruit dessert!
The Essential Scoop of Ice Cream
This is a non-negotiable for me, especially when I serve it slightly warm. You need that temperature contrast! Cold, hard vanilla ice cream works magic against the warm, spiced apples.
- Vanilla Bean, Please: If you can manage it, go for a good quality vanilla bean ice cream. The little flecks of real vanilla bean add a sophisticated counterpoint to the cinnamon and nutmeg in the filling.
- Salted Caramel Twist: If vanilla feels too plain, use a salted caramel ice cream. The touch of salt dramatically enhances the sweetness from the brown sugar in the streusel. It’s decadent, but oh so worth it for a holiday treat.
The Role of Cream (Because We Deserve It)
If ice cream melts too fast on a hot pie, or if you just prefer something lighter that won’t overwhelm the texture of that wonderful crumb topping, whipped cream is the answer. But don’t grab the aerosol can if you can help it!
Whipping your own cream only takes about three minutes and tastes infinitely better. Just use heavy cream whipped until soft peaks form. You can sweeten it lightly, but honestly, the pie is sweet enough.
- Lightly Sweetened Classic Cream: Whip heavy cream with just a tiny drizzle of maple syrup instead of powdered sugar. Maple pairs beautifully with apples and baked goods.
- Cinnamon Whipped Cream: Stir in a tiny pinch of ground cinnamon and maybe a quarter teaspoon of vanilla extract into your heavy cream before whipping. It mirrors the flavors inside the pie perfectly.
Serving Temperature Matters
Remember how I stressed that 3-hour cooling time? When serving, aim for “room temperature but slightly warm.” You don’t want it steaming hot, but you definitely don’t want it fridge-cold.
If your leftovers have been in the fridge (and I’m assuming you cut them into slices first!), reheat them gently. I reheat individual slices in a low oven—about 350 degrees for 10 minutes. This brings the apples back to life and re-crisps the edges of that beautiful topping without melting your ice cream instantly upon serving. It’s all about respecting the textures we worked hard to achieve!
Frequently Asked Questions About the dutch apple pie recipe
Whenever I share a recipe this detailed, questions always pop up! That’s totally normal, especially when we are digging deep into a classic like this. Everyone wants to make sure their dutch apple pie recipe turns out exactly how they pictured it—golden, crunchy on top, and perfectly spiced inside. I’ve gathered the most common things people ask me about to save you some guesswork. When you master this technique, you realize how straightforward amazing baking can be!
Can I make the dutch apple pie recipe ahead of time?
Yes, you absolutely can! Preparing ahead of time is great, especially if you’re managing a big holiday menu. But here’s my big rule for a Crumb Topping Pie: keep the components separate until the very last minute. You can easily mix your apple filling and keep it tightly covered in the fridge for up to 24 hours. Also, you can mix the streusel topping completely and store that in an airtight container in the fridge for a couple of days.
The crust is the only thing I really advise making the day you plan to bake, or buying pre-made if that’s your shortcut. When you go to assemble, just toss the filling, top it with the chilled streusel, and bake according to the directions. If the topping has been chilling, it might need an extra five minutes of baking time, so just keep an eye on things!
What apples are best for this Apple Pie Recipe?
I’m sticking to my guns here: Granny Smiths are the gold standard for nearly any baked apple dessert, including this Apple Pie Recipe featuring the crumb top. They are wonderfully tart, which balances the incredible sweetness of that streusel, and more importantly, they hold their shape. They don’t turn to applesauce halfway through the bake!
If you absolutely must mix varieties, pairing a firm, tart apple like Granny Smith with a slightly softer one that has good flavor, like Honeycrisp or Braeburn, works well. Just make sure you cut them all to the same 1/4-inch thickness. If you want more flavor ideas, check out how I adjust the spices in my jiffy corn casserole—sometimes a simple spice swap makes all the difference!
How do I prevent the topping from getting soggy later?
Oh, the dreaded softness! This usually happens when the pie cools or is stored improperly. The best defense is the same defense we use against a soggy bottom: baking it right! Make sure you use that two-stage baking method, hitting it with high heat first to really set the bottom crust and bake off surface moisture. Also, when you store the leftovers, make sure they are fully cooled, covered loosely (I use parchment paper first, remember?), and kept out of the steamy fridge environment if you plan to eat the slice within 12 hours.
If you’re storing it in the fridge for more than a day, you have to reheat it properly. Never microwave! Reheat slices in a 350-degree oven for about 10 minutes to crisp that topping back up. If you’re interested in other classic pies, you might want to look up this Dutch Apple Pie recipe I found that folks really love, too!
Estimated Nutritional Data for This dutch apple pie recipe
Now, I’m definitely not making this pie for health reasons, but I also believe in being totally transparent about what we’re eating. After all, this is your kitchen, and you deserve to know exactly what you’re pulling out of that oven! Since we use a full cup of butter in that spectacular crumb topping alone, you can imagine this is a truly rich treat.
Please remember that this is just an estimate based on standard ingredients and assuming an 8-slice yield. If you use half butter and half coconut oil in the topping, or if you use baking apples that are much smaller, your numbers will shift! This is a ballpark guide for your wonderful, indulgent dutch apple pie recipe.
Here is the estimated breakdown for one slice:
- Serving Size: 1 slice
- Calories: 450
- Sugar: 35g
- Sodium: 250mg
- Fat: 25g (That’s the butter talking!)
- Saturated Fat: 15g
- Unsaturated Fat: 10g
- Trans Fat: 0g (Hooray for real butter!)
- Carbohydrates: 58g
- Fiber: 4g
- Protein: 5g
- Cholesterol: 75mg
If you want to lighten this up just a touch without sacrificing flavor—I know, I know—you could try reducing the sugar in the crumb topping just slightly, maybe by a quarter cup total, and see how you like it. If you’re planning out your week, maybe pair this magnificent dessert with a savory meal from my easy cornbread recipe to balance things out!
Share Your Baking Success
I truly hope you enjoy making this pie as much as I do. Pulling that beautiful, fragrant, crunchy-topped pie out of the oven is one of the best feelings in the world, second only to maybe eating the first slice! This recipe aims to be the best flavor bridge between the classic apple pie recipe memories we hold and the need for that incredible, craveable texture that only a real streusel can provide.
If you followed along and your kitchen smells as amazing as mine does right now, please come back and tell me about it! I absolutely live to see what you all create. Did you try adding pecans to the topping? Did you manage that 3-hour cool down like a champion? Drop a rating below, leave a comment, and share a picture so I can see your glorious Homemade Dutch Apple Pie. You can also see what others made when they tried my chewy chocolate chip cookies!
And if you’re looking for more great inspiration, check out what the folks at Easy Savory made when they tackled their Dutch apple pie recipe!
Estimated Nutritional Data for This dutch apple pie recipe
Now, I’m definitely not making this pie for health reasons, but I also believe in being totally transparent about what we’re eating. After all, this is your kitchen, and you deserve to know exactly what you’re pulling out of that oven! Since we use a full cup of butter in that spectacular crumb topping alone, you can imagine this is a truly rich treat.
Please remember that this is just an estimate based on standard ingredients and assuming an 8-slice yield. If you use half butter and half coconut oil in the topping, or if you use baking apples that are much smaller, your numbers will shift! This is a ballpark guide for your wonderful, indulgent dutch apple pie recipe.
Here is the estimated breakdown for one slice:
- Serving Size: 1 slice
- Calories: 450
- Sugar: 35g
- Sodium: 250mg
- Fat: 25g (That’s the butter talking!)
- Saturated Fat: 15g
- Unsaturated Fat: 10g
- Trans Fat: 0g (Hooray for real butter!)
- Carbohydrates: 58g
- Fiber: 4g
- Protein: 5g
- Cholesterol: 75mg
If you want to lighten this up just a touch without sacrificing flavor—I know, I know—you could try reducing the sugar in the crumb topping just slightly, maybe by a quarter cup total, and see how you like it. If you’re planning out your week, maybe pair this magnificent dessert with a savory meal from my easy cornbread recipe to balance things out!
Share Your Baking Success
I truly hope you enjoy making this pie as much as I do. Pulling that beautiful, fragrant, crunchy-topped pie out of the oven is one of the best feelings in the world, second only to maybe eating the first slice! This recipe aims to be the best flavor bridge between the classic apple pie recipe memories we hold and the need for that incredible, craveable texture that only a real streusel can provide.
If you followed along and your kitchen smells as amazing as mine does right now, please come back and tell me about it! I absolutely live to see what you all create. Did you try adding pecans to the topping based on my suggestions? Did you manage that 3-hour cool down like a champion? Drop a rating below, leave a comment, and share a picture so I can see your glorious Homemade Dutch Apple Pie. I love seeing real results in real kitchens!
When I share these recipes, I’m sharing a piece of my family’s history, and seeing it successful on your table means everything to me. If you loved the challenge of this pie, you should definitely check out the feedback I get on my chewy chocolate chip cookies—those are simple but deeply satisfying too!
And if you’re looking for more inspiration on similar bakes, I always recommend seeing what other bakers are trying! You can check out what the folks at Easy Savory made when they tackled their Dutch apple pie recipe for some fun variations while you’re here!
PrintThe Ultimate Homemade Dutch Apple Pie with Perfect Buttery Crumb Topping

Make this Dutch Apple Pie from scratch. It features a flaky crust, sweet cinnamon-spiced apples, and the signature buttery, crisp streusel topping. This is the best apple pie recipe for fall baking and holiday gatherings.
- Prep Time: 35 min
- Cook Time: 65 min
- Total Time: 100 min
- Yield: 8 servings 1x
- Category: Dessert
- Method: Baking
- Cuisine: American
- Diet: Vegetarian
Ingredients
- 1 recipe for double pie crust (for bottom crust and lattice/edge)
- 6 large Granny Smith apples, peeled, cored, and sliced 1/4 inch thick
- 1/2 cup granulated sugar
- 1/4 cup packed light brown sugar
- 2 tablespoons all-purpose flour
- 1 teaspoon ground cinnamon
- 1/4 teaspoon ground nutmeg
- 1/8 teaspoon ground allspice
- 1 tablespoon lemon juice
- 1 tablespoon unsalted butter, cut into small pieces
- 1 large egg, beaten with 1 teaspoon water (for egg wash)
- For the Buttery Crumb Topping:
- 1 1/2 cups all-purpose flour
- 1 cup packed light brown sugar
- 1/2 cup granulated sugar
- 1/2 teaspoon ground cinnamon
- 1/4 teaspoon salt
- 1 cup (2 sticks) cold unsalted butter, cut into small cubes
Instructions
- Prepare your pie crust dough. Roll out half of the dough and fit it into a 9-inch pie dish. Trim the edges and chill the crust while you prepare the filling.
- In a large bowl, combine the sliced apples, granulated sugar, brown sugar, flour, cinnamon, nutmeg, allspice, and lemon juice. Toss gently until the apples are evenly coated.
- Preheat your oven to 425 degrees Fahrenheit. Place the chilled pie crust on a baking sheet.
- Pour the apple filling into the chilled pie crust. Dot the top of the apples with the small pieces of butter.
- Prepare the Buttery Crumb Topping: In a separate medium bowl, whisk together the flour, brown sugar, granulated sugar, cinnamon, and salt for the topping.
- Cut in the cold butter cubes using a pastry blender or your fingertips until the mixture resembles coarse crumbs, with some pea-sized pieces remaining. Do not overmix.
- Sprinkle the entire crumb topping evenly over the apple filling.
- Brush the exposed edges of the bottom pie crust with the egg wash.
- Bake at 425 degrees Fahrenheit for 15 minutes.
- Reduce the oven temperature to 375 degrees Fahrenheit. Continue baking for an additional 40 to 50 minutes, or until the topping is golden brown and the filling is bubbling thickly. If the topping browns too quickly, loosely cover the pie with aluminum foil.
- Let the Dutch Apple Pie cool on a wire rack for at least 3 hours before slicing and serving. This allows the filling to set properly.
Notes
- For the best texture, make sure your butter for the crumb topping is very cold when you mix it in.
- If you want a deeper dish pie, use a 10-inch pie plate and increase the apple filling by about 1/4.
- Serve this comforting dessert warm with vanilla ice cream or fresh whipped cream.
Nutrition
- Serving Size: 1 slice
- Calories: 450
- Sugar: 35g
- Sodium: 250mg
- Fat: 25g
- Saturated Fat: 15g
- Unsaturated Fat: 10g
- Trans Fat: 0g
- Carbohydrates: 58g
- Fiber: 4g
- Protein: 5g
- Cholesterol: 75mg