
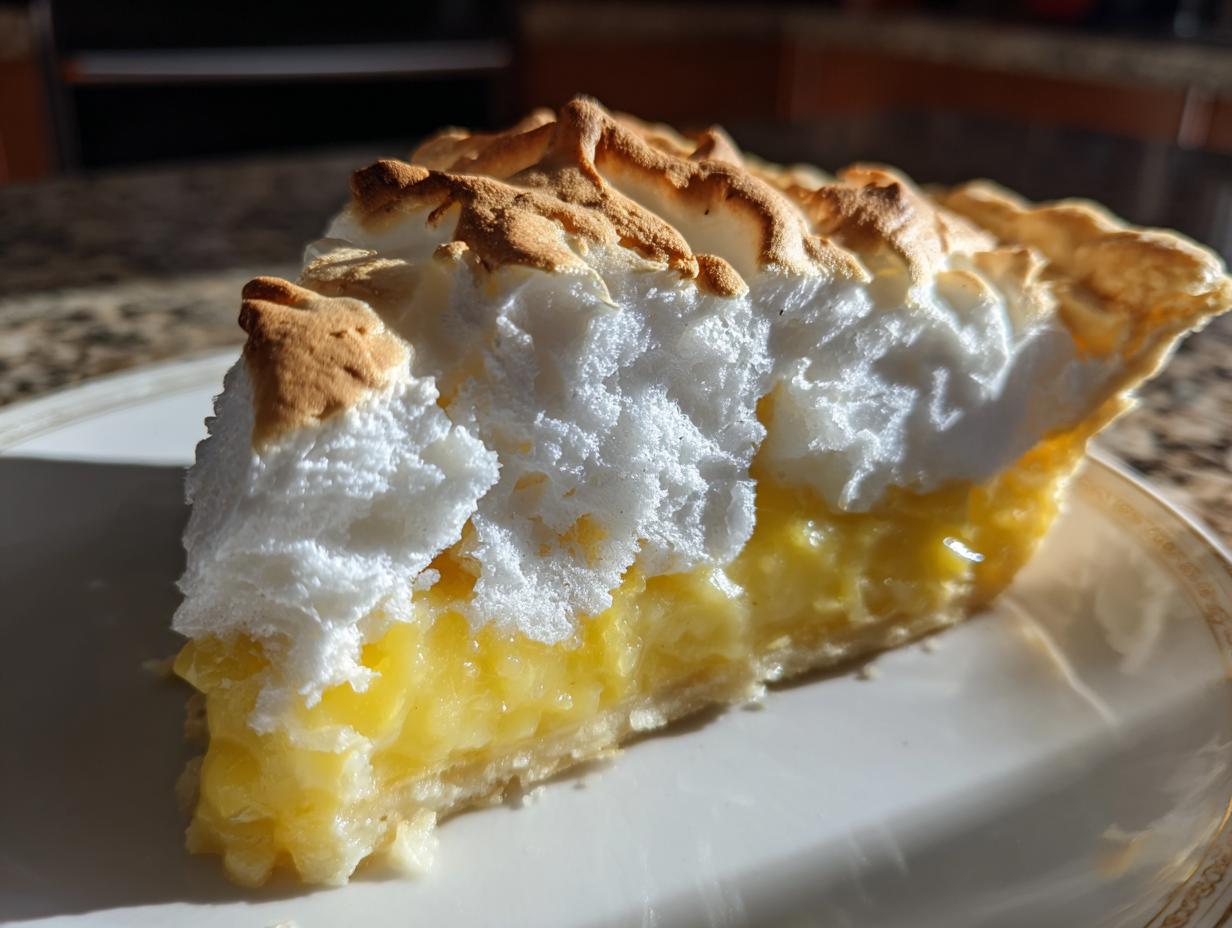
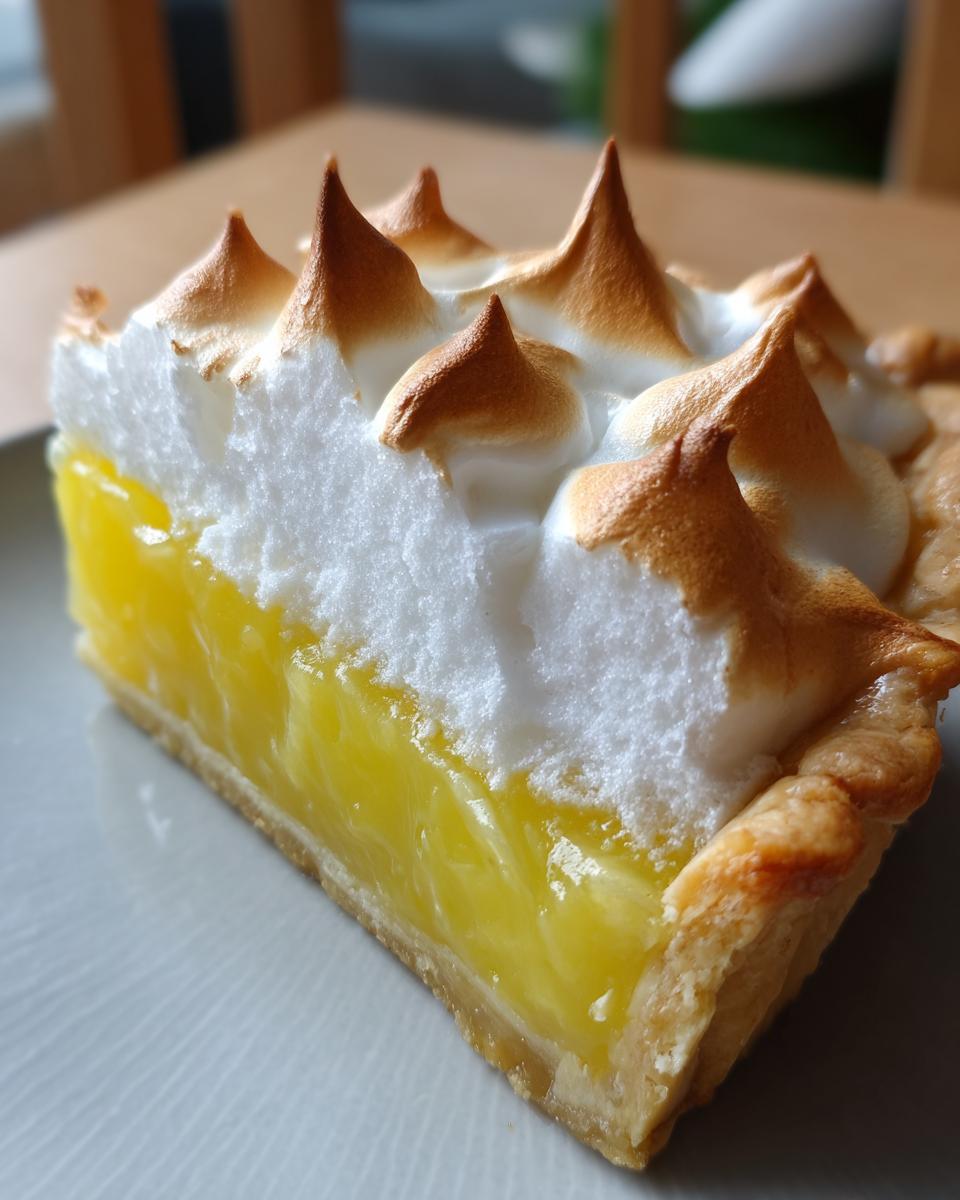
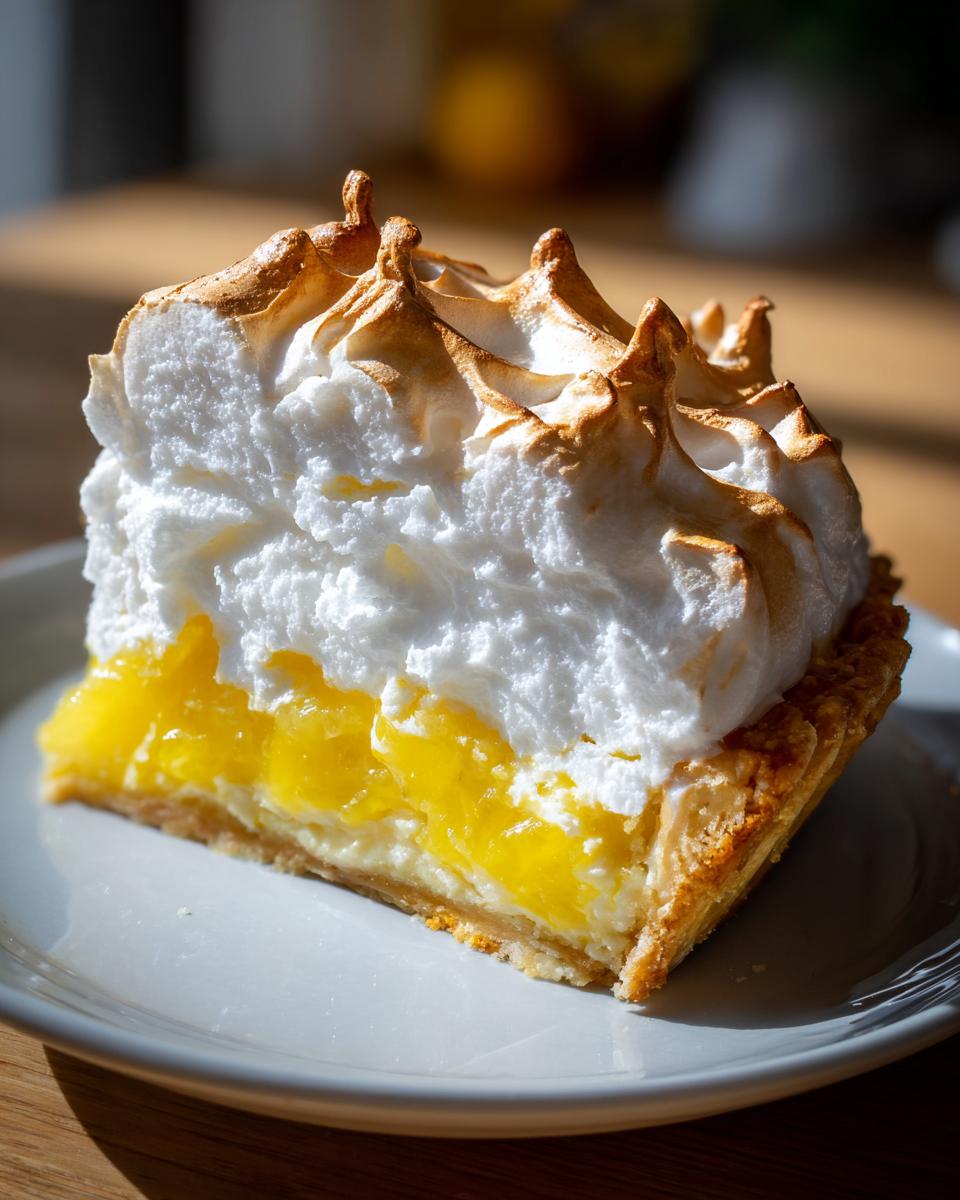
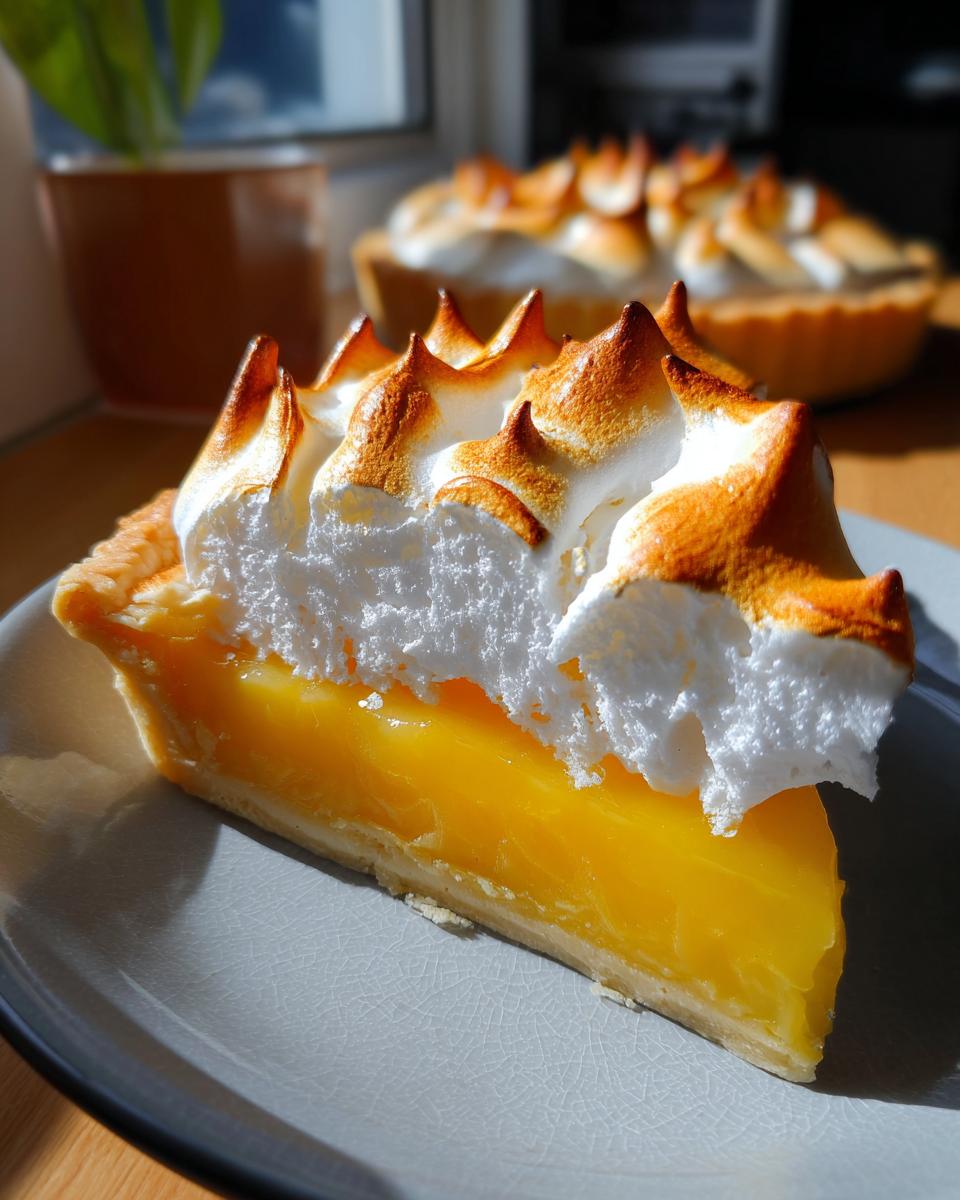
When I think about truly classic American desserts, the kind that make people stop talking when you bring it to the table, my mind immediately goes to the sunshine-bright perfection of a slice of lemon meringue pie. Forget those box mixes you see in stores; that’s not what my family taught me. This recipe, the one I learned standing right next to my own mentor in the kitchen, is all about making it completely from scratch. We focus on that intensely tart, zesty lemon custard, but the real star, honestly, is stopping that awful weeping business that ruins a beautiful meringue. When you bake heritage recipes like this, you’re connecting to something bigger, and I’m so happy to share Grandma’s secrets with you today!
- Why This Classic Lemon Meringue Pie Recipe Works (E-E-A-T Focus)
- Ingredients Needed for Homemade Lemon Meringue Pie From Scratch
- Step-by-Step Instructions for Classic Lemon Meringue Pie
- Tips for Success: Mastering Your Lemon Meringue
- Ingredient Notes and Substitutions for Your Lemon Meringue
- Storage and Reheating Instructions for Lemon Meringue Pie
- Frequently Asked Questions About Lemon Meringue Pie
- Estimated Nutritional Data for This Lemon Meringue
- Share Your Showstopping Holiday Dessert Experience
Why This Classic Lemon Meringue Pie Recipe Works (E-E-A-T Focus)
If you’ve been burned by runny fillings or sad, watery meringue before, I get it! That’s why I trust this method completely. It’s been tested over decades, and the techniques ensure reliability. There’s nothing worse than putting that much effort in only to have the layers slide apart. This approach focuses on precision where it counts and gives you results that taste like they came straight from a professional bakery, but with all the love of a home kitchen.
- The custard filling is intensely zesty because we use fresh lemon juice and zest—no shortcuts taken here!
- We tackle the infamous “weeping meringue” head-on with careful egg white preparation and sealing the filling edge.
- It all rests on a perfect, flaky, buttery pie crust that complements the bright filling instead of fighting it.
Ingredients Needed for Homemade Lemon Meringue Pie From Scratch
Alright, gathering your supplies is the first step to pie glory! Seriously, don’t skip reading the details on the egg whites—that’s your secret weapon against sad slumping meringue. While my recipe calls for a ready-made crust, trust me, using a homemade buttery pie crust you made yourself really takes this from good to absolutely legendary. You’ll need to make sure everything is assembled before you get started, especially the eggs for the meringue.
For the Buttery Pie Crust
We start with the foundation. Since this filling is so wet and delicate, the crust needs to be totally pre-baked and cooled. We need:
- 1 (9-inch) unbaked pie crust (I really encourage you to try a homemade buttery crust recipe; it makes a HUGE difference in flavor contrast!)
For the Zesty Lemon Meringue Filling
This is where that bright, tangy flavor explodes! Don’t even think about bottled lemon juice here, we need the fresh stuff for that real zing. You might want to check out my thoughts on handling starters and yeast, because precision matters in baking, just like managing activity in a live culture!
- 1 1/2 cups granulated sugar
- 1/4 cup cornstarch
- 1/4 teaspoon salt
- 1 1/2 cups cold water
- 4 large egg yolks, lightly beaten (save those whites!)
- 1/2 cup fresh lemon juice (Fresh! I’m serious!)
- 1 tablespoon lemon zest
- 2 tablespoons butter
For the Fluffy Meringue Topping Tutorial
This list is short but highly critical. The temperature of your egg whites is non-negotiable here if you want that cloud of fluffy goodness. Make sure those eggs have been sitting on the counter for at least 30 minutes before you whip them!
- 6 large egg whites, at room temperature
- 1/2 teaspoon cream of tartar (This is the stabilizing magic!)
- 6 tablespoons granulated sugar (for meringue)
Step-by-Step Instructions for Classic Lemon Meringue Pie
This is where the show comes to life! Don’t rush any of these stages, especially when we start dealing with those yolks—scrambled eggs in your custard is just a tragedy we simply cannot allow in this kitchen. Remember, we are working with heat and delicate proteins, so pay attention to the timing cues I give you. Once you nail the technique, you won’t even need to look at the recipe again!
Preparing the Crust and Zesty Lemon Custard Recipe
First things first: make sure your 9-inch pie crust is baked and completely cooled down! I mean it, piping hot filling into a cold crust works wonders. Now, let’s make the filling. In a saucepan—and this is crucial—whisk together the 1 1/2 cups of sugar, cornstarch, and salt. Slowly whisk in the cold water until everything looks smooth. Put that on medium heat and stir constantly until it gets thick and starts boiling. Let it boil for a solid minute while you keep stirring. Turn that heat off.
Time for the tempering trick! In a separate bowl, lightly beat your 4 egg yolks. You need hot stuff in the cold stuff very slowly. Take about one cup of that hot sugar liquid and drizzle it *very* slowly into the yolks while whisking like crazy. This gently warms the yolks up! Once they look happy, pour that yolk mixture right back into the saucepan with the rest of the hot liquid. Pop it back on medium heat and stir non-stop until it thickens again. You want it bubbling slightly, but don’t let it boil hard now! Turn the heat off for good. Stir in your zesty lemon juice, zest, and that 2 tablespoons of butter until it melts right in. Pour this gorgeous, thick filling straight into your cooled crust. If you’re looking for more amazing desserts, check out my take on pecan cream pie!
Achieving the No Weeping Meringue Pie Secret
Okay, this stage dictates whether you win or lose the meringue battle! Make sure you are using a completely clean bowl and beaters—any trace of grease and you are doomed to flat meringue. Put your 6 room temperature egg whites and the cream of tartar in there. Start mixing on medium speed until they hold soft peaks, like little gentle waves on the surface. Now, gradually—and I mean a tiny bit at a time—start adding those remaining 6 tablespoons of sugar.
Keep beating until you get stiff, glossy peaks. They should stand up straight when you lift the beater. This process dissolves the sugar into the protein structure, which is key to stopping that weeping later! Trust me, a few extra minutes beating here saves you so much heartache later. This is your moment to create that fluffy meringue topping tutorial masterpiece.
Baking and Cooling the Perfect Lemon Meringue
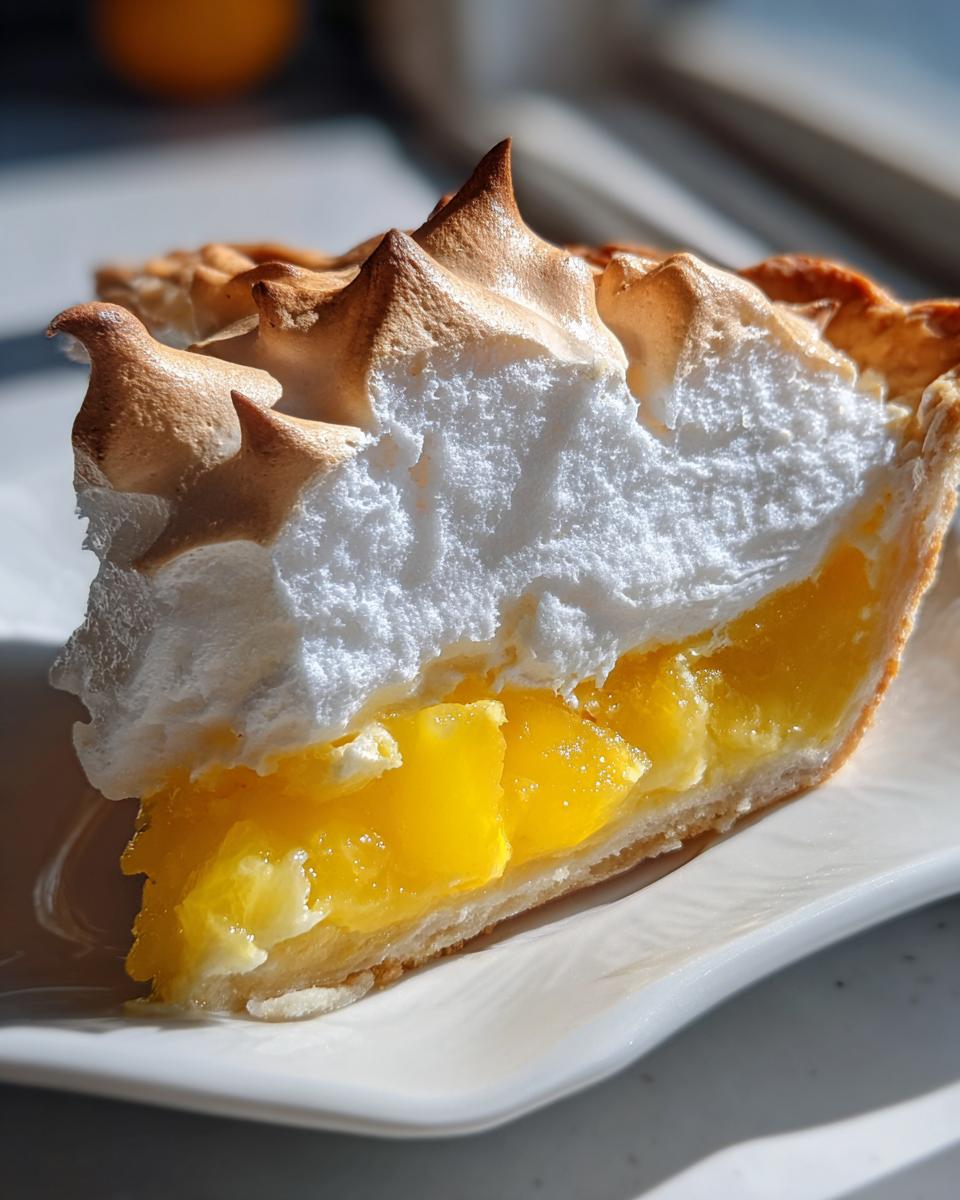
With the filling still hot, spoon that gorgeous meringue right on top. Here’s the sealing trick: every single edge of the meringue *must* touch the crust edge all the way around. If there’s a gap, that’s where the moisture escapes and causes shrinkage! Make some nice tall swirls on top with the back of a spoon—these will brown beautifully. Pop it into your 350°F oven for about 12 to 15 minutes. You’re just looking for those peaks to turn a lightly golden brown.
When it comes out, you have to be patient. Do *not* stick it in the fridge right away! Let the whole pie cool slowly on a wire rack at room temperature for at least 4 hours. This slow, gradual cooling helps the custard set firmly and keeps that beautiful meringue stable. Resist the temptation; these 4 hours are the final, most important step for a perfect slice.
Tips for Success: Mastering Your Lemon Meringue
I’ve compiled a few quick notes from the testing process because I want you to have the absolute best experience making this lemon meringue pie. Seriously, ditching the grease in the mixing bowl is number one for a fluffy topping. Any little bit of fat prevents the egg whites from reaching their full, glorious volume, and we need every bit of lift we can get!
Also, remember that the filling needs to be hot when the meringue goes on top. This hot surface helps seal the meringue right to the custard, which is a huge step toward preventing that dreaded slide-off later. If you are feeling fancy, skip the oven baking entirely—though the oven works great—and use a kitchen torch just on the peaks for a really professional, deeply golden look. That instant browning locks everything in beautifully.
And for the ultimate tip on stabilizing that custard: cool it slowly at room temperature for at least four hours. No cheating and putting it straight into the fridge; that sudden chill often messes with the set.
Ingredient Notes and Substitutions for Your Lemon Meringue
When it comes to ingredients here, I always say that quality really shows through, especially with something as simple as a **lemon meringue** pie. You simply cannot beat fresh lemon juice for the filling. Bottled juice just tastes flat compared to that bright, zesty punch you get from zesting and squeezing your own lemons. It makes all the culinary difference!
Now, what if you don’t have cream of tartar? Don’t panic! That stabilizer is fantastic, but if you’re out, you can use about half a teaspoon of white vinegar or lemon juice to help your egg whites whip up stable. It’s not quite the same magic, but it’ll get you those stiff peaks for your **fluffy meringue topping tutorial** so you can seal that pie perfectly.
Storage and Reheating Instructions for Lemon Meringue Pie
Once you’ve managed to let that beautiful pie cool completely—remember, that crucial 4-hour wait at room temperature—it’s time to think about storage. Because of that delicate meringue topping, this pie is best eaten the day you make it, honestly! If you have leftovers, cover the pie loosely with plastic wrap, making sure the wrap doesn’t actually touch the meringue peaks, and pop it into the fridge. It’s usually fine for two days.
Now, here is a big warning: do not try to reheat this pie! Warming it up, even slightly, guarantees that the meringue will start to deflate and definitely weep all over your beautiful lemon custard. Just enjoy those slices straight from the fridge. That intense lemon flavor is still amazing cold!
Frequently Asked Questions About Lemon Meringue Pie
When pie gives you trouble, you come to me! It feels like almost every time I bake a stunning **lemon meringue** pie, one small thing goes wrong. But don’t you worry one bit! These are the common little hiccups that happen to everyone, even experienced bakers, and I'm going to give you the quick fixes so your next attempt is picture-perfect. I feel like I should mention up front that if you're stressing about perfecting this pie, maybe try my ideas for easy breakfast ideas first—keep things low-stress before tackling that meringue!
Why is my lemon meringue filling runny?
Oh, the dreaded runny filling! This almost always comes back to heat or cooling. If you didn’t let your cornstarch mixture come to a full boil and boil for that one minute, the starch never fully activates and thicken those starches. Also, if you rush the process and put the hot filling into the oven before it has cooled slightly, the high heat can break down the initial thickening action. Remember, you want that filling piping hot when the meringue goes on, but not boiling violently when you take it off the burner.
Can I make this Classic Lemon Pie Dessert ahead of time?
Absolutely! You can definitely get a major head start on this **Classic Lemon Pie Dessert**. The buttery crust should be baked and fully cooled, and the zesty lemon custard filling should be made as described, poured into the crust, and allowed to cool for at least an hour at room temperature until it’s just warm—not hot—before you cover it with the meringue. The meringue is the part that needs to be done the day you plan to serve it because it starts to change structure pretty quickly once it’s on the filling.
What causes the meringue to weep on my lemon meringue pie?
Ah, weeping! It’s the bane of every lemon meringue maker’s existence. The biggest reason this happens is usually a temperature shock, like putting a very hot pie straight into a cold refrigerator, which makes the water droplets form. Another huge cause is when the meringue isn’t perfectly sealed to the edge of the crust—if there’s a tiny gap, steam escapes and collapses the meringue right there! Finally, make sure you beat all that 6 tablespoons of sugar fully into your egg whites until they are glossy and stiff; undissolved sugar causes tiny tears as the pie cools.
Estimated Nutritional Data for This Lemon Meringue
Now, I know some of you are watching macros, and some of you are just eyeballing it and reaching for a second slice (us too!). But just so you have all the details, here is the estimated nutritional breakdown for this incredible **lemon meringue** pie. Remember, because we are making everything from scratch, especially the crust, these numbers are an educated guess based on standard ingredient measurements. This is calculated based on 8 generous slices, so adjust your expectations if you’re cutting wedges fit for a hungry football player!
Here’s what you can expect per slice:
- Calories: Approximately 380
- Sugar: Around 45g (Hey, it’s pie! That sugar is essential for that fluffiness!)
- Fat: About 18g (Mostly from that wonderful, buttery crust)
- Carbohydrates: Roughly 53g
- Protein: About 6g
We’re keeping this list short because the real joy of this **classic lemon pie dessert** isn’t the numbers; it’s that perfect sweet-and-tangy bite every single time you make it!
Share Your Showstopping Holiday Dessert Experience
Now that you have made your very own **showstopping holiday dessert**, I truly want to hear all about it! Did you achieve those beautiful, stiff, glossy peaks on your meringue? Did your family even wait for it to cool before diving in? Please, don’t keep the success stories to yourself!
Head on down to the comments section below and leave me a star rating, especially if this recipe cured your fear of that weeping meringue. I absolutely love hearing how this classic pie turns out in your real-world kitchens. If you took a picture of that perfect slice—that vibrant yellow filling against the toasted white clouds—please tag me on social media!
Making something this beautiful from scratch feels like a real accomplishment, and I want to cheer you on! If you loved this recipe and are looking for another amazing centerpiece for your next gathering, you must check out my recipe for moist gingerbread cake next. And if you want to see how other bakers are making out with their pies, check out some inspiration over at this site!
Thank you so much for baking with me today. I hope this bright, zesty **lemon meringue** pie brings tons of sunshine to your table!
PrintGrandma’s Classic Lemon Meringue Pie From Scratch

Make this classic lemon meringue pie with a buttery crust, zesty lemon custard filling, and a tall, fluffy meringue topping. This recipe focuses on simple steps for a perfect, non-weeping result.
- Prep Time: 30 min
- Cook Time: 35 min
- Total Time: 4 hours 5 minutes
- Yield: 8 servings 1x
- Category: Dessert
- Method: Baking
- Cuisine: American
- Diet: Vegetarian
Ingredients
- 1 (9-inch) unbaked pie crust (buttery homemade recommended)
- 1 1/2 cups granulated sugar
- 1/4 cup cornstarch
- 1/4 teaspoon salt
- 1 1/2 cups cold water
- 4 large egg yolks, lightly beaten
- 1/2 cup fresh lemon juice
- 1 tablespoon lemon zest
- 2 tablespoons butter
- 6 large egg whites, at room temperature
- 1/2 teaspoon cream of tartar
- 6 tablespoons granulated sugar (for meringue)
Instructions
- Prepare your 9-inch pie crust and bake it according to your preferred recipe until lightly golden. Set aside to cool.
- For the filling, whisk together 1 1/2 cups sugar, cornstarch, and salt in a medium saucepan. Gradually whisk in the cold water until smooth.
- Cook the mixture over medium heat, stirring constantly, until it thickens and boils. Boil for 1 minute, stirring constantly. Remove from heat.
- In a separate bowl, lightly beat the 4 egg yolks. Slowly temper the yolks by whisking about 1 cup of the hot sugar mixture into the yolks.
- Pour the tempered yolk mixture back into the saucepan with the remaining hot sugar mixture. Cook over medium heat, stirring constantly, until the filling thickens again and just begins to bubble. Do not boil.
- Remove the pan from the heat. Stir in the lemon juice, lemon zest, and butter until the butter melts completely.
- Pour the hot lemon filling immediately into the cooled, pre-baked pie crust.
- For the meringue, place the 6 room temperature egg whites and cream of tartar in a clean, grease-free mixing bowl. Beat with an electric mixer on medium speed until soft peaks form.
- Gradually add the 6 tablespoons of sugar, one tablespoon at a time, beating well after each addition. Continue beating until stiff, glossy peaks form. This prevents weeping.
- Spread the meringue over the hot lemon filling, making sure the meringue touches the edge of the crust all the way around to seal it. Create swirls on top with the back of a spoon.
- Bake at 350°F (175°C) for 12 to 15 minutes, or until the meringue peaks are lightly golden brown.
- Cool the pie completely on a wire rack at room temperature for at least 4 hours before slicing. Avoid placing it in the refrigerator immediately to prevent the meringue from weeping.
Notes
- To prevent the meringue from weeping, make sure your mixing bowl and beaters are completely free of any grease or fat residue.
- Use fresh lemon juice and zest for the brightest flavor.
- For a truly showstopping dessert, use a kitchen torch to brown the meringue peaks instead of baking.
- Cool the pie slowly at room temperature before chilling to help stabilize the filling and meringue.
Nutrition
- Serving Size: 1 slice
- Calories: 380
- Sugar: 45g
- Sodium: 210mg
- Fat: 18g
- Saturated Fat: 7g
- Unsaturated Fat: 11g
- Trans Fat: 0.5g
- Carbohydrates: 53g
- Fiber: 1g
- Protein: 6g
- Cholesterol: 110mg