
Oh my goodness, if you think you have to choose between a slice of warm, spiced apple pie and a gooey, soft cinnamon roll, I’m here to tell you that decision is officially over! Welcome to the ultimate comfort food dessert fusion. This incredible Cinnamon Roll Apple Pie truly combines the best of both worlds, giving you tender apples nestled underneath a puffy, sweet topping of canned cinnamon rolls. It’s absolutely divine and happens to be one of the simplest mashups I’ve ever tackled.
Here at MDLATDMM Recipes, Maddie works so hard to translate those cherished, vague family recipes into clear instructions that just *work* every time you try them. Trust me when I say this recipe is no exception. It’s ready faster than most regular pies, and the result is spectacular!
- Why This Cinnamon Roll Apple Pie Recipe Works for Comfort Food Dessert Fusion
- Essential Ingredients for Your Cinnamon Roll Topped Apple Pie
- Step-by-Step Instructions for the Cinnamon Roll Apple Pie Recipe
- Expert Tips for the Best Cinnamon Roll Topped Apple Pie
- Variations on the Cinnamon Roll Apple Pie Dessert Mashup
- Serving Suggestions for Your Gooey Cinnamon Apple Bake
- Storage and Reheating Instructions for Cinnamon Roll Apple Pie
- Frequently Asked Questions About This Cinnamon Roll Apple Pie Recipe
- Nutritional Estimates for a Slice of Cinnamon Roll Apple Pie
Why This Cinnamon Roll Apple Pie Recipe Works for Comfort Food Dessert Fusion
Honestly, I needed this recipe in my life because sometimes you just don’t have time for rolling out a full bottom crust, chilling it, and then making a separate lattice. This version hits that sweet spot where maximum comfort meets minimum effort. It’s the cozy baked good you reach for when you want Fall Baking Ideas but only have 45 minutes!
- It takes everything we love about apple pie filling—the spice, the warmth—and pairs it with the soft, sugary pull-apart texture of a fresh cinnamon roll.
- Using canned solutions for the dough means virtually zero cleanup until you’re halfway through eating it.
- The texture contrast between the gooey topping and the stewed apples below is seriously addictive.
Quick Prep Time for a Satisfying Cinnamon Roll Apple Pie
This is the real magic, folks. You only need about 10 minutes of actual hands-on work before this drops into the oven. That means you can go from craving to eating in under an hour! This is truly a quick apple dessert using dough hack, making it perfect for a last-minute dessert or even a wild weekend breakfast treat. Forget complex recipes; this is pure, reliable comfort!
Essential Ingredients for Your Cinnamon Roll Topped Apple Pie
Okay, you’re going to love how simple the grocery list is for this one. Remember, we’re leaning into those ready-made shortcuts to get you to the gooey payoff faster! When I make my Cinnamon Roll Topped Apple Pie, I lay everything out first so there’s zero panic once the oven is hot. You need to make sure you grab the refrigerated kind of rolls, not the frozen ones, okay?
Ingredient Clarity: Apple Filling and Cinnamon Roll Components
Because we are skipping the bottom crust, the apple filling needs to do all the heavy lifting when it comes to flavor. I always use 2 cans (that’s 21 ounces each, if you’re checking labels!) of pre-made apple pie filling. Then, for the topping, grab one standard box—it usually has 8 count—of those refrigerated pre-made cinnamon rolls, icing packets still attached! Don’t forget your water, extra cinnamon, and sugar to boost that fruit layer.
Step-by-Step Instructions for the Cinnamon Roll Apple Pie Recipe
Alright, let’s get this amazing Cinnamon Roll Apple Pie Recipe started! Since we are relying on pre-made filling, the active time here is unbelievably fast. I want you to think of this as building layers of flavor quickly, not spending hours slaving away. Following these simple steps ensures that gooey, beautiful result every single time.
Preparing the Apple Base for the Cinnamon Roll Apple Pie
First things first, get that oven humming at 375 degrees Fahrenheit and make absolutely sure your 9-inch pie dish is greased up well—no one wants sticky edges! Now, take those two cans of pre-made apple pie filling and pour them right in. This is where we trick people into thinking it’s all homemade: stir in that extra tablespoon of ground cinnamon and about 1/4 cup of granulated sugar right into the apples. It just deepens that warming spice flavor before we cover it up. This careful addition is what turns a simple bake into something special!
Assembling the Gooey Cinnamon Apple Bake Topping
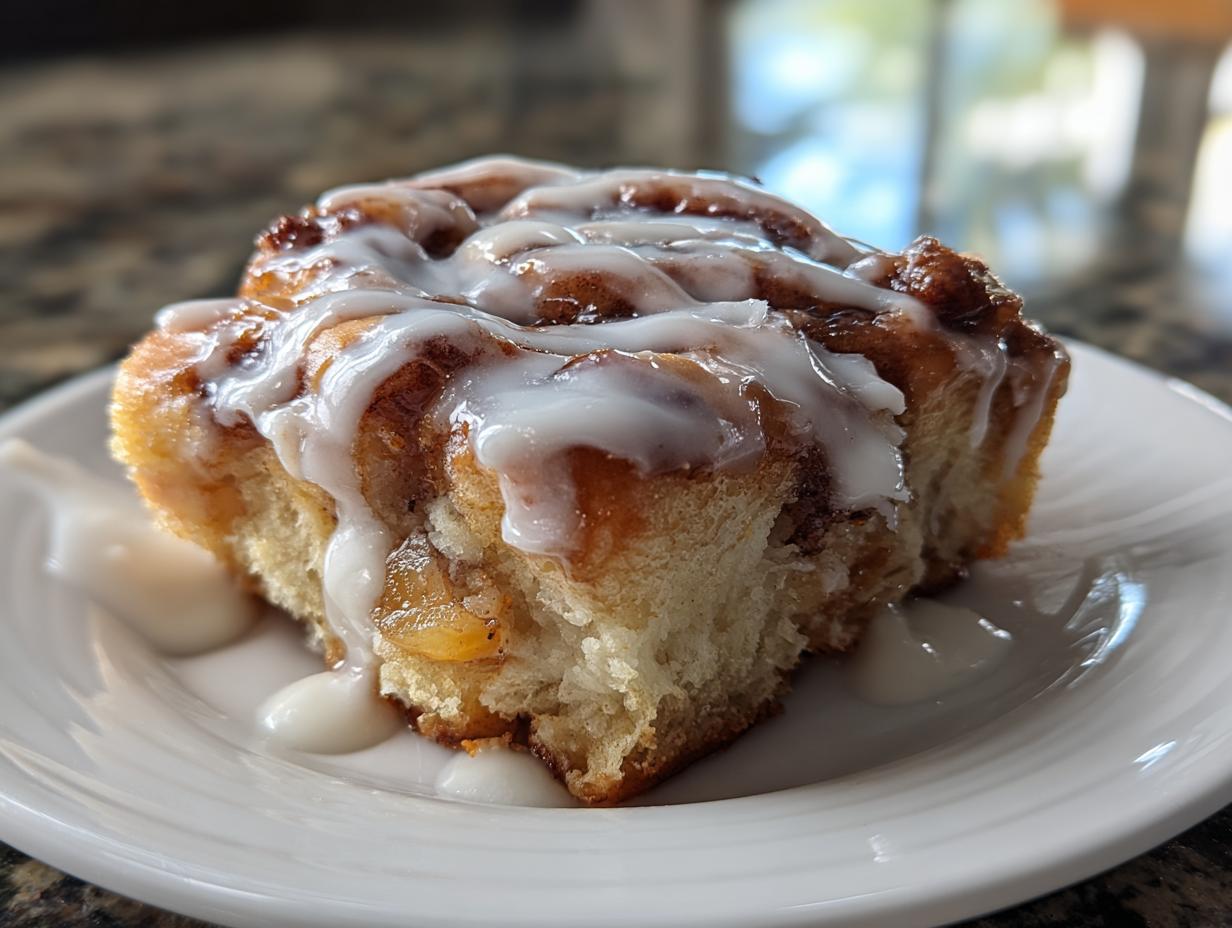
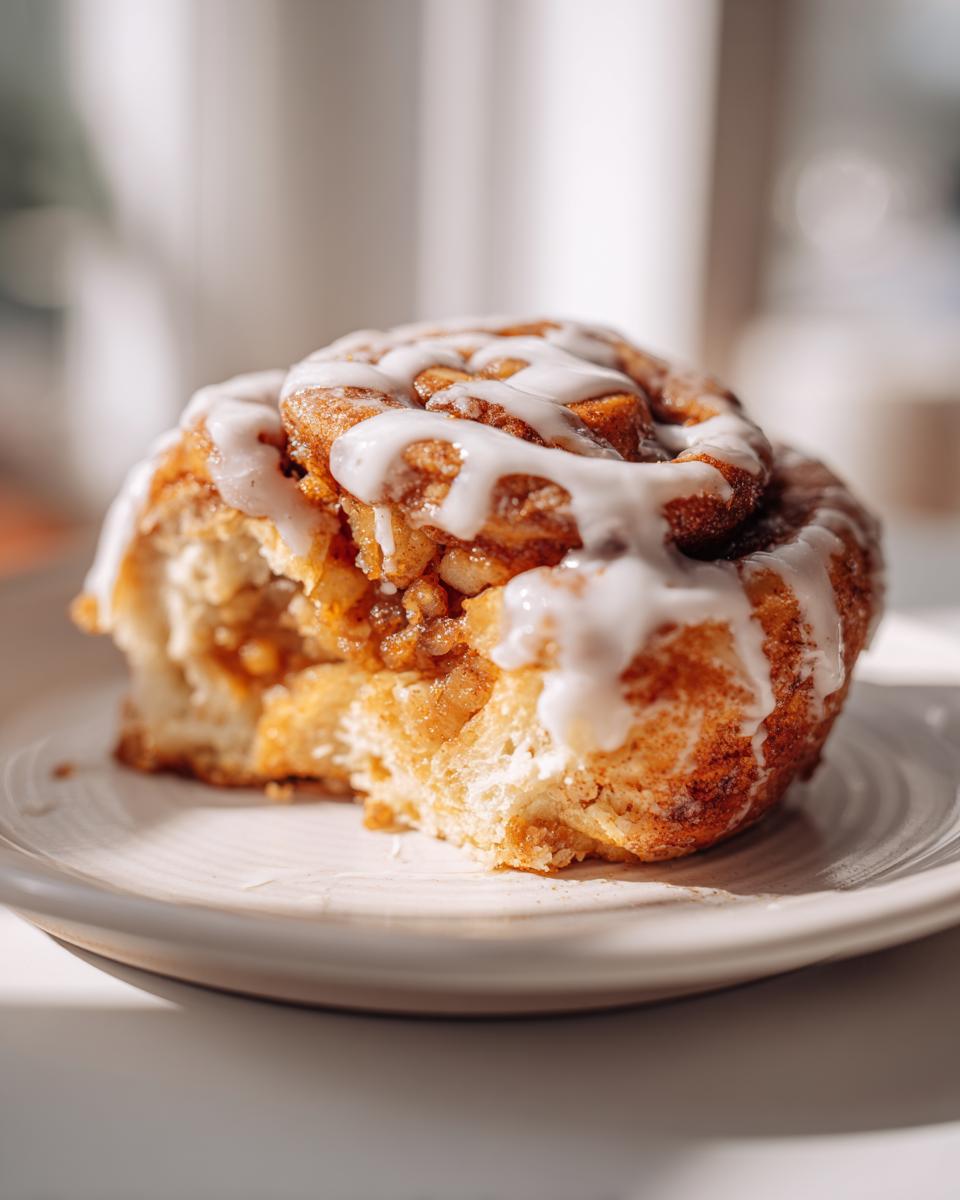
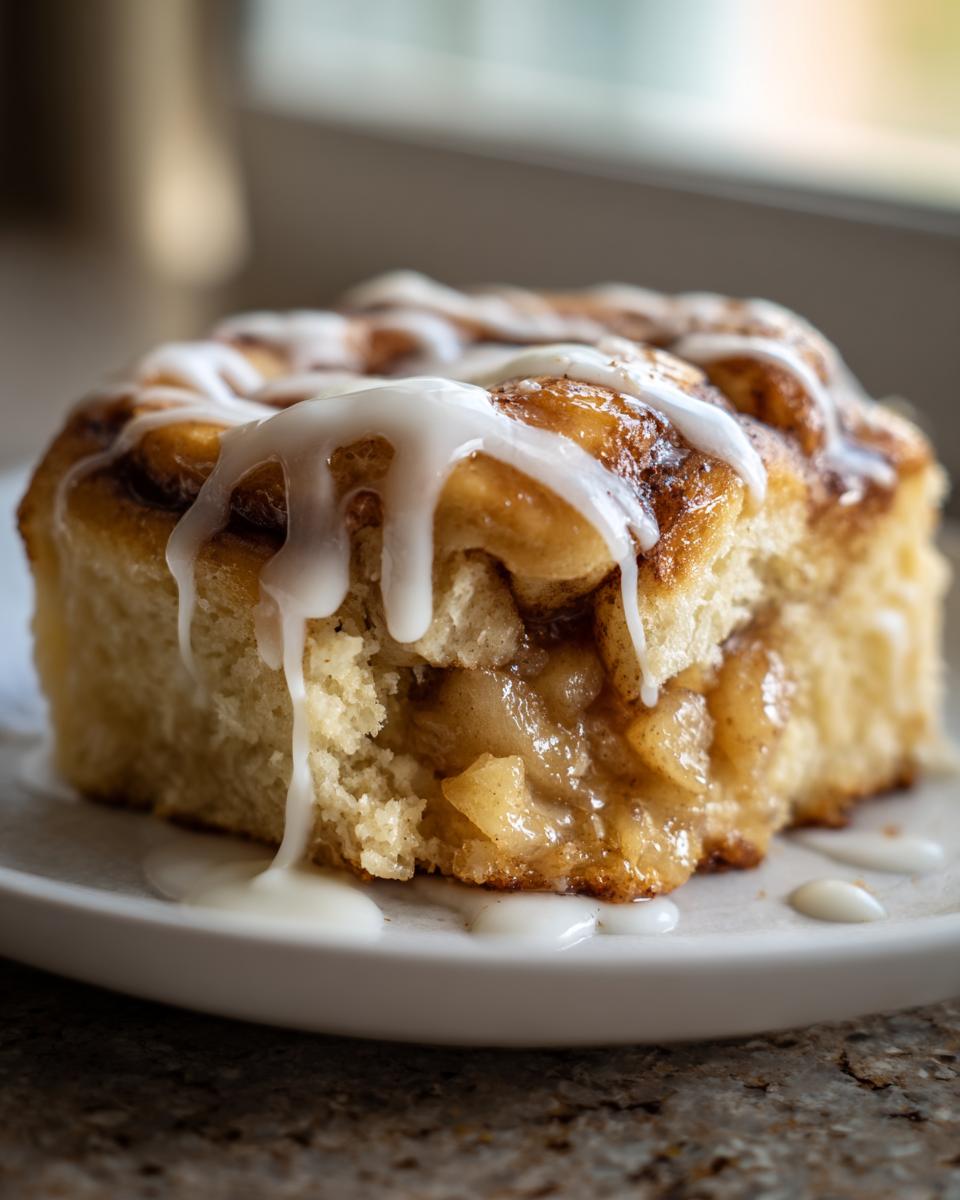
Next up is the best part! Grab your package of cold cinnamon rolls. You need to separate them right there in the can—don’t unroll them yet! Arrange these raw rolls directly on top of your spiced apple base. You can squish them close for a solid, puffy top, or leave a tiny bit of space between them to get that fun lattice look that lets the apple steam bubble up. Bake this beauty for 30 to 35 minutes, or until those cinnamon rolls are cooked all the way through and look perfectly puffed. Don’t forget to check out what they are doing over at Cinnamon Roll Apple Pie for visual inspiration!
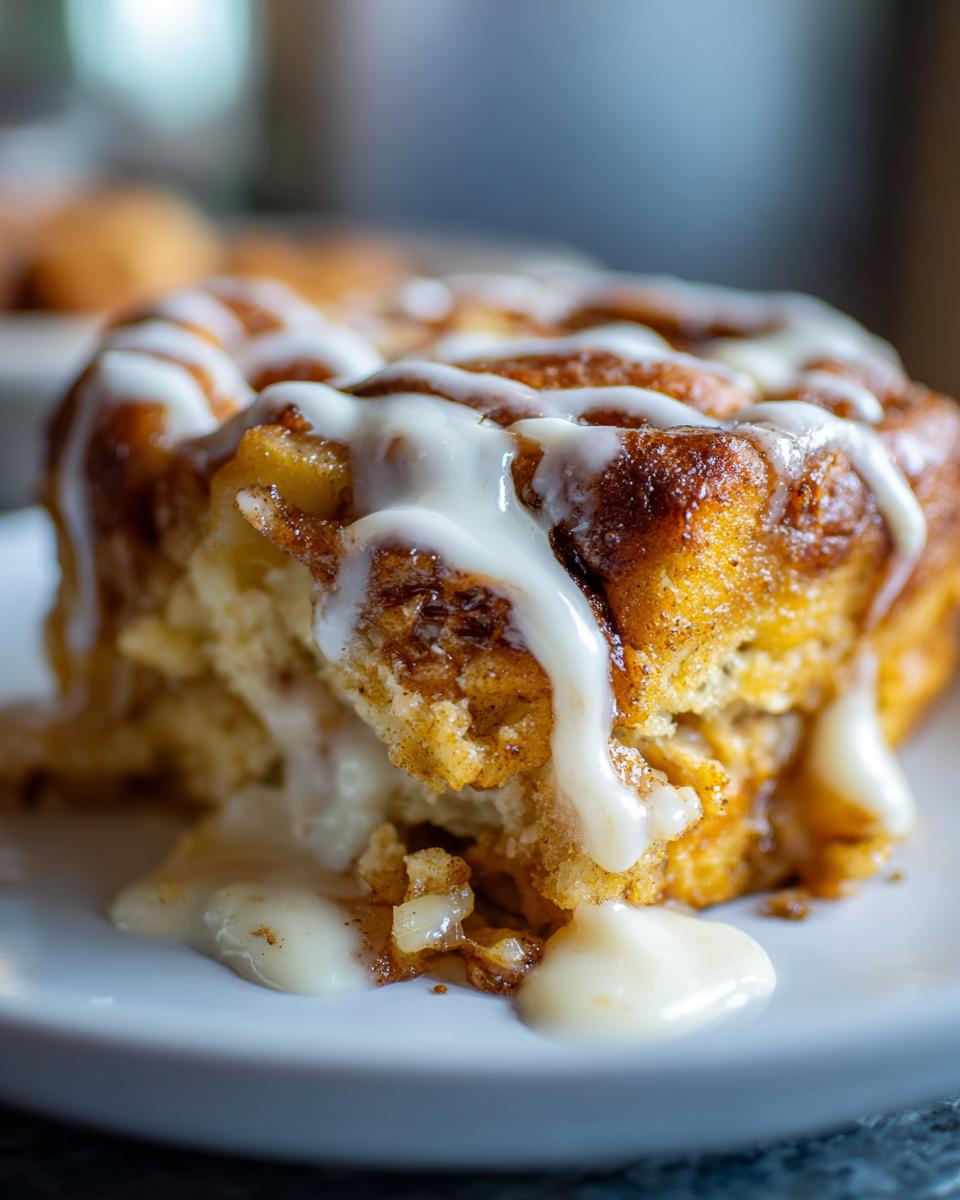
Once she’s out of the oven, you absolutely must let the pie cool down for about 10 minutes. This lets the filling settle just a tad. While you wait, whisk up your simple icing drizzle using the powdered sugar and milk. Once cooled just right, drizzle that sweet stuff generously all over the warm cinnamon rolls. That glaze melting into the warm swirls? That’s the moment you know you nailed this gooey cinnamon apple bake!
Expert Tips for the Best Cinnamon Roll Topped Apple Pie
Even though this is a super easy recipe, a couple of little tricks make all the difference between good and outstanding. If you’re aiming for that perfect balance in your Cinnamon Roll Apple Pie, texture control is key. See, the residual heat inside that apple filling is still cooking the bottom of your cinnamon roll topping even after it comes out of the oven.
If you want that topping to be extra gooey—I mean, like, pull-apart-with-maximum-ooze gooey—pull the pie out just when the edges of the rolls start looking golden. They will finish cooking perfectly while you make the glaze. If texture is your biggest worry, remember that you can always use a store-bought pie crust for the bottom and reserve the cinnamon roll dough *only* for the top layer for a crispier base. If you’re feeling adventurous, check out my tips for making pumpkin-banana-bread for future holiday baking inspiration, they share some similar flavor profiles!
Variations on the Cinnamon Roll Apple Pie Dessert Mashup
Now, while I absolutely adore this exact combo—a classic apple base with that gooey swirl on top—there are tons of ways to switch things up and make this your own! Think of this as a starting point for your next great apple cranberry cobbler-style adventure. If you want more crunch, definitely toss in some chopped pecans or walnuts right on top of the apple filling before laying down those cinnamon rolls.
If apples aren’t your total must-have this week, grab a can of cherry pie filling instead for a vibrant twist on this easy apple pie dessert mashup feel. And for those who demand a proper bottom crust, don’t stress! You can always use a store-bought pastry crust on the bottom and reserve the cinnamon roll dough just for a decorative lattice or covering. It creates that fun Apple Pie with Cinnamon Roll Crust effect without all the rolling fuss!
Serving Suggestions for Your Gooey Cinnamon Apple Bake
This gooey cinnamon apple bake is almost too delicious to wait, but trust me, serving it warm is the only way to go. Right out of the oven is great, but letting it cool just a touch lets that icing set up perfectly without running everywhere! If you want to take it to the next level, you absolutely have to serve each warm slice with a scoop of high-quality vanilla bean ice cream. The cold creaminess against the warm, spiced cinnamon and apples is just heaven on a plate!
Storage and Reheating Instructions for Cinnamon Roll Apple Pie
I rarely have leftovers of this Cinnamon Roll Apple Pie, but when I do, proper storage is key to keeping that topping soft! Once it’s completely cooled down, you’ll want to cover the pie loosely with plastic wrap or foil. You can keep it on the counter overnight, but honestly, for keeping that gooey factor strong, I find the fridge works better, especially if you’ve used the extra icing. Just make sure it’s covered well so it doesn’t dry out!
When it’s time to reheat, skip the microwave if you can! Microwaving tends to make the cinnamon roll topping a little chewy and strange. If you want to bring back that fresh-baked joy, pop a slice in a 350-degree oven for about 8 to 10 minutes until warmed through. That gentle heat keeps the apples nice and the topping tender!
Frequently Asked Questions About This Cinnamon Roll Apple Pie Recipe
Can I use this recipe if I want to make everything completely from scratch?
Oh, that’s a lovely thought! This recipe is truly designed as a wonderful comfort food dessert fusion shortcut, relying on those pre-made cans to get dinner done fast. If you want to go fully homemade, you absolutely can! You would need to make your favorite pie crust recipe for the bottom, and then roll out homemade cinnamon roll dough for the top. Just remember that using homemade dough might increase your bake time quite a bit, since the canned stuff starts out softened and ready to go!
What if I don’t like canned apple pie filling—can I use fresh apples?
You can, but you’ll need to prepare them first! If you want to swap out those cans, you’ll need about 6 or 7 medium apples (like Granny Smith mixed with Honeycrisp). You’ll need to slice them thin and toss them generously with sugar, flour, and extra spices—maybe a teaspoon more of cinnamon and a pinch of nutmeg—before spreading them in the dish. This will definitely push this past being a “quick apple dessert” territory, but the flavor will be amazing, especially for a special holiday apple dessert!
Can this Cinnamon Roll Apple Pie be made ahead of time?
This is tricky because of the cinnamon roll topping. I wouldn’t assemble the entire thing more than an hour before baking. The raw dough starts to get sticky and strange if it sits too long at room temperature waiting for the oven. If you need to prep ahead, just mix your spiced apple filling and store it covered in the fridge. Then, when you’re ready to bake, drop the rolls on top and go! If you’ve already baked it, see the storage section above—it’s best eaten the same day, but leftovers are fine for a day or two.
Does the icing packet come on the pie when baking?
Nope, please don’t do that! The icing is meant to be drizzled on at the very end. If you leave that sugary packet on during the 35 minutes in the oven, it will turn into a burnt, sticky, dark mess around the edges of your beautiful rolls. We save that icing until the pie has cooled just slightly, so it melts into a gorgeous glaze all over the warm top. That final drizzle is what makes it the ultimate gooey cinnamon apple bake!

Nutritional Estimates for a Slice of Cinnamon Roll Apple Pie
I always feel a little nervous sharing the numbers, because let’s be real, this Cinnamon Roll Apple Pie isn’t exactly health food—it’s comfort food, pure and simple! But because we believe in being upfront about what goes into our favorite bakes, here are the general estimates Maddie cooked up for one standard slice of this dessert. If you use fresh apples instead of canned filling, these numbers will definitely shift!
Please treat these figures as a guide, since the exact outcome depends heavily on the brand of canned filling and rolls you use. We always say the most important ingredient is the love we put in, not the saturated fat count, but here are the details:
- Serving Size: 1 slice
- Calories: 450
- Sugar: 55g
- Sodium: 350mg
- Fat: 22g
- Saturated Fat: 10g
- Unsaturated Fat: 12g
- Trans Fat: 0g
- Carbohydrates: 60g
- Fiber: 2g
- Protein: 5g
- Cholesterol: 30mg
Enjoy every single bite! Pairing this with a cup of coffee makes that sugar count totally worth it, I promise.
PrintCinnamon Roll Topped Apple Pie

Combine the best of two desserts: a classic apple pie filling topped with gooey, sweet cinnamon roll dough for a comforting fusion bake.
- Prep Time: 10 min
- Cook Time: 35 min
- Total Time: 45 min
- Yield: 8 servings 1x
- Category: Dessert
- Method: Baking
- Cuisine: American
- Diet: Vegetarian
Ingredients
- 1 box (8 count) refrigerated pre-made cinnamon rolls
- 2 cans (21 ounces each) pre-made apple pie filling
- 1 tablespoon ground cinnamon
- 1/4 cup granulated sugar
- 1/4 cup water
- 1/2 cup powdered sugar (for icing)
- 2 tablespoons milk or cream (for icing)
Instructions
- Preheat your oven to 375 degrees Fahrenheit. Lightly grease a 9-inch pie dish.
- Pour both cans of apple pie filling into the prepared pie dish. Stir in the 1 tablespoon of ground cinnamon and 1/4 cup of granulated sugar to enhance the apple flavor. Spread the filling evenly.
- Open the package of refrigerated cinnamon rolls. Separate the rolls but do not remove them from the can.
- Arrange the cinnamon rolls on top of the apple filling. You can place them close together to form a solid top layer or space them slightly apart to create a lattice effect.
- Bake for 30 to 35 minutes, or until the crust edges are golden brown and the cinnamon rolls are cooked through and puffed.
- While the pie bakes, prepare the icing. Whisk together the 1/2 cup powdered sugar and 2 tablespoons of milk or cream until smooth. Add more milk if needed to reach a drizzling consistency.
- Remove the pie from the oven. Let it cool for 10 minutes.
- Drizzle the prepared icing generously over the warm cinnamon rolls on top of the pie before serving.
Notes
- If you prefer a crispier topping, you can use store-bought pie crust for the bottom and only use the cinnamon roll dough for the top layer.
- For an extra gooey texture, bake the cinnamon rolls slightly less time, as the residual heat from the apples will continue to cook them.
- This dessert pairs well with vanilla ice cream.
Nutrition
- Serving Size: 1 slice
- Calories: 450
- Sugar: 55g
- Sodium: 350mg
- Fat: 22g
- Saturated Fat: 10g
- Unsaturated Fat: 12g
- Trans Fat: 0g
- Carbohydrates: 60g
- Fiber: 2g
- Protein: 5g
- Cholesterol: 30mg