
There’s just something about those old-fashioned desserts, you know? The ones that smell like slowing down and remembering easier times. If you’re searching for that deep, comforting flavor, stop right now because I’ve got the gold standard: a truly classic, creamy, scratch-made butterscotch pie. My professional chef training means nothing when I need real comfort, and that’s when I head straight to my grandmother’s recipe card. Baking this pie takes me right back to the bustling kitchen of my childhood. It’s rich, it’s deeply nostalgic, and trust me, making this butterscotch pie from scratch is guaranteed to silence any dessert critics at your table. Let’s get that butter melting!
- Why This Classic Butterscotch Pie Recipe Delivers Comfort
- Gathering Ingredients for Your Butterscotch Pie
- Step-by-Step Instructions for Classic Butterscotch Pie
- Tips for the Best Homemade Butterscotch Pie
- Serving Suggestions for Your Butterscotch Pie
- Storage and Reheating Instructions for Butterscotch Pie
- Frequently Asked Questions About Butterscotch Pie
- Nutritional Estimates for This Creamy Butterscotch Filling
- Share Your Homemade Butterscotch Pie Experience
Why This Classic Butterscotch Pie Recipe Delivers Comfort
This isn’t just any pie; it’s an experience. When I decided to translate my family’s favorites for the blog, this butterscotch pie had to be number one. People are tired of overly processed desserts, and this recipe delivers that deep, honest flavor that only happens when you make things the old-fashioned way. It’s pure goodness that reminds you of holiday gatherings or just a perfect Sunday dinner.
- It uses real butter and brown sugar—no shortcuts on flavor here.
- The texture of the filling is impossibly silky and rich.
- It gives you that wonderful scratch-made satisfaction.
If you’re looking for more comforting treats, I have a whole collection over here: my favorite easy dessert recipes.
Achieving the Perfect Creamy Butterscotch Filling
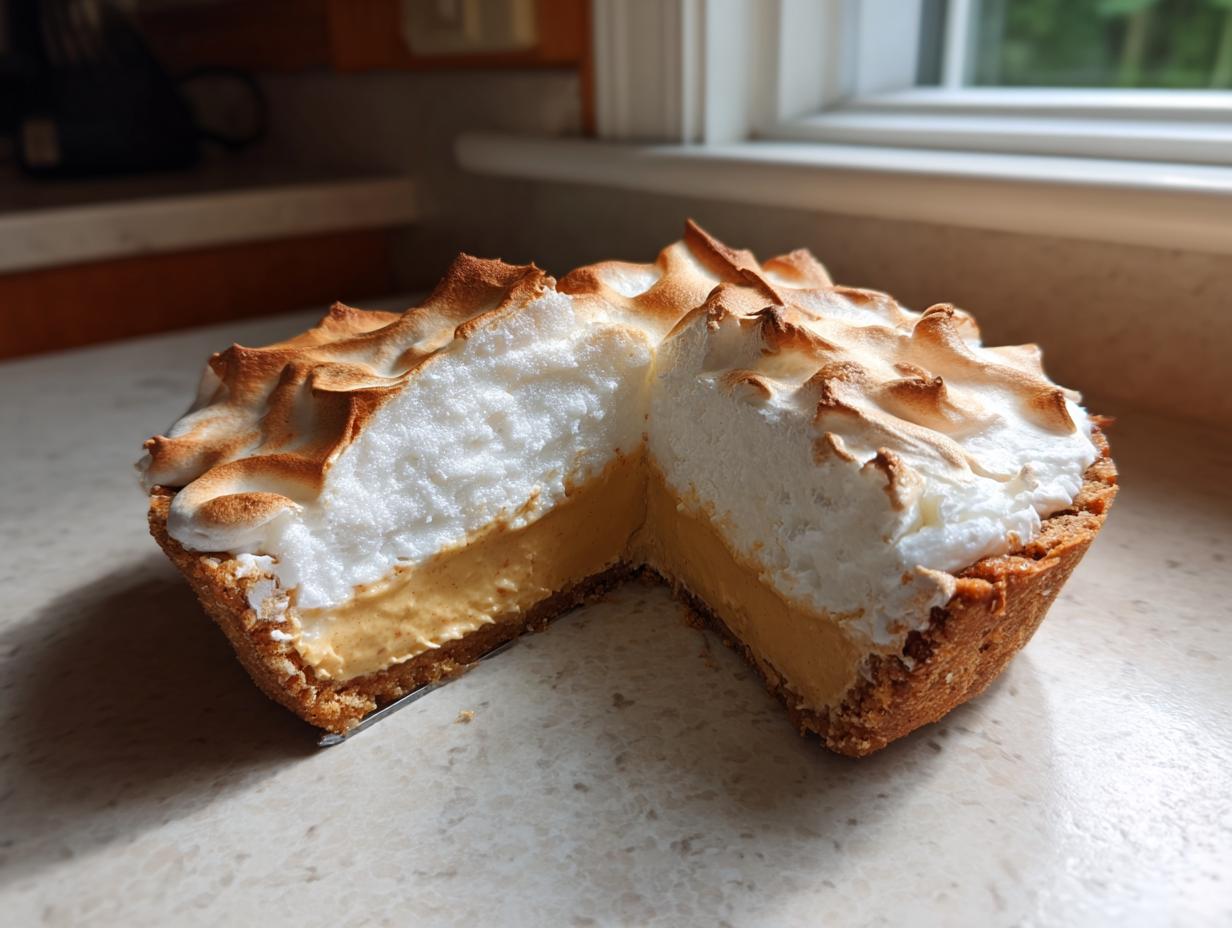
The absolute goal is that gorgeous, silky-smooth texture. We are not aiming for grainy or overly firm; we want it to melt in your mouth! The secret sauce to avoiding grainy texture—and achieving that superb Creamy Butterscotch Filling—is all about how you handle those egg yolks. You *must* temper them slowly. It’s the one step that separates a decent pie from one that makes people gasp when they take the first bite.
The Importance of a Homemade Pie Crust
You can’t put something this luxurious into a sad, store-bought container! The homemade pie crust is vital because its flaky, buttery shatter is the perfect textural contrast to that dense, creamy center. It’s what elevates this from being just a pudding in a bowl to a true show-stopping Scratch Made Pie. Think of the crust as the sturdy, flaky base supporting a sweet masterpiece!
Gathering Ingredients for Your Butterscotch Pie
Okay, let’s talk supplies! Because this is an Old Fashioned Butterscotch Dessert, we need to make sure we have everything on hand before we start cooking on the stovetop. Precision matters here, especially with the eggs and sugar, so please measure everything out before you turn on the burner, alright? I learned the hard way that trying to scoop brown sugar while whisking milk just ends in disaster!
Since we aren’t using any boxed mixes, we are relying on simple pantry staples to create that magic. If you’re feeling ambitious and want to check out another incredible scratch-made dessert staple, you have to see my classic pecan cream pie recipe next!
Ingredients for the Rich Butterscotch Filling
This is where that deep, complex flavor comes from. Make sure you’re using light brown sugar here, packed tightly into the cup, and definitely use whole milk—the fat content really helps the texture stabilize. Don’t skimp on the butter; we need every bit of that richness!
- 1 (9-inch) unbaked Homemade Pie Crust (blind-baked is great, or follow the recipe instructions for baking it alongside the filling once slightly set).
- 1 cup packed light brown sugar
- 1/4 cup all-purpose flour
- 1/4 teaspoon salt
- 1 1/2 cups milk (Whole milk works best for that rich texture!)
- 3 large egg yolks, lightly beaten (Make sure to save those whites for the topping!)
- 1/2 cup (1 stick) unsalted butter, cut into small pieces
- 1 teaspoon vanilla extract
Optional Meringue Topping Ingredients
If you’re going for the full, glorious presentation—and honestly, why wouldn’t you?—you need the meringue. The absolute most important thing here is making sure those egg whites are at room temperature. Cold whites just won’t whip up to the stiff, glossy peaks we dream about for a perfect Meringue Topping Pie.
- 3 large egg whites, room temperature
- 1/4 teaspoon cream of tartar (this stabilizer is non-negotiable!)
- 6 tablespoons granulated sugar
Step-by-Step Instructions for Classic Butterscotch Pie
Alright, deep breath! This is the part where we turn simple ingredients into that stunning, rich dessert everyone raves about. Don’t let the custard elements intimidate you; we’re just taking it nice and slow. First things first, get that oven preheated to 375 degrees Fahrenheit. Have your unbaked pie crust already sitting on a baking sheet—this makes moving it way easier later on. Don’t worry about cooling the filling down first; we’re doing a ‘hot pour’ method, which is one of the tricks to getting that perfect set!
Preparing the Filling Base and Cooking
We start on the stovetop with the dry bits. In a medium saucepan—not too big, we want thickness!—whisk together that brown sugar, flour, and salt until there are absolutely no dusty clumps left. Now, slowly whisk in your milk until the whole thing looks uniform and smooth. Set it over medium heat. You need to stir constantly here. Keep scraping the bottom and sides of the pan until it bubbles up and thickens enough to coat the back of a spoon. When it hits a real boil, let it boil for just 60 seconds, still stirring, and then pull it right off the heat. We have to move fast now!
Tempering Egg Yolks for a Smooth Butterscotch Pie
This is where we become experts! If you dump those lovely **egg yolks** straight into the hot sugar mixture, you’ll end up with scrambled eggs, and nobody wants a **butterscotch pie** full of little yellow bits. To prevent that disaster, we temper. Take about half a cup of that hot sugar liquid and drizzle it *very* slowly, in a thread-like stream, into your beaten yolks while you whisk the yolks like crazy. Once those yolks are warmed through and slightly lighter in color, you can gently pour that warmed yolk mixture back into the saucepan with the rest of the filling. Return it to the heat for just one to two minutes until it thickens up again. Remember: after the yolks go in, don’t let it boil!
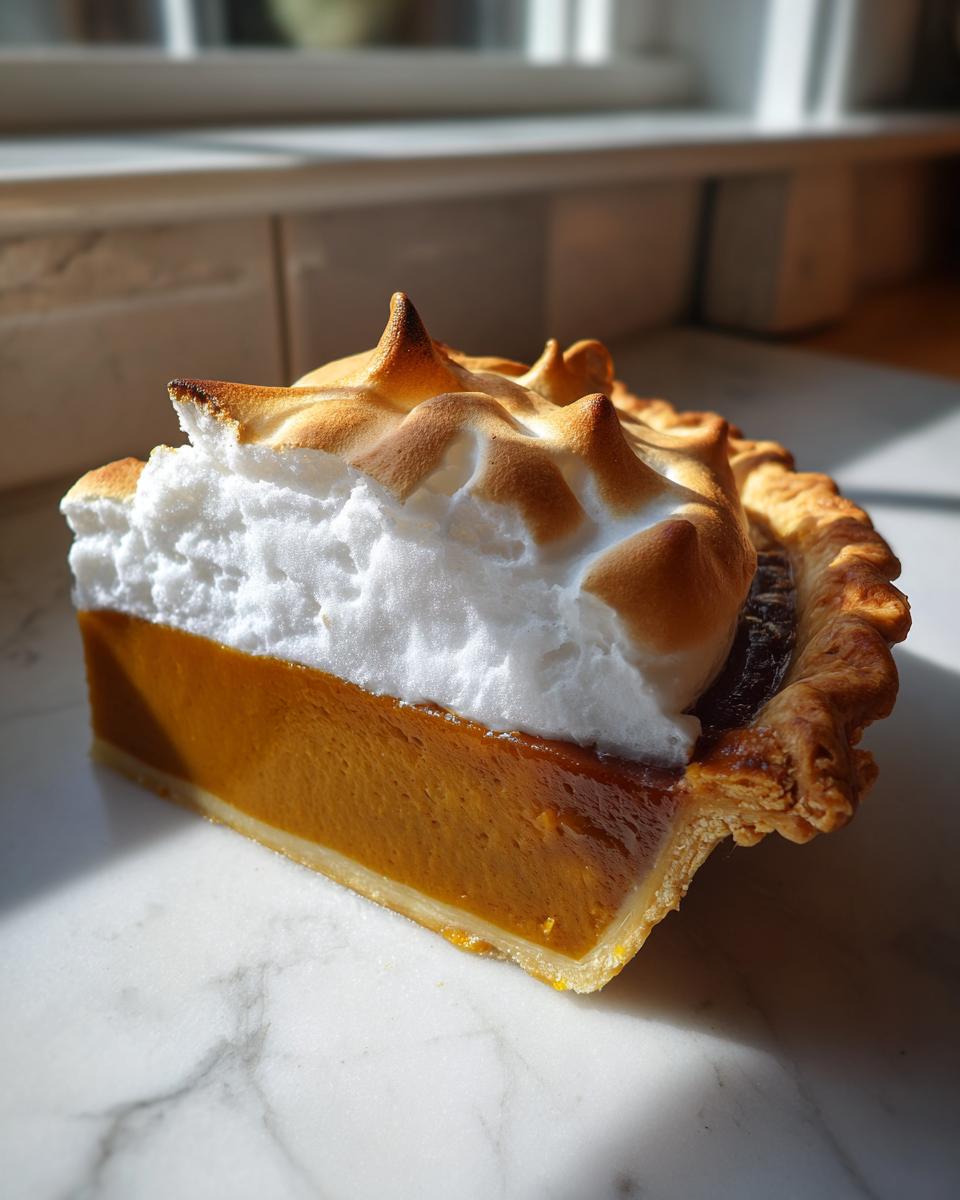
Baking the Pie and Making the Meringue
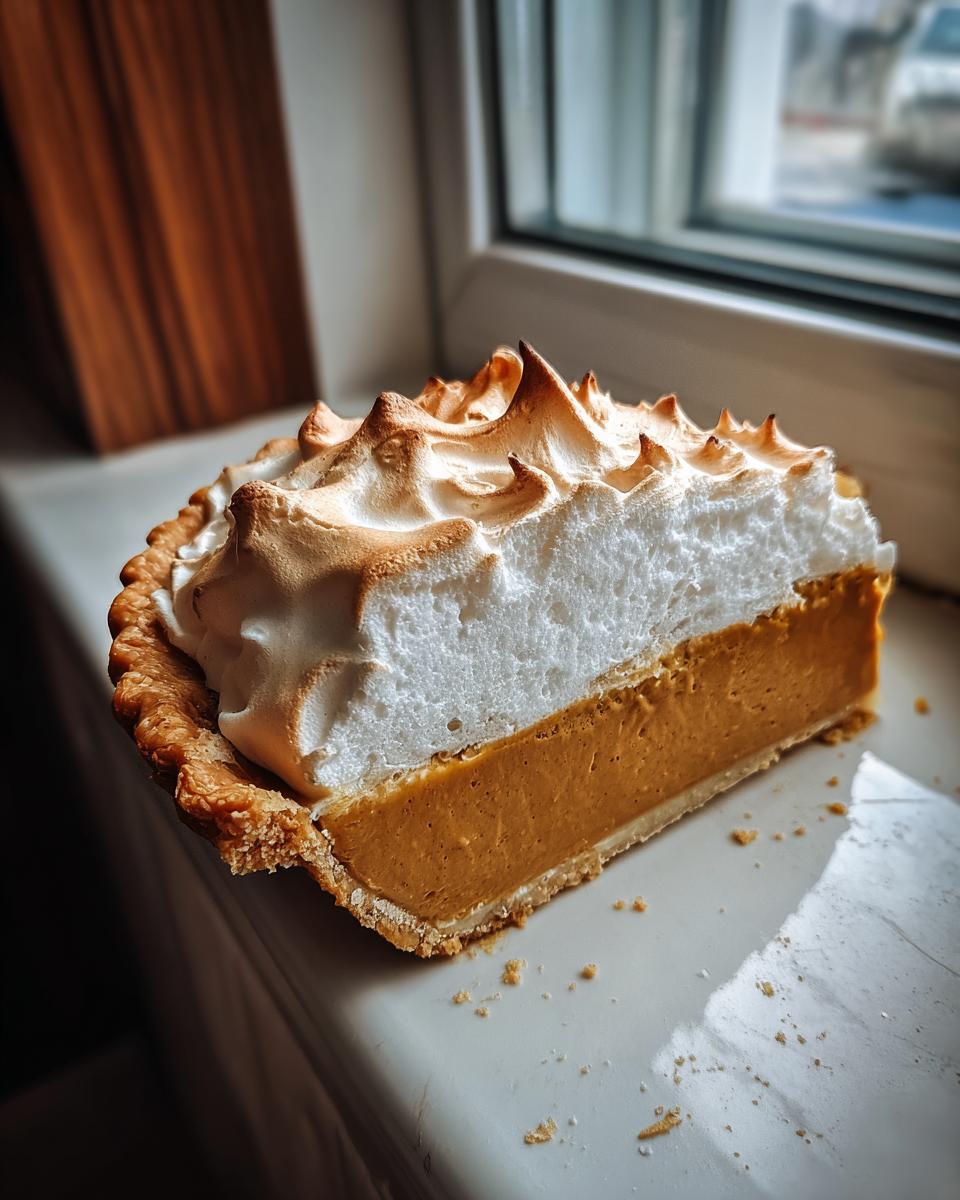
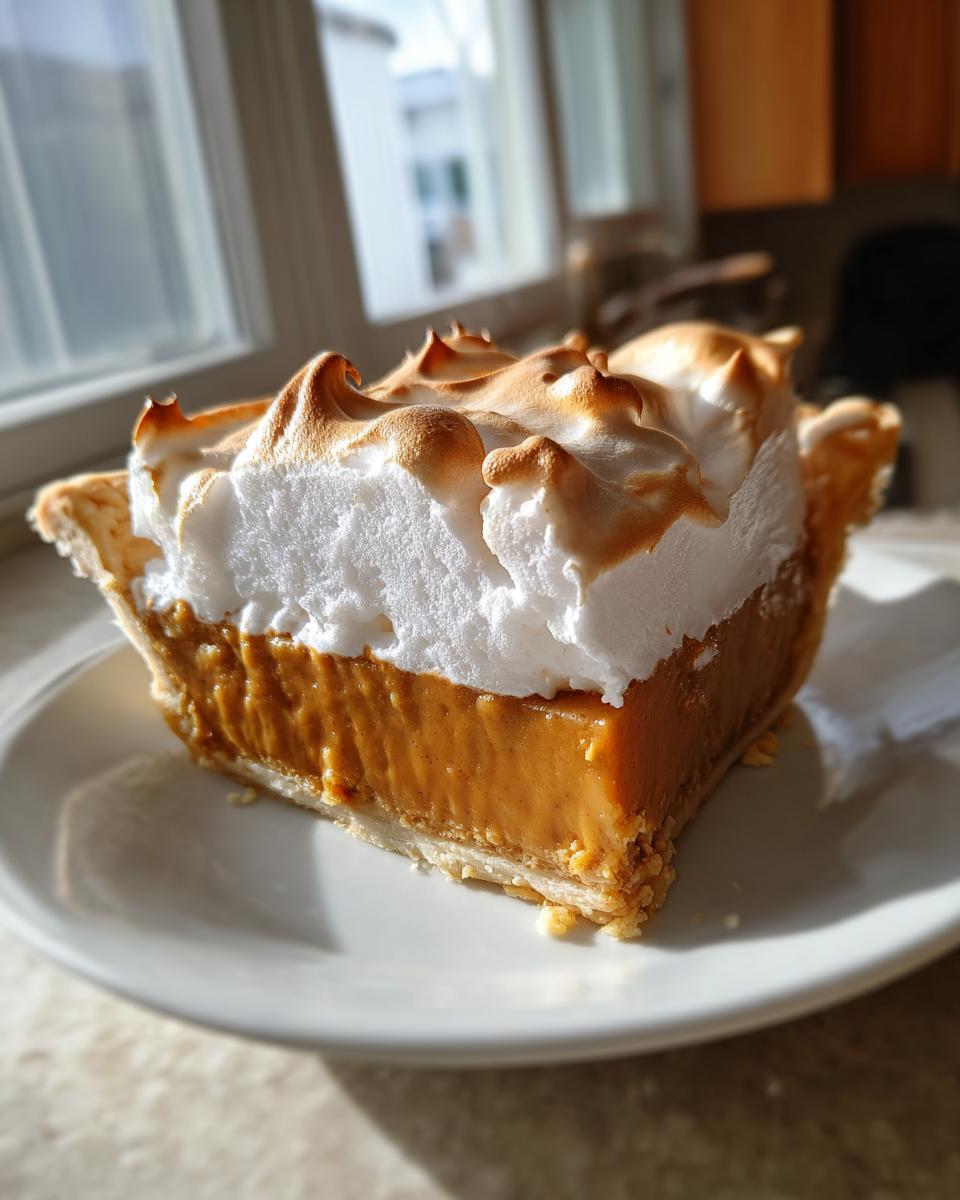
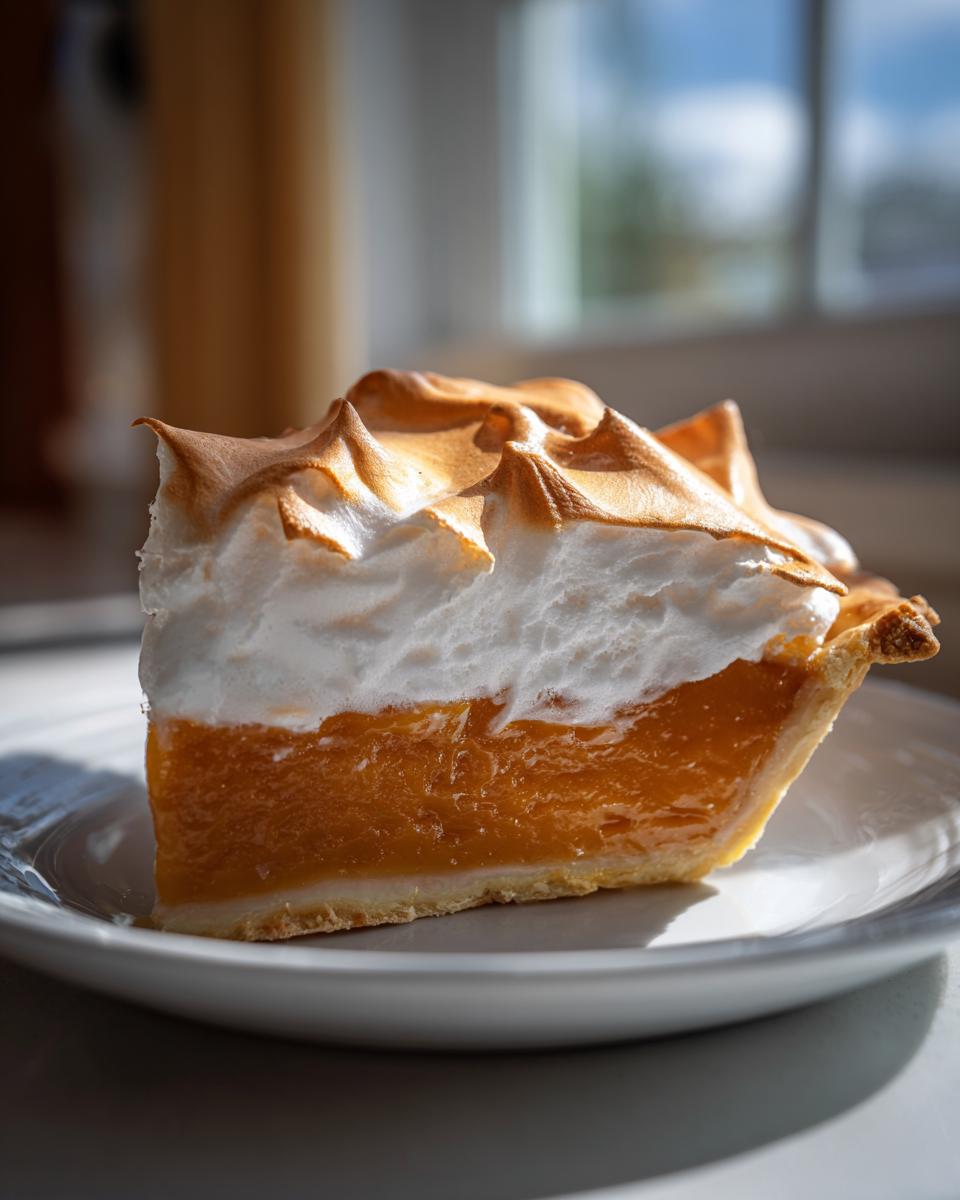
Once it’s thick again, take it off the heat for good and stir in that butter until it’s all melted and glossy, followed by the vanilla. Pour this magnificent, hot filling into your waiting pie crust. Pop it on the baking sheet into the oven for about 15 to 20 minutes just to set the crust edges. If you’re making the meringue, whip those room-temperature egg whites with the cream of tartar until they give you soft peaks. Then, slowly stream in the granulated sugar until you have stiff, glossy peaks—think mountain tops! Spread that meringue right over the hot filling, making sure it seals against the very edge of the crust. Pop it back in at 375°F for a quick 5 to 8 minutes until those peaks brown beautifully. If you skip the meringue, let the pie cool completely on a rack! Speaking of perfect ratios, if you ever need a reminder on how to get chewy cookies just right, check out my guide to soft and chewy chocolate chip cookies.
Tips for the Best Homemade Butterscotch Pie
Making this spectacular butterscotch pie should feel fun, not frightening! While the custard base is straightforward, there are a couple of tiny tricks I always employ to guarantee the filling is perfect and the meringue doesn’t decide to run away halfway through cooling. These little details are what make the difference between a regular pie and one that instantly becomes a family favorite. Remember, we are going for that luxurious, buttery flavor that sticks with you.
Preventing Meringue Shrinkage
Oh, the dreaded shrinking meringue! It’s unsightly, and frankly, it feels like failure after all that whipping. You absolutely must make sure the meringue is touching the inner edge of the crust all the way around the perimeter after you spread it on the hot filling. When the meringue seals against the crust, it anchors everything together as it cools and bakes, stopping that ugly gap from forming between the filling and the crust. It’s a super simple physical barrier!
Flavor Boosts for Your Rich Butterscotch Dessert
Since this is a Rich Butterscotch Dessert, using the best quality butter you can find really makes a difference—I use European style if I can find it! Also, if you feel like experimenting, try adding just a tiny, tiny pinch of a ground spice like cardamom or just a whisper of espresso powder right into the filling before you temper the yolks. It won’t taste like cardamom or coffee, but it deepens the brown sugar flavor dramatically. For more ideas on decadent sweets, I always love seeing what others are baking; check out this inspiration source!
Serving Suggestions for Your Butterscotch Pie
Once you’ve navigated the beautiful process of baking and crowning your creation with that gorgeous, barely toasted meringue, the hardest part begins: waiting! You absolutely have to let this pie cool completely on a wire rack—I mean, truly cool—and then chill it for at least three to four hours. If you try slicing it warm, you’ll get a lovely, sweet puddle, not those neat slices we’re aiming for!
When it’s finally time to serve, I find that because this butterscotch pie is so intensely rich and sweet, it pairs wonderfully with something light and clean on the side. Forget heavy sides! Keep it simple.
Here’s what I love doing:
- A dollop of softly whipped cream that isn’t heavily sweetened. Just cream, maybe a tiny bit of vanilla, and a whisper of powdered sugar. The lightness cuts through that deep butterscotch flavor beautifully.
- If you skipped the meringue, a light dusting of high-quality cocoa powder can look very professional and adds a lovely earthy note.
- Coffee or tea is the perfect beverage pairing. A strong, slightly bitter black coffee is truly magnificent against the sweetness.
If you found yourself needing a lighter, less intensive dessert that still hits those comforting notes, you might want to look at my apple cinnamon muffins recipe. But trust me, for a showstopper holiday treat, this chilled pie cannot be beaten!
Storage and Reheating Instructions for Butterscotch Pie
Now that your gorgeous butterscotch pie is perfectly chilled, we need to talk about keeping it that way! Since we worked so hard for that silky filling, we want to make sure it stays fresh. The biggest thing you need to know right away is that if you made the meringue topping, you really should eat this pie the same day you make it.
Meringue has a mind of its own, and it just doesn’t like the fridge very much; it tends to weep or get weepy after about 12 hours, even if you sealed it to the crust. It’s a fussy topping!
Refrigerating the Pie
For the best results, store any leftovers—meringue-topped or not—in the refrigerator. Cover it loosely with plastic wrap, but try not to let the plastic touch the meringue directly, or you guarantee stickiness! It should hold up beautifully for about three days when stored this way. If you want to make life easier, you can even bake the crust and fill it the day before you plan to serve it, but don’t add the meringue until just before you serve the pie.
What If I Skipped the Meringue?
If you opted for whipped cream or just a dusting of powdered sugar on your filling, you get a little more wiggle room! The Creamy Butterscotch Filling, when unfrosted, keeps really well covered in the fridge for up to four days. It will firm up more as it sits, which is perfect if you like a firmer slice, almost like fudge!
Can You Freeze It?
Honestly, I wouldn’t risk it for this particular recipe. The custard filling and the meringue don’t handle being frozen and thawed well at all; they get watery and break down. We want this to be a fresh, stellar experience, so plan on making it when you know you’ll have enough happy eaters to finish it within three days!
Frequently Asked Questions About Butterscotch Pie
I always get so many questions once people see how gorgeous this pie turns out! It’s natural when you’re trying something new, especially a beloved classic like this. I’ve gathered a few of the most common things readers ask me about making this butterscotch pie perfectly, so hopefully, this helps clear up any last-minute worries before you jump into the kitchen. If you are looking for more simple sweets after mastering this one, don’t forget to browse my collection of easy dessert recipes!
Can I make this butterscotch pie without the meringue topping?
Oh, absolutely! While I personally think that toasted meringue is heavenly, sometimes you just need an Easy Butterscotch Pie, or maybe you just aren’t a meringue fan. If you skip it, the pie still sets up beautifully in the fridge. My favorite alternative is topping the cooled pie filling with fresh, lightly sweetened whipped cream. That cool, airy topping contrasts perfectly with the dense, buttery filling underneath. Just make sure you let the filling cool completely before adding the cream, unlike the hot meringue application!
What is the difference between this and a caramel pie?
That’s a sneaky question because they seem so similar! The key really lies in the sugar base. For a true butterscotch pie, we are relying heavily on brown sugar—that deep, molasses-rich flavor is what defines it. Caramel pies, on the other hand, often start with granulated white sugar that is caramelized first, then mixed with cream or butter. While they both taste amazing, the brown sugar in this recipe gives us that signature warm, slightly earthy molasses note that you just can’t get from white caramelized sugar alone. That’s why this is an Old Fashioned Butterscotch Dessert!
Can I use a store-bought crust for this Classic Butterscotch Pie Recipe?
Listen, sometimes you’re short on time, and that’s perfectly okay in a modern kitchen! Yes, you can absolutely use a good quality, store-bought 9-inch crust if needed for this Classic Butterscotch Pie Recipe. It will certainly save you about 15 minutes of prep time. I will always tell you, though, that a flaky, all-butter Homemade Pie Crust is going to make the final product unbeatable. The richer, more tender crumb of a homemade crust really stands up better to the heavy custard filling. If you check out what others are doing, sometimes their scratch methods look impressive, like this grandma’s version, and you see how crust matters!
Nutritional Estimates for This Creamy Butterscotch Filling
Now, I know what you might be thinking: with all that brown sugar and butter, this butterscotch pie is certainly a rich treat! And you’d be right. This is indulgent, full-flavor home cooking, not a low-calorie snack, and I think it’s important to be upfront about what we’re working with here.
I have run the ingredients through a few standard calculators, and these are the general estimates per slice (1/8th of the pie, assuming you used the full recipe including the meringue topping). Remember, these numbers are just estimates! If you use low-fat milk instead of whole, or swap out the butter brand, things will shift slightly. The homemade, scratch-made nature of our recipes means we rely on good ingredients, and that impacts the final count!
These estimates are based on 8 generous servings:
- Serving Size: 1 slice
- Calories: Roughly 450
- Sugar: Around 45g (That’s where the rich butterscotch flavor comes from!)
- Sodium: About 250mg
- Fat: Approximately 25g
- Saturated Fat: In the 15g range
- Unsaturated Fat: About 10g
- Trans Fat: Less than 1g
- Carbohydrates: Around 55g
- Fiber: Just 1g
- Protein: About 6g
- Cholesterol: In the 120mg range
Look, this isn’t an everyday dessert, but it is the absolute perfect dessert for when you want to sit down, savor the moment, and enjoy something made with real care. Don’t let the numbers stop you from enjoying this slice of comforting, old fashioned dessert heaven!
Share Your Homemade Butterscotch Pie Experience
Well, you did it! You successfully navigated the hot custard base, you tempered those yolks like a pro, and hopefully, you’re staring at a gloriously set, creamy butterscotch pie right now. Making these cherished family recipes, even when they feel a little intimidating, is so rewarding, isn’t it?
Now that you’ve experienced the rich flavor of a truly scratch-made dessert, I’d love to hear all about it! Did your meringue puff up like a cloud? Did your family ask for the recipe immediately? Every time you bake something, you’re adding your own layer of history to that dish, and I want to know what your kitchen experienced.
Please, take a minute and tell me what you thought! Drop a comment below and let me know your rating. If you took a picture of that beautiful slice, I’d be thrilled if you shared it!
- Rate this recipe from 1 to 5 stars!
- Tell me about your favorite part of the process.
- Did you substitute anything? Let us all know if it worked!
If you want to send me a direct message with photos or feedback about this recipe, you can always reach out through my contact page. And if you’re looking for visual inspiration from others who have tackled this classic, check out what others have made over at Cuts Food—it might just inspire your next bake!
Sending you all the happiest baking wishes!
PrintClassic Creamy Homemade Butterscotch Pie
You will create a rich, nostalgic butterscotch pie with a silky-smooth filling and a flaky crust. This old-fashioned dessert is simple to make and always impresses your guests.
- Prep Time: 20 min
- Cook Time: 30 min
- Total Time: 230 min
- Yield: 8 servings 1x
- Category: Dessert
- Method: Baking
- Cuisine: American
- Diet: Vegetarian
Ingredients
- 1 (9-inch) unbaked homemade pie crust
- 1 cup packed light brown sugar
- 1/4 cup all-purpose flour
- 1/4 teaspoon salt
- 1 1/2 cups milk (whole milk works best)
- 3 large egg yolks, lightly beaten
- 1/2 cup (1 stick) unsalted butter, cut into pieces
- 1 teaspoon vanilla extract
- For Topping (Optional Meringue): 3 large egg whites, room temperature; 1/4 teaspoon cream of tartar; 6 tablespoons granulated sugar
Instructions
- Preheat your oven to 375 degrees Fahrenheit. Place your unbaked pie crust on a baking sheet.
- In a medium saucepan, whisk together the brown sugar, flour, and salt until combined.
- Gradually whisk in the milk until the mixture is smooth.
- Cook the mixture over medium heat, stirring constantly, until it thickens and comes to a boil. Boil for 1 minute, stirring constantly. Remove from heat.
- Temper the egg yolks: Slowly pour about 1/2 cup of the hot sugar mixture into the beaten egg yolks while whisking quickly. This prevents the yolks from scrambling.
- Pour the tempered egg yolk mixture back into the saucepan with the remaining hot mixture. Return the pan to medium heat.
- Cook, stirring constantly, for 1 to 2 minutes until the filling thickens again. Do not let it boil after adding the yolks.
- Remove the pan from the heat. Stir in the butter until it melts completely. Stir in the vanilla extract.
- Pour the hot butterscotch filling into the unbaked pie crust.
- Bake for 15 to 20 minutes, or until the crust edges are lightly golden brown. If the crust edges brown too quickly, cover them loosely with foil strips.
- Remove the pie from the oven. If you are adding meringue, proceed to the next step immediately. If not, let the pie cool completely on a wire rack before chilling.
- To make the meringue: In a clean, grease-free bowl, beat the egg whites and cream of tartar with an electric mixer until soft peaks form. Gradually add the granulated sugar, beating until stiff, glossy peaks form.
- Spread the meringue evenly over the hot filling, making sure the meringue touches the inner edge of the crust all the way around to prevent shrinking.
- Return the pie to the 375 degrees Fahrenheit oven for 5 to 8 minutes, or until the meringue is lightly golden brown.
- Cool the pie completely on a wire rack for at least 3 hours before slicing and serving. Chill thoroughly before serving for the best texture.
Notes
- For a richer flavor, use a homemade pie crust made with all butter.
- If you skip the meringue, you can top the cooled pie with lightly sweetened whipped cream.
- This pie tastes best when served cold. Allow ample time for chilling.
Nutrition
- Serving Size: 1 slice
- Calories: 450
- Sugar: 45g
- Sodium: 250mg
- Fat: 25g
- Saturated Fat: 15g
- Unsaturated Fat: 10g
- Trans Fat: 0.5g
- Carbohydrates: 55g
- Fiber: 1g
- Protein: 6g
- Cholesterol: 120mg