
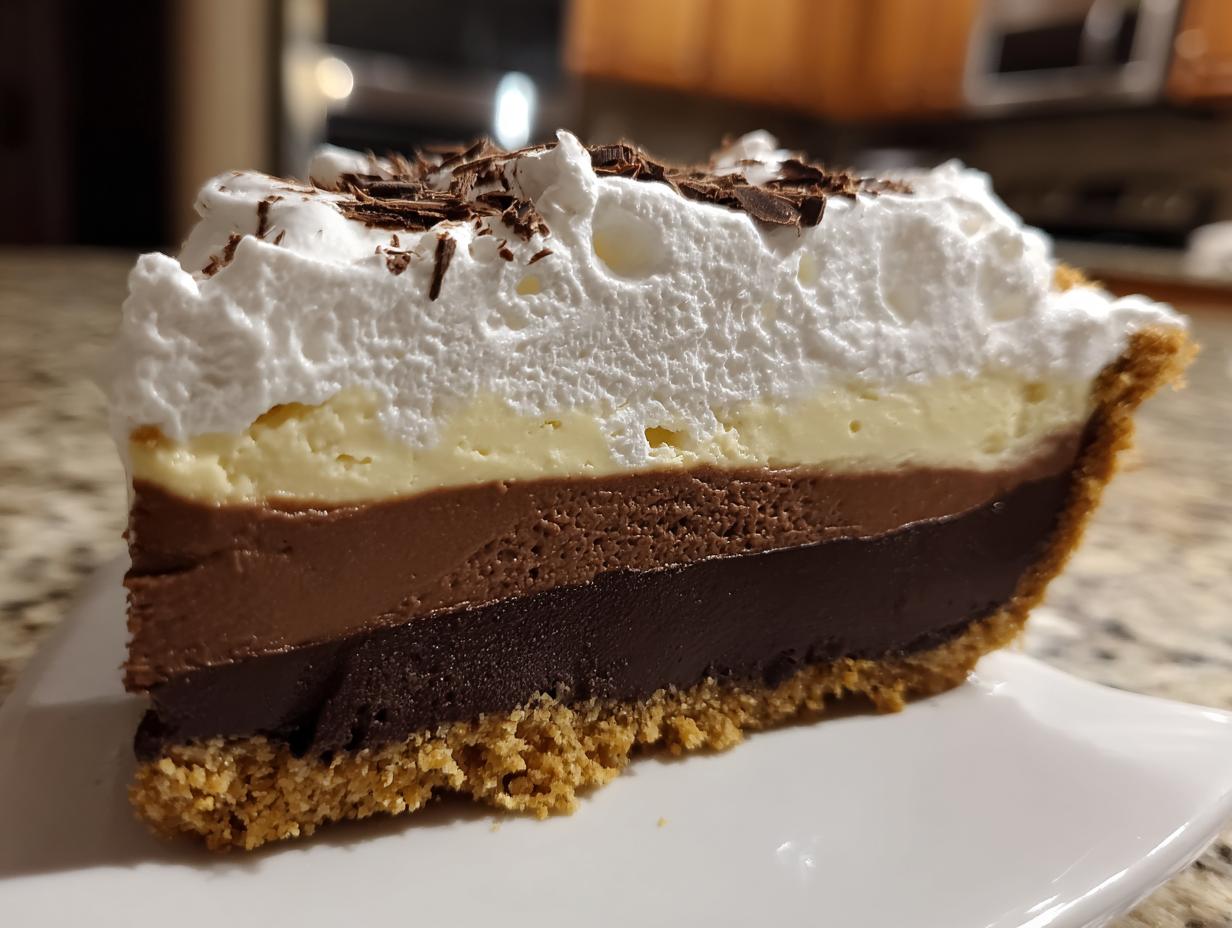
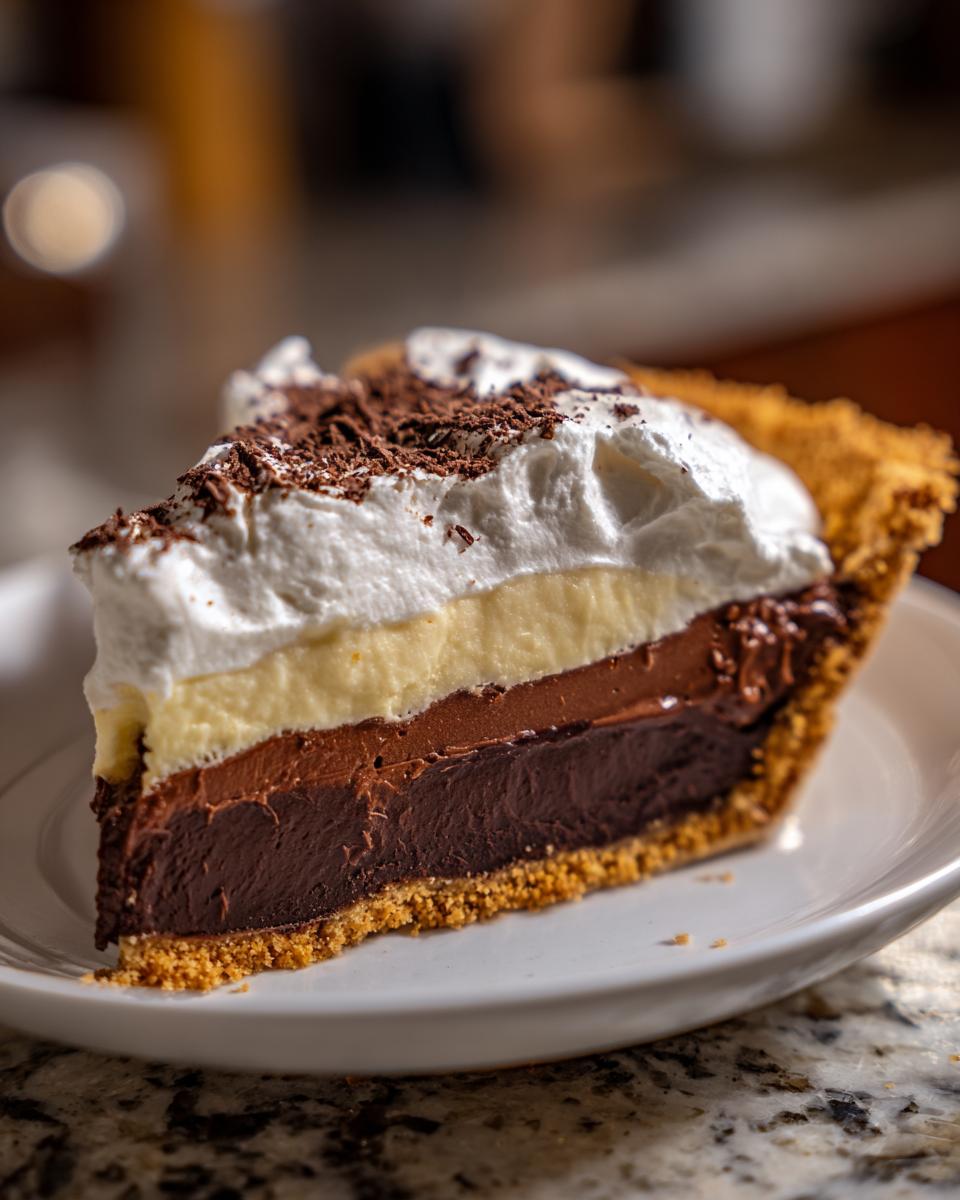
Oh, bring on the nostalgia and comfort food! There’s just something about a truly classic dessert that just makes everything feel right again, isn’t there? My absolute favorite? It has to be a show-stopping black bottom pie. Seriously, that deep, rich chocolate layer contrasting with the smooth, silky vanilla custard and don’t even get me started on that perfectly crisp graham cracker crust. It’s a dessert that feels like a warm hug from grandma, perfect for those moments when you just need a little bit of old-fashioned goodness.
- Why You'll Love This Black Bottom Pie
- Ingredients for Your Perfect Black Bottom Pie
- Crafting the Black Bottom Pie: Step-by-Step Instructions
- Tips for the Best Black Bottom Pie
- Make-Ahead and Serving Suggestions for Your Holiday Pie Recipe
- Frequently Asked Questions about Black Bottom Pie
- Nutritional Information
- Share Your Black Bottom Pie Creations!
Why You’ll Love This Black Bottom Pie
Seriously, this pie is a winner for so many reasons:
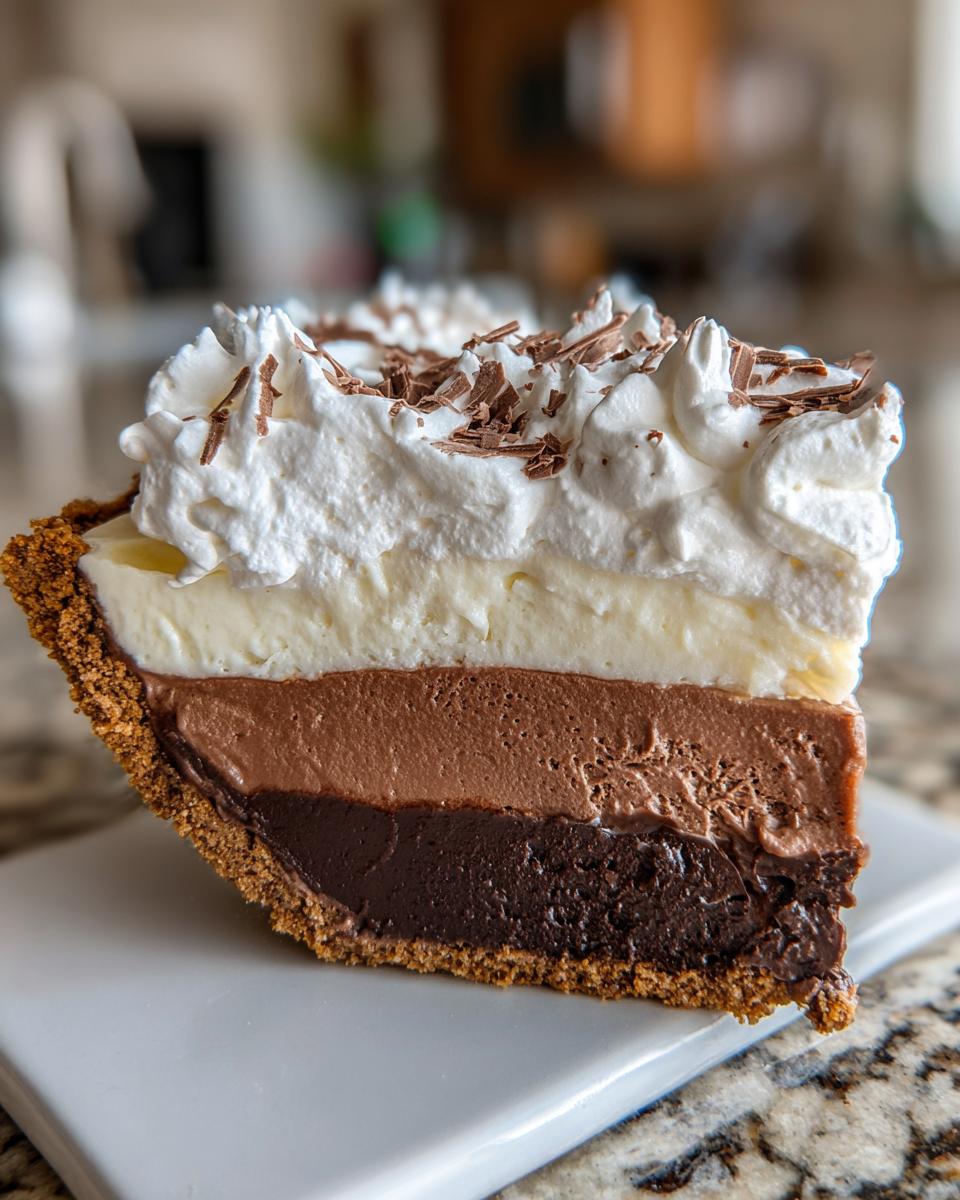
- It’s a total show-stopper with that gorgeous dark chocolate peeking through.
- You get this amazing contrast of creamy custard and a perfectly crunchy graham cracker crust.
- It’s a make-ahead dream, so you can get a head start on holiday baking.
- It’s elegant enough for your fanciest dessert boards but comfortingly familiar.
- It’s just a pure hug in pie form!
Ingredients for Your Perfect Black Bottom Pie
Alright, let’s get our hands on the goodies we need for this amazing black bottom pie! It looks like a lot, but trust me, it all comes together beautifully.
For the crust, you’ll need:
- 1 and a half cups of graham cracker crumbs (just blitz them up in the food processor or a Ziploc bag with a rolling pin!)
- A ¼ cup of granulated sugar
- And 6 tablespoons of unsalted butter, all melted and ready to go.
Now, for that dreamy chocolate bottom layer:
- 1 cup of granulated sugar
- A ¼ cup of good quality unsweetened cocoa powder
- 3 tablespoons of cornstarch (this is our thickener!)
- ½ teaspoon of salt to balance it all out
- 3 cups of milk (whole milk works best for richness)
- 4 large egg yolks, just lightly beaten
- 2 tablespoons more of unsalted butter
- And 1 teaspoon of pure vanilla extract.
And for the cloud-like topping:
- 1 and a half cups of heavy cream, nice and cold
- A ¼ cup of powdered sugar
- And 1 teaspoon of vanilla extract.
- Oh, and a little something extra for garnish – think chocolate shavings or pretty curls!
Crafting the Black Bottom Pie: Step-by-Step Instructions
Alright, let’s get this magic happenin’! Making this black bottom pie is like painting a delicious picture, layer by layer. Don’t worry if it seems a bit involved, each step is totally doable and makes the final result so worth it! If you’re looking for other crust ideas, you might want to check out my recipe for easy cornbread!
Preparing the Graham Cracker Crust
First things first, let’s get that crust ready. Preheat your oven to 350°F (175°C). In a bowl, just mix up those graham cracker crumbs, the ¼ cup of sugar, and the melted butter until everything looks nicely moistened. Press this mixture firmly and evenly into the bottom and up the sides of a 9-inch pie plate. Pop it in the oven for about 8 to 10 minutes until it’s just golden. Then, pull it out and let it cool completely while we make the yummy filling.
Making the Rich Chocolate ‘Black Bottom’ Layer
Now for the star of the bottom! Grab a medium saucepan and whisk together the 1 cup of sugar, cocoa powder, cornstarch, and salt until they’re all nicely combined. Slowly whisk in the milk until there are no lumps. Cook this over medium heat, stirring *constantly*, until it gets thick and starts to boil. Let it boil for just one minute, still stirring away. Now, here’s a little trick: take about a cup of that hot chocolate mixture and slowly drizzle it into your lightly beaten egg yolks while whisking like crazy – this is called tempering, and it stops your eggs from scrambling! Pour that lovely tempered yolk mix back into the saucepan. Put it back on medium-low heat and stir for another 2 minutes, just until it’s thick and smooth again, but don’t let it boil!
Take it off the heat and stir in the 2 tablespoons of butter and 1 teaspoon of vanilla until that butter is all melted and smooth. Easy peasy!
Assembling and Chilling the Pie
Pour that gorgeous, rich chocolate custard right into your cooled graham cracker crust. It’ll look amazing already! To keep a pesky skin from forming on top while it chills, press a piece of plastic wrap directly onto the surface of the custard. Pop the whole pie into the fridge for at least 2 hours, or until it’s nice and firm. This is where the magic of setting happens!
Creating the Silky Vanilla Custard and Whipped Cream Topping
While the chocolate layer is getting chilly, let’s whip up the topping. Grab a *cold* bowl and add your heavy cream, the ¼ cup of powdered sugar, and that last teaspoon of vanilla. Beat it with your electric mixer until you’ve got lovely stiff peaks – you know, the kind that stand straight up when you pull the beaters away! Gently spread this fluffy cloud of whipped cream over the chilled chocolate layer. Don’t be shy!
Tips for the Best Black Bottom Pie
Alright, let’s talk about making this black bottom pie absolutely perfect! It really comes down to a few little tricks I’ve picked up over the years. First off, use good quality cocoa powder – it makes a HUGE difference in that rich chocolate flavor. When you’re tempering those egg yolks, go slow and steady; nobody wants scrambled eggs in their custard, right? I learned that the hard way making my grandma’s classic chocolate chip cookies once, and it’s a lesson I carried over to all my custard recipes! Also, make sure whatever milk you use is whole milk for the creamiest texture. And for the whipped cream topping, make sure your bowl and beaters are super cold – it really helps it whip up nice and fluffy, almost like magic. You want those stiff peaks so your topping doesn’t just melt away!
Make-Ahead and Serving Suggestions for Your Holiday Pie Recipe
This black bottom pie is a total lifesaver around the holidays, no joke! You can totally make the graham cracker crust and that amazing chocolate custard layer the day before. Just keep them covered in the fridge. Then, when you’re ready to wow everyone, whip up that topping and spread it on. It’s a fantastic way to get ahead of the game, like my make-ahead hash brown egg casserole! For super elegant slices, especially for dessert boards, use a sharp knife that’s been dipped in hot water and wiped dry between each cut. It makes for such clean, pretty slices that really show off those beautiful layers. Looking for more holiday pie recipes? This one’s a keeper!
Frequently Asked Questions about Black Bottom Pie
Got questions about this dreamy black bottom pie? I totally get it! This vintage dessert is pretty special, so here are some things people often ask:
Can I use a different crust for this pie?
You sure can! While the graham cracker crust is classic for a reason – it’s got that perfect sweet crunch – you could totally try a chocolate cookie crust or even a buttery shortbread crust. Some folks even go for a chocolate wafer crust! Just make sure whatever crust you choose is baked and cooled before adding the custard.
Why is my chocolate custard lumpy?
Oh no, lumps happen! Usually, it’s because the heat was a little too high when you were cooking the custard, or maybe the cornstarch clumps didn’t get fully whisked out. A good trick is to whisk really well over medium or medium-low heat and not let it boil too rapidly. If you do get lumps, you can always push the custard through a fine-mesh sieve before pouring it into the crust. It’s like magic for smoothing things out!
How long will my black bottom pie last?
Because of that lovely whipped cream topping, this pie is best kept chilled in the refrigerator. It usually stays good for about 2 to 3 days. It’s definitely a pie that’s best enjoyed fresh, especially that fluffy topping! My easy breakfast ideas might last longer, but this pie is all about immediate deliciousness!
Nutritional Information
Just a heads-up, the nutritional info for this amazing black bottom pie is an estimate, of course! Things can change a bit depending on the brands you use and how you slice it. But generally, one slice packs about 350 calories, 20g of fat (12g saturated), 40g carbs, 35g sugar, and 5g protein. Enjoy every bite!
Share Your Black Bottom Pie Creations!
Alright, now that you’ve hopefully made (and devoured!) this incredible black bottom pie, I’d absolutely LOVE to hear all about it! Did you make it for a special occasion? Did your family go wild for it? Drop a comment below and tell me everything! And if you snapped a photo, tag me on social media – I can’t wait to see your beautiful pie creations! If you have any lingering questions or want to share more tips, feel free to reach out via my contact page!
PrintBlack Bottom Pie
A vintage cream pie featuring a rich chocolate custard base, a silky vanilla custard filling, and a fluffy whipped cream topping, all nestled in a graham cracker crust.
- Prep Time: 30 min
- Cook Time: 20 min
- Total Time: 50 min
- Yield: 8 servings 1x
- Category: Dessert
- Method: Baking
- Cuisine: American
- Diet: Vegetarian
Ingredients
- 1 ½ cups graham cracker crumbs
- ¼ cup granulated sugar
- 6 tablespoons unsalted butter, melted
- 1 cup granulated sugar
- ¼ cup unsweetened cocoa powder
- 3 tablespoons cornstarch
- ½ teaspoon salt
- 3 cups milk
- 4 large egg yolks, lightly beaten
- 2 tablespoons unsalted butter
- 1 teaspoon vanilla extract
- 1 ½ cups heavy cream
- ¼ cup powdered sugar
- 1 teaspoon vanilla extract
- Chocolate shavings or curls, for garnish
Instructions
- Preheat your oven to 350°F (175°C).
- In a medium bowl, combine graham cracker crumbs, 1/4 cup granulated sugar, and 6 tablespoons melted butter. Mix until crumbs are moistened. Press the mixture evenly into the bottom and up the sides of a 9-inch pie plate. Bake for 8-10 minutes, until lightly golden. Let cool completely.
- In a medium saucepan, whisk together 1 cup granulated sugar, cocoa powder, cornstarch, and salt. Gradually whisk in the milk until smooth.
- Cook over medium heat, stirring constantly, until the mixture thickens and comes to a boil. Boil for 1 minute, stirring constantly.
- Remove from heat. Gradually temper the egg yolks by slowly whisking about 1 cup of the hot chocolate mixture into the beaten yolks. Then, pour the tempered yolk mixture back into the saucepan with the remaining chocolate mixture.
- Return the saucepan to medium-low heat and cook, stirring constantly, for 2 minutes more. Do not boil.
- Remove from heat and stir in 2 tablespoons butter and 1 teaspoon vanilla extract until the butter is melted and incorporated.
- Pour the chocolate custard into the prepared graham cracker crust. Press plastic wrap directly onto the surface of the custard to prevent a skin from forming. Chill for at least 2 hours, or until firm.
- In a chilled bowl, beat the heavy cream, 1/4 cup powdered sugar, and 1 teaspoon vanilla extract with an electric mixer until stiff peaks form.
- Spread the whipped cream evenly over the chilled chocolate custard.
- Garnish with chocolate shavings or curls. Chill until ready to serve.
Notes
- For make-ahead convenience, prepare the graham cracker crust and chocolate custard a day in advance. Add the whipped cream topping just before serving.
- To create elegant slices for dessert boards, use a sharp knife dipped in hot water and wiped dry between each cut.
Nutrition
- Serving Size: 1 slice
- Calories: 350
- Sugar: 35g
- Sodium: 200mg
- Fat: 20g
- Saturated Fat: 12g
- Unsaturated Fat: 8g
- Trans Fat: 0g
- Carbohydrates: 40g
- Fiber: 2g
- Protein: 5g
- Cholesterol: 80mg