
Is there anything more heavenly than that moment when a spoon breaks through the surface of a perfectly set, impossibly rich dessert? I’m talking about true comfort food magic, and today, we’re achieving it with the Easiest Ever Silky, No-Bake Chocolate Mousse. Seriously, if you think making classic comfort desserts involves endless complicated steps, you haven’t met my philosophy yet! At MDLATDMM, we strip away the fuss so you can get that decadent result easily. This classic chocolate mousse is proof positive that beginners can nail a restaurant-quality, creamy texture without ever turning on the oven. It’s simple, it’s quick, and it’s everything your sweet tooth has been asking for.
You can find more reliable, time-tested favorites in my collection of delicious dessert recipes, but this mousse holds a special place because it requires zero technical skill but delivers maximum flavor payoff.
- Why This Easy Chocolate Mousse Recipe Works (Beginner Friendly)
- Gathering Ingredients for Your Silky Chocolate Mousse
- Step-by-Step Instructions for the Easiest Chocolate Mousse Recipe
- Tips for Success Making Homemade Mousse
- Serving Suggestions for Your Decadent Chocolate Treat
- Storage and Reheating Instructions for Chocolate Mousse
- Troubleshooting Common Chocolate Mousse Issues
- Frequently Asked Questions About This Chocolate Mousse Recipe
- Nutritional Estimates for Your Homemade Mousse
Why This Easy Chocolate Mousse Recipe Works (Beginner Friendly)
I know, I know. Mousse sounds fancy, right? Like something you only attempt when you have three hours and a degree in pastry. But trust me, this version is a total game-changer. It’s an absolute keeper when you need a no bake dessert that still feels totally gourmet. We cut out the traditional complicated steps so you’re left with pure, unadulterated indulgence. This preparation guarantees you get that unbelievably creamy chocolate dessert texture every single time.

Achieving that Silky Chocolate Mousse Texture
The real secret hiding in plain sight is how we introduce that hot water to the chocolate. If you just throw cold cream at solid chocolate, you risk seizing, and seized chocolate is grainy chocolate—and nobody wants that! By melting the bittersweet chocolate first with just a splash of hot water, we create an initial smooth, glossy base. Think of that warm mixture as the foundation for everything silky that follows. It emulsifies perfectly so your final chocolate mousse is flawlessly smooth.
Quick Dessert Ideas: Minimal Hands-On Time
When I need a decadent chocolate treat but I’m short on time, this recipe saves the day. You are looking at maybe 15 minutes of actual hands-on work. That’s it! Since it’s a no bake dessert, the rest is just waiting time in the fridge. This makes it one of my go-to quick dessert ideas for unexpected company or when I realize I forgot I promised dessert after dinner. It’s fast prep, maximum reward!
Gathering Ingredients for Your Silky Chocolate Mousse
Okay, getting things ready is half the battle with any chocolate mousse recipe, and since this is so straightforward, having everything measured out is key! We aren’t using eggs or complicated stabilizers here; we’re relying on the magic combination of good chocolate and perfectly whipped cream. For four lovely servings of this rich chocolate dessert, here’s what we need to get moving. You’ll want 6 ounces of bittersweet chocolate, which needs to be finely chopped. Then, you’ll need just 1/4 cup of hot water—don’t worry, it helps melt everything smoothly! Don’t forget 1 teaspoon of vanilla extract, 1/4 teaspoon of salt to make that chocolate pop, and the star of the show: 1 1/2 cups of heavy whipping cream that must be ice cold. Finally, just 2 tablespoons of granulated sugar for the cream. See? Super simple ingredients for such a fluffy chocolate mousse!
Ingredient Notes and Substitutions for Perfect Chocolate Mousse
Let’s chat quality for a minute. Since this homemade mousse relies on just a few items, their quality really shines through. Please, use bittersweet chocolate—not semi-sweet or milk chocolate. That higher cocoa content provides the necessary structure and the deep, decadent chocolate treat flavor we are aiming for. If you use milk chocolate, it gets too sweet and soft, and frankly, it just won’t set right.
The second non-negotiable is the heavy whipping cream. It has to be cold, I mean, straight-from-the-back-of-the-fridge cold! If your cream is even slightly warm, it won’t achieve those stiff peaks we need to incorporate air. Those air pockets are what make this easy chocolate mousse so light and airy. If you want to get fancy, a dash of instant espresso powder mixed into the hot water is an amazing alternative to vanilla for deepening the flavor profile!
Step-by-Step Instructions for the Easiest Chocolate Mousse Recipe
Alright, time to put those gorgeous ingredients to work! This recipe moves fast once you get going, so have your bowls and whisks ready. Remember, because this is a no bake dessert, timing when you mix the elements is what gives you that incredible, pillow-soft result. We are essentially creating a rich chocolate base and then folding it into a cloud of whipped cream to create the perfect chocolate mousse structure.
Melting the Chocolate Base for Rich Chocolate Dessert
First things first: take your finely chopped bittersweet chocolate and put it in a heatproof bowl. Heat up your 1/4 cup of water until it’s hot—just shy of boiling is perfect. Pour that water right over the chocolate. Now, walk away for exactly two minutes. Don’t touch it! Those couple of minutes let the heat do the work uniformly. After the pause, grab a whisk and stir patiently until everything is liquid, glossy, and utterly smooth. That’s your sign that you haven’t got any grainy bits hiding in there! Once it’s silky, stir in your vanilla extract and that pinch of salt. Set this bowl aside to cool just slightly—we don’t want it hot enough to melt our whipped cream later, but it doesn’t need to be cold either.
Whipping Cream for Fluffy Chocolate Mousse
While the chocolate is cooling down, move onto your cream! Put your VERY cold heavy whipping cream and the 2 tablespoons of sugar into a large, clean bowl. Now, you need to whip this up until you get stiff peaks. What does that mean for a beginner? It means when you lift the whisk or mixer beater out, the peak of cream that forms doesn’t droop over; it stands straight up, strong and proud. If you gently tip the bowl, the cream shouldn’t slide at all—that’s stiff peaks! This is the air that makes our final Mousse light.
The Folding Technique: Creating the Creamy Chocolate Dessert
Here is where patience really pays off for that creamy chocolate dessert finish. Take about one-third of your stiff whipped cream and gently dollop it right into your slightly cooled chocolate base. Use a spatula and fold it in quickly but gently—we are just trying to lighten the heavy chocolate so it accepts the rest of the cream smoothly. Then, take the remaining two-thirds of the whipped cream and fold that in even more carefully. Work slowly, cutting down the middle and sweeping up the side of the bowl. Stop mixing the second you see no more white streaks remaining. Seriously, two or three final gentle folds and that’s it! Overmixing at this stage is the number one way to deflate all that beautiful air we just whipped in, leaving you with dense, heavy chocolate, not fluffy chocolate mousse.
Once you’ve managed that perfect fold, you can spoon the mixture into your little glasses. Then, they just need a good 2 hours in the fridge to firm up. See? Easy peasy! You can see some other great ideas for light desserts over here at my delicious dessert recipes collection, but this one is definitely my favorite quick fix.
Tips for Success Making Homemade Mousse
Even though this is an easy recipe, a few little secrets will guarantee you get that luscious, silky chocolate mousse texture every time. The biggest hurdle people face with any creamy chocolate dessert is rushing the cooling or chilling stages. Don’t even think about taking these servings straight from the bowl to the table after mixing!
Make sure that melted chocolate has cooled down slightly before you introduce the whipped cream. If it’s hot, it will instantly deflate all your beautiful air bubbles, and you’ll end up with thick chocolate pudding instead of mousse. My rule of thumb is that the chocolate bowl should feel just slightly warm to the touch—not hot—before you start folding.
For the best set, plan ahead! You absolutely need those two hours in the fridge, but honestly, four hours is even better when you’re making it ahead for a party. Chilling allows the fats in the chocolate and cream to firm up properly. If you can manage it, making this homemade mousse the day before means it sets even more beautifully. If you want to try a chewy chocolate number later, check out my chewy chocolate chip cookies, but for now, focus on chilling this luscious treat!
Serving Suggestions for Your Decadent Chocolate Treat
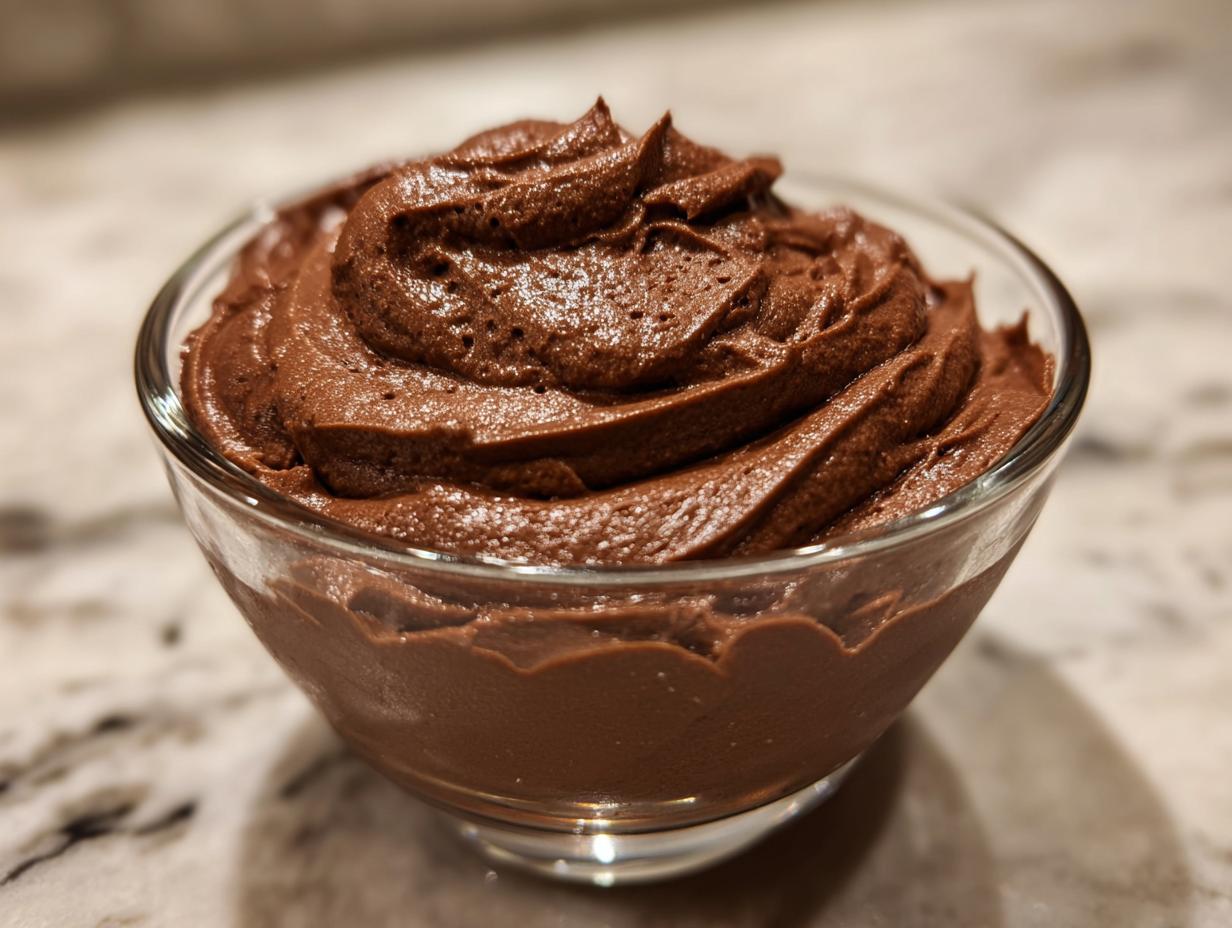
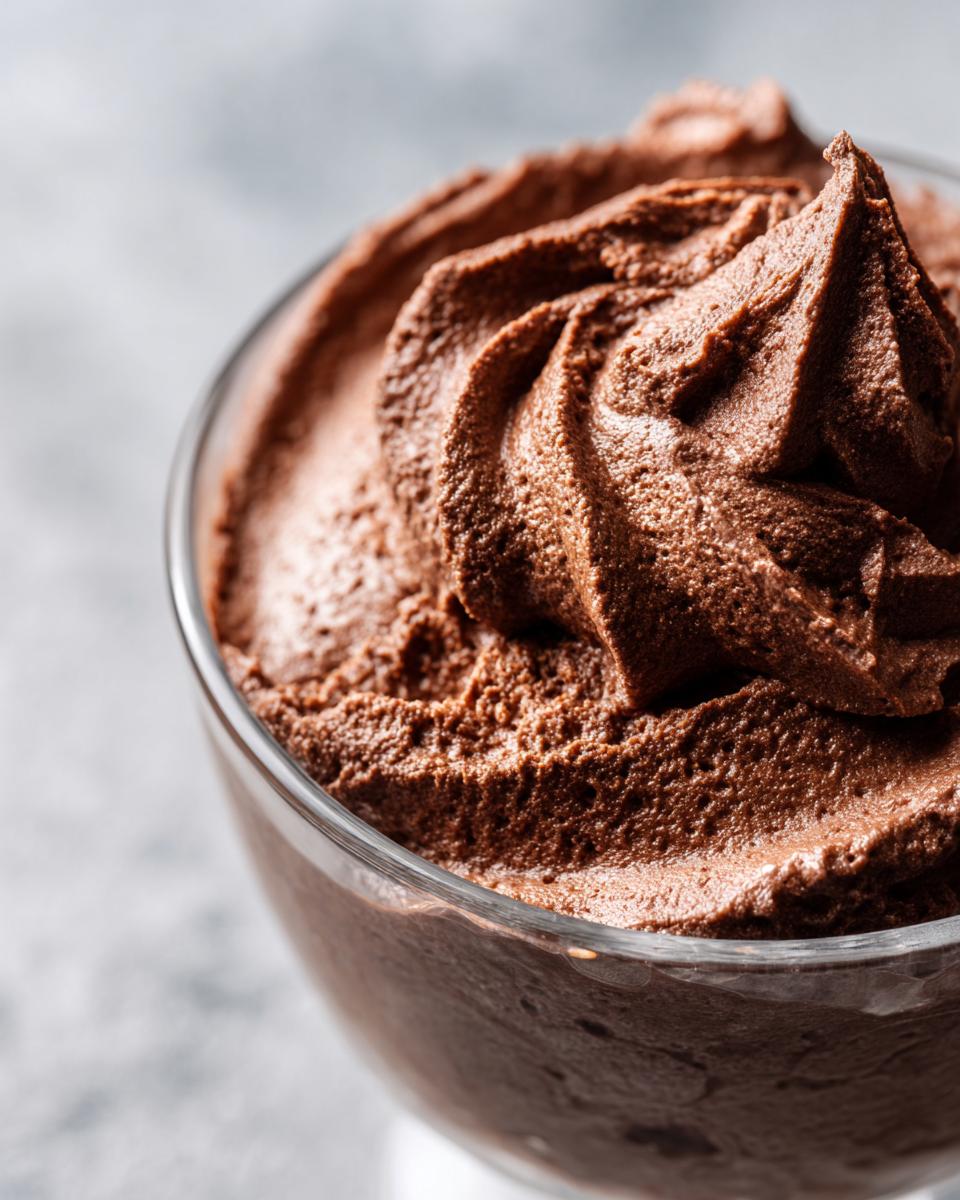
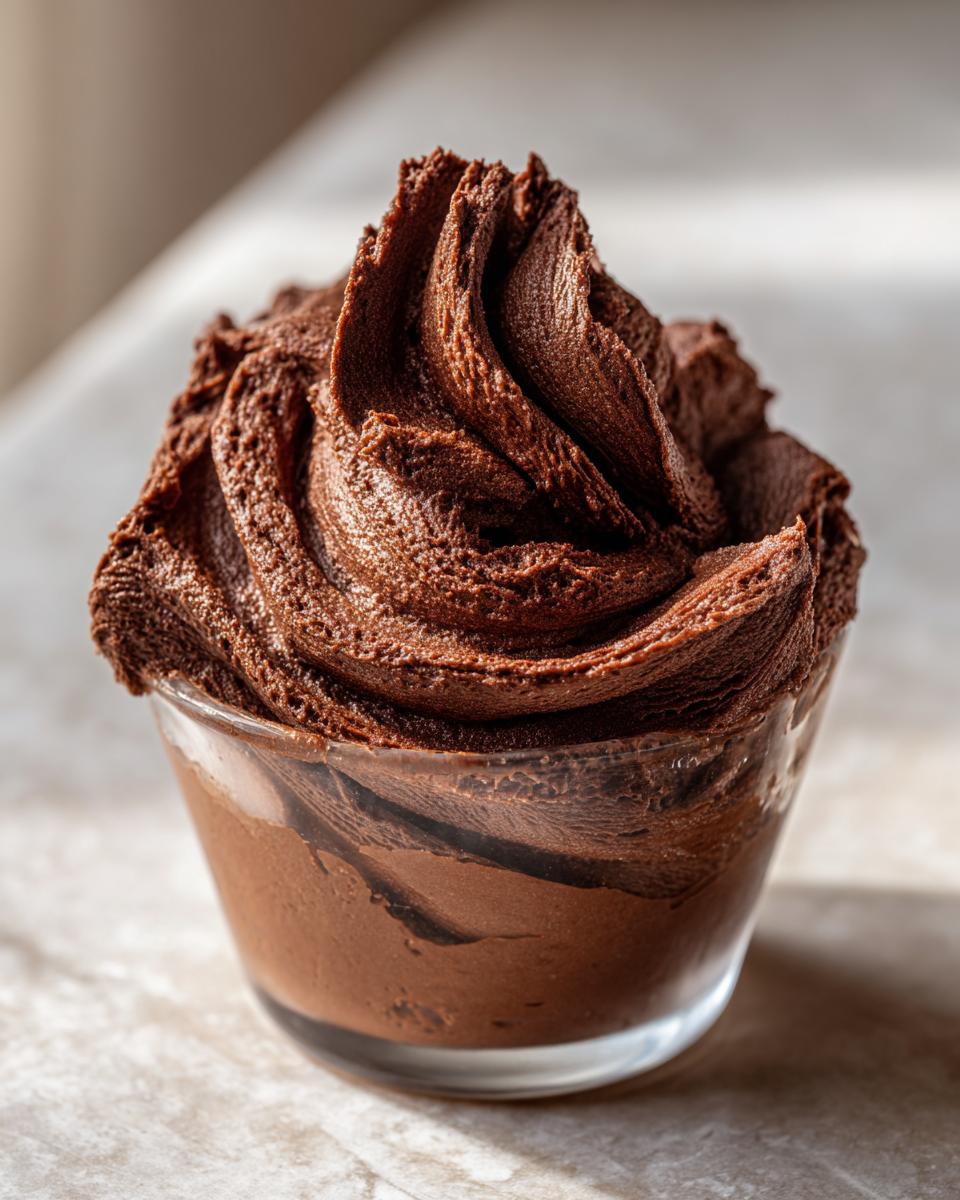
Now that you have this perfectly set, silky chocolate mousse, the fun part begins: showing it off! Since this is such a straightforward, rich chocolate dessert, the presentation really elevates it from a simple weeknight snack to something worthy of a fabulous chocolate dessert for dinner party. Forget serving it straight out of a giant mixing bowl, bless its heart. We want elegance!
The recipe calls for spooning it into individual glasses, and I absolutely love that choice. Think small, clear wine glasses, cute little mason jars, or even espresso cups if you’re serving it alongside coffee. Seeing those creamy layers through the glass just screams “gourmet,” even if we whipped it up in about 15 minutes!
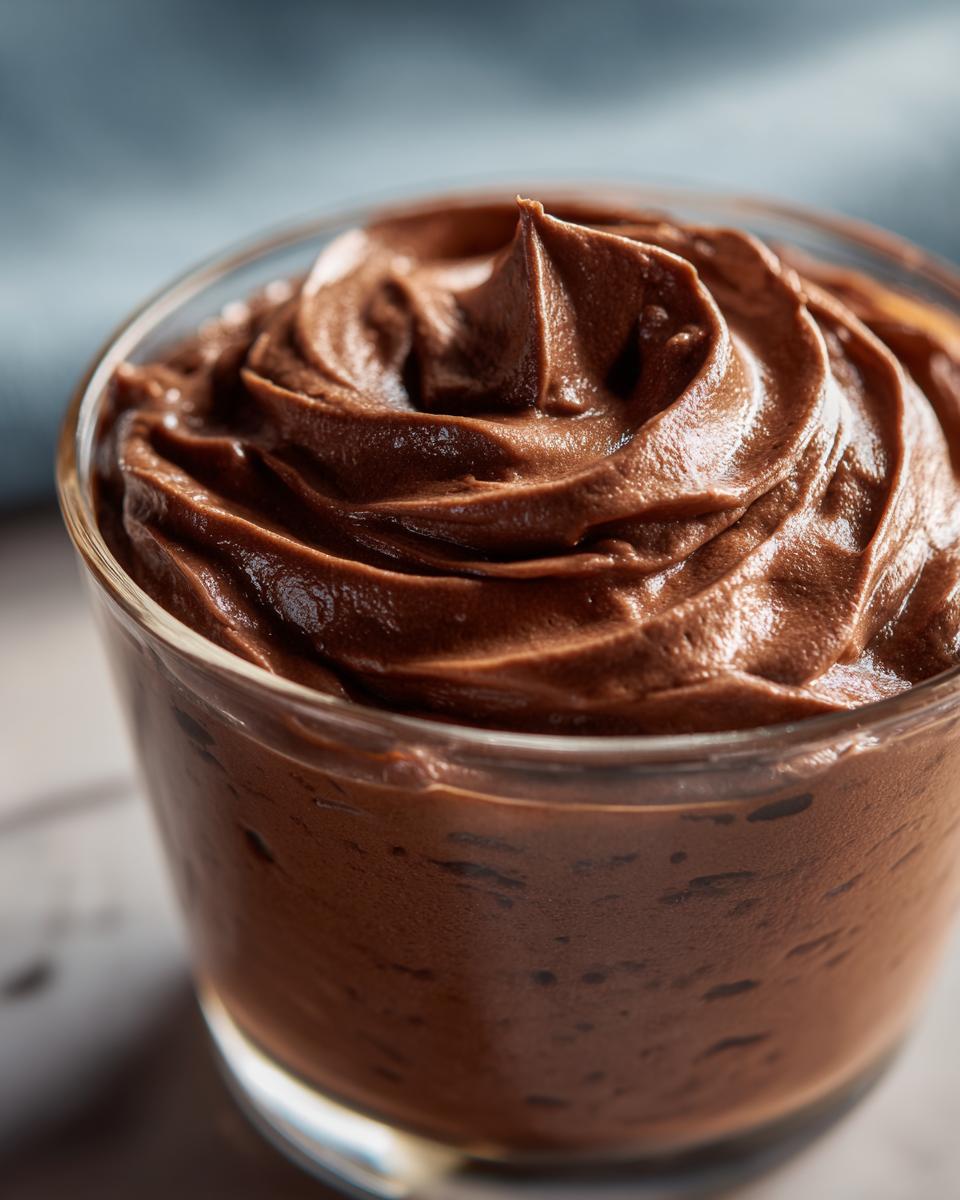
For garnishes, the optional suggestions are really just the starting line. I rely heavily on contrasting color and texture to make this homemade mousse pop. A quick spiral of melted chocolate drizzled on top looks fantastic. If you’re feeling extra fancy, grate some extra bittersweet chocolate right over the top just before serving—that fresh grating melts beautifully on your tongue.
If you prefer something with freshness to cut through the richness, think about a couple of small, bright red raspberries or a thinly sliced strawberry placed right in the center. It’s simple, but it adds such a gorgeous visual touch. We want people to remember this amazing, easy chocolate mousse!
If you’re looking for more ways to present your spectacular desserts, you should definitely check out some of the presentation ideas I found over at Silky Smooth Chocolate Mousse for Any Occasion; they have some truly elegant setups for serving individual portions!
Storage and Reheating Instructions for Chocolate Mousse
Because this no bake dessert relies almost entirely on chilled, stabilized heavy cream for its structure, storage is pretty straightforward, but we have to be careful about refrigeration time to keep that light, airy texture intact! The goal here is to maintain that super silky chocolate mousse feeling, which means we generally don’t want to mess with freezing it.
If you’ve portioned your chocolate mousse into individual serving dishes—which I highly recommend for that elegant look we were talking about—cover each dish tightly with plastic wrap. You want to make sure the plastic wrap isn’t sagging onto the surface of the mousse, or it will leave an ugly dent! Pop those covered dishes right into the refrigerator. You can safely store this creamy chocolate dessert this way for up to three days. Trust me, it rarely lasts that long in my house!
Now, about freezing: I usually advise against it for this specific recipe. When you freeze and then thaw mousse that relies on whipped cream, the texture can sometimes separate or become a little icy or grainy on the edges. It won’t be the beautifully fluffy chocolate mousse you pulled out of the fridge. If you absolutely must freeze it—maybe you made a huge batch for a future party—make sure you thaw it very slowly in the refrigerator overnight. But really, this recipe comes together so fast, making it fresh is half the fun!
If you decide to use any of those wonderfully chewy textures in your kitchen later, like those in my chewy chocolate chip cookies, just remember that baked goods handle room temp and freezing much differently than this glorious, delicate mousse!
Troubleshooting Common Chocolate Mousse Issues
Even with the easiest recipe, sometimes things go a little sideways in the kitchen, right? Don’t panic! When you’re making something as delicate as a silky chocolate mousse, it’s usually a tiny slip-up during temperature control or mixing timing. I’ve been there—that moment you look in the bowl and realize your beautiful dessert base isn’t quite right. But because we know the key pitfalls, we can easily fix them or avoid them next time.
Here are the two main issues I see crop up when making this creamy chocolate dessert:
- Grainy Texture: This is almost always about the melted chocolate.
- Deflated Mousse: This is the result of being too aggressive while folding.
Grainy Texture: Did Your Chocolate Seize?
If your melted chocolate looks dull, thick, or suddenly developed little hard specks, it seized up on you. This usually happens for two reasons. First, if you introduced a single drop of water to the chocolate when it wasn’t fully melted, or second, if you added the whipped cream to chocolate that was too hot. Remember when I said the chocolate needed to cool slightly? If it’s too hot, it will shock the cream, and the emulsion breaks. If this happens, I hate to say it, but you might need to start the chocolate base over—it’s hard to bring that seized texture back!
Deflated Mousse: The Folding Fiasco
This is the one that breaks a beginner’s heart! You have your gorgeous, fluffy whipped cream, and you fold it into the chocolate, and suddenly… nothing. It’s heavy and slopes into the bowl like thick mud instead of holding gentle peaks. That means you overmixed. When you fold, you are trying to gently incorporate the heavy chocolate layer into the airy cream layer without knocking the air out of the cream. Keep your spatula strokes slow and deliberate. Stop mixing the moment you see the last streak of white disappear. Seriously, if you see one tiny white spot left, leave it alone! It will disappear when you chill the homemade mousse.
Chocolate Too Runny After Folding?
If you folded gently but the mixture is still liquidy, it usually means your whipping cream didn’t reach stiff peaks, or perhaps your kitchen was too warm when you mixed everything. If that’s the case, you can’t fix the airiness now. The best thing to do is just cover those dishes and stick them in the fridge immediately. Give them extra time—maybe 4 or 5 hours instead of the standard two. Sometimes, with a little extra chill time, even a slightly softer chocolate mousse will set up well enough to serve, especially if you’re eating it with a spoon!
Frequently Asked Questions About This Chocolate Mousse Recipe
I always get asked the same few things when people try this, and honestly, I love hearing your questions! It means you’re getting ready to make your very own rich chocolate dessert. Since this is my favorite easy chocolate mousse, I’ve tried to build it to be foolproof, but here are a few tweaks people often ask about regarding ingredients and method.
Can I use milk chocolate instead of bittersweet?
While you absolutely *can*, I really advise against it for this specific recipe. Milk chocolate has much more sugar and lower cocoa solids, which means your beautiful homemade mousse might never firm up properly in the fridge. Stick to bittersweet or at least 60% cacao for the best results, otherwise, you’re basically making a thick chocolate pudding!
Can I add coffee or espresso powder?
Oh, yes, you totally can! If you love that hint of depth that coffee brings out in chocolate, try adding about half a teaspoon of instant espresso powder when you mix in the vanilla and salt. It won’t make it taste like coffee, but it makes every bite of that creamy chocolate dessert taste darker and richer. Plus, it’s a wonderful addition when you’re looking for quick dessert ideas for a grown-up dinner party!
How long does this quick dessert need to chill?
The recipe calls for 2 hours minimum, but I’ve learned that giving it the full 3 to 4 hours makes a world of difference. If you’re prepping early ones day, I’d suggest checking out my thoughts on quick weeknight dinners; sometimes having a whole meal plan makes finding time to chill easier! The longer it sets, the firmer and silkier your final result will be. Don’t rush the chill time if you want that perfect texture!
Is this a traditional French Chocolate Mousse?
That’s a great question! No, this isn’t the traditional French version, but it gets really close without the fuss. Classic French mousse relies on whisked egg whites and sometimes yolks for that airy lift. Since we are aiming for a beginner dessert recipe that is no-bake and super reliable, I swapped the eggs out for whipped cream. You get all the light, luxurious texture of a fluffy chocolate mousse, but without worrying about raw eggs! If you want to geek out on the classic way, you can see how others tackle it over at Easy Homemade Chocolate Mousse Recipe in Minutes.
Nutritional Estimates for Your Homemade Mousse
Because we are using rich ingredients like high-quality chocolate and heavy cream to achieve that incredible, decadent chocolate treat texture, I always get questions about the nutrition side of things. It’s a rich chocolate dessert, no doubt, but knowing the numbers can help when planning out a week of eating! Below, I’ve laid out the general estimates for one serving of this luscious chocolate mousse.
Keep in mind that these figures are based on the ingredients listed in the recipe—if you decide to use a different brand of chocolate or add more sugar to your cream, these numbers will shift slightly. These are good ballpark figures for a truly velvety chocolate mousse, but they aren’t official lab reports! Remember, this is a treat, and it’s totally worth it.
- Serving Size: 1 serving
- Calories: Approximately 350
- Sugar: Around 20g
- Sodium: About 75mg
- Total Fat: Roughly 28g
- Saturated Fat: Around 17g
- Carbohydrates: Approximately 25g
- Protein: About 5g
That decent fat content is what gives our easy chocolate mousse its signature melt-in-your-mouth quality. Enjoy every single bite of this no bake dessert without guilt!
PrintEasiest Ever Silky, No-Bake Chocolate Mousse Recipe

Make this rich, creamy, and silky chocolate mousse with simple ingredients. This no-bake dessert is perfect for beginners and delivers a decadent treat quickly.
- Prep Time: 15 min
- Cook Time: 0 min
- Total Time: 2 hr 15 min
- Yield: 4 servings 1x
- Category: Dessert
- Method: No-Bake
- Cuisine: American
- Diet: Vegetarian
Ingredients
- 6 ounces bittersweet chocolate, chopped
- 1/4 cup hot water
- 1 teaspoon vanilla extract
- 1/4 teaspoon salt
- 1 1/2 cups heavy whipping cream, cold
- 2 tablespoons granulated sugar
- Optional garnish: chocolate shavings or fresh berries
Instructions
- Place the chopped bittersweet chocolate in a medium heatproof bowl. Pour the hot water over the chocolate and let it sit for 2 minutes. Whisk until the chocolate is completely melted and smooth. Stir in the vanilla extract and salt. Set aside to cool slightly.
- In a separate large bowl, use an electric mixer to beat the cold heavy whipping cream and granulated sugar on medium-high speed until stiff peaks form. This creates your fluffy base.
- Gently fold about one-third of the whipped cream mixture into the slightly cooled chocolate mixture to lighten it.
- Carefully fold the remaining whipped cream into the chocolate mixture until just combined. Do not overmix; stop when no white streaks remain to keep the mousse light and airy.
- Spoon or pipe the chocolate mousse into individual serving dishes or small glasses.
- Chill the mousse in the refrigerator for at least 2 hours, or until firm.
- Garnish with chocolate shavings or berries before serving your homemade mousse.
Notes
- For an extra rich dessert, use high-quality dark chocolate.
- If you prefer a lighter texture, you can use a whisk instead of an electric mixer for the cream, but it will take longer to reach stiff peaks.
- This recipe makes a classic chocolate dessert that is naturally gluten free.
Nutrition
- Serving Size: 1 serving
- Calories: 350
- Sugar: 20
- Sodium: 75
- Fat: 28
- Saturated Fat: 17
- Unsaturated Fat: 11
- Trans Fat: 0
- Carbohydrates: 25
- Fiber: 3
- Protein: 5
- Cholesterol: 95