
Oh, the memory of a perfectly baked cherry pie… it just takes me right back, doesn’t it? It’s that smell, that sweet-tart cherry aroma mingling with warm, buttery pastry, that instantly makes a house feel like a home. For me, that’s what MDLATDMM Recipes is all about – bringing those feelings of comfort and connection into your kitchen. I’m Maddie, and this classic cherry pie recipe is one that holds a special place in my heart, straight from my family’s traditions. Forget those runny fillings that just ooze everywhere when you cut a slice! This one, with its gorgeous buttery lattice crust and that wonderfully thick, jammy center, is truly something special. It’s the kind of pie that makes any gathering feel a bit more festive, especially when the holidays roll around. I just love sharing recipes that work, that taste incredible, and that remind us all why home cooking is just… well, the best.
- Why You'll Love This Classic Cherry Pie Recipe
- Ingredients for Your Homemade Cherry Pie
- Crafting the Perfect Lattice Cherry Pie: Step-by-Step
- Tips for Baking a Perfect Homemade Cherry Pie
- Make-Ahead and Storage for Your Holiday Cherry Pie
- Frequently Asked Questions about Cherry Pie
- Estimated Nutritional Information
- Share Your Homemade Cherry Pie Creation!
Why You’ll Love This Classic Cherry Pie Recipe
Trust me, this isn’t just any cherry pie recipe. It’s the one you’ll want to make again and again!
- Cafe-Style Perfection: That hint of almond extract in the filling gives it that extra something special, just like you’d find in a fancy bakery.
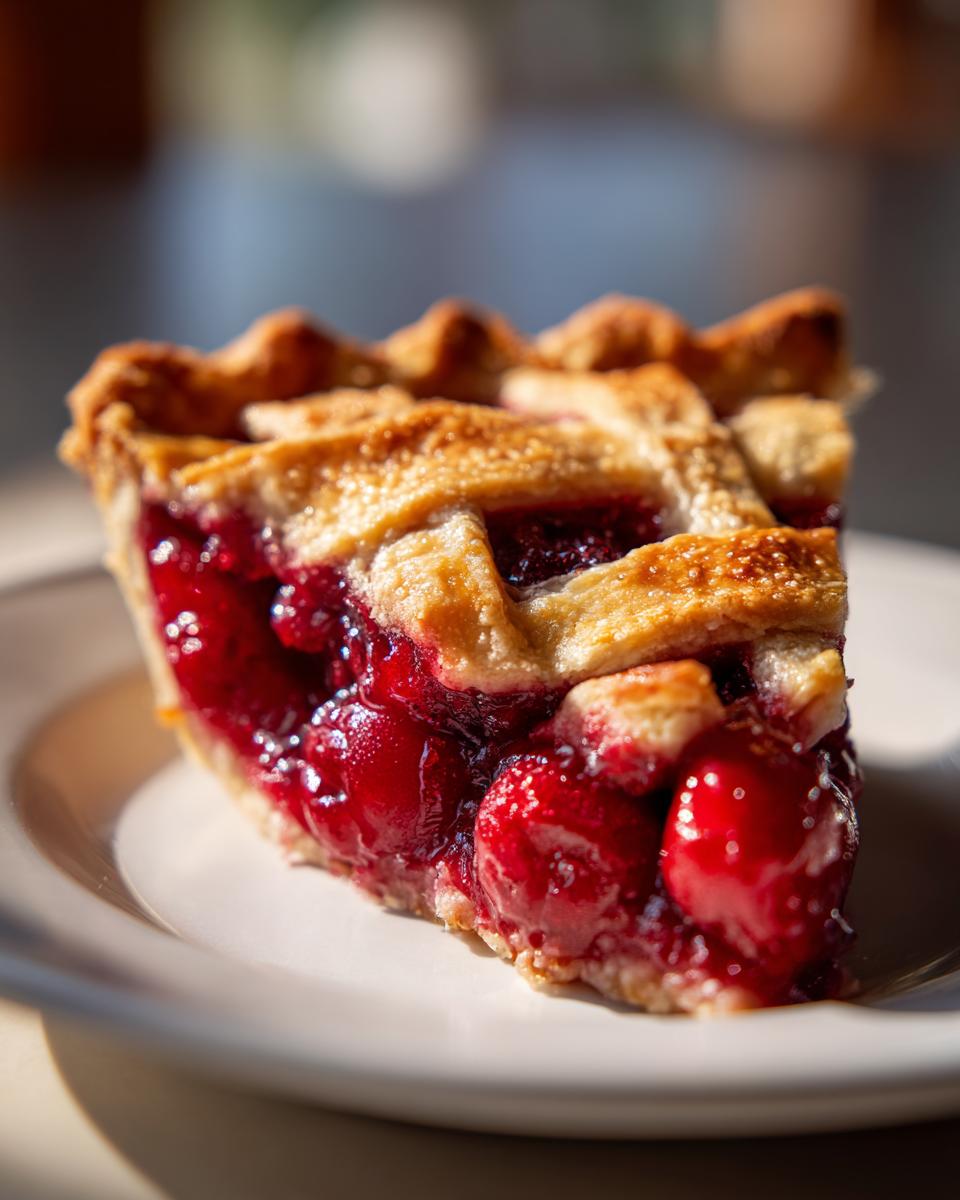
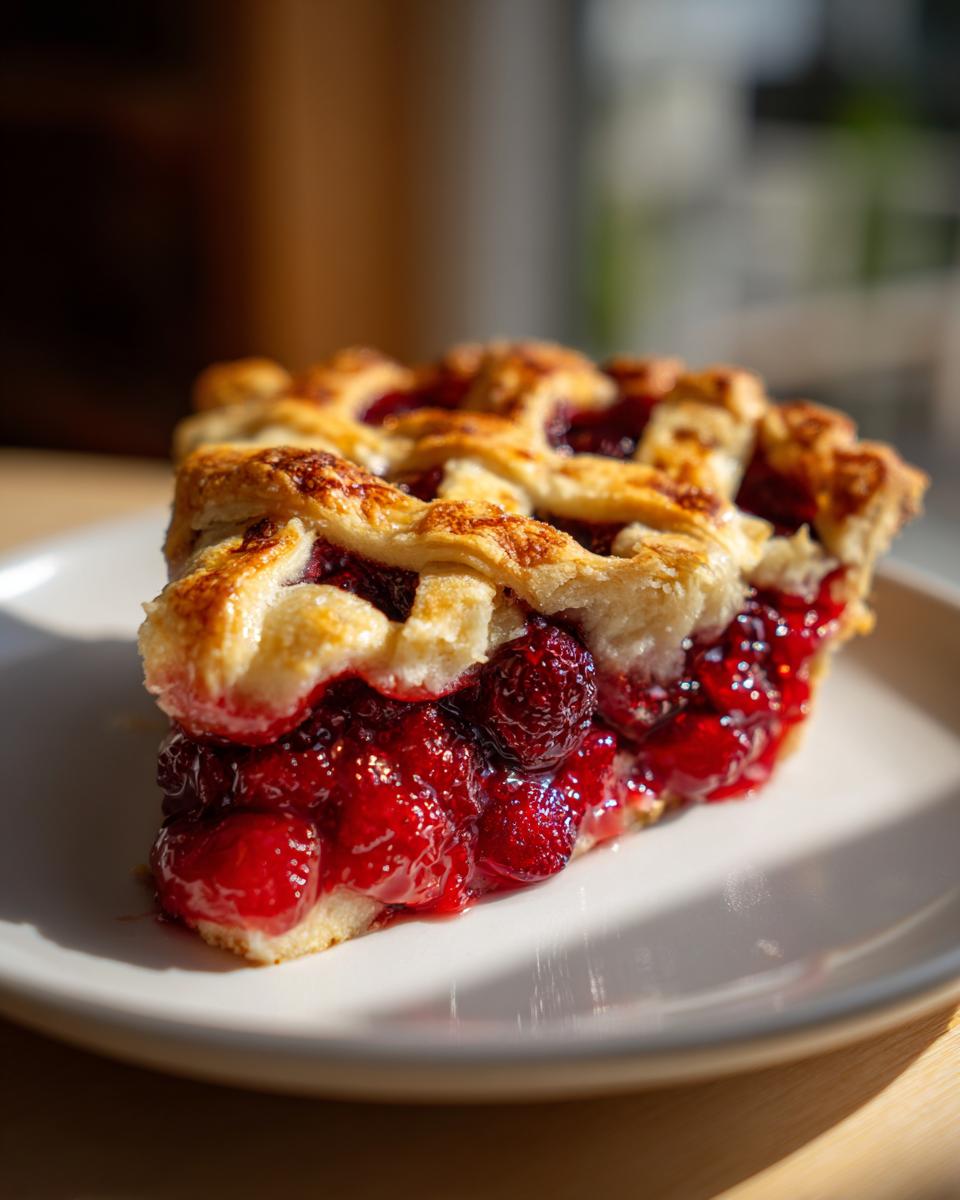
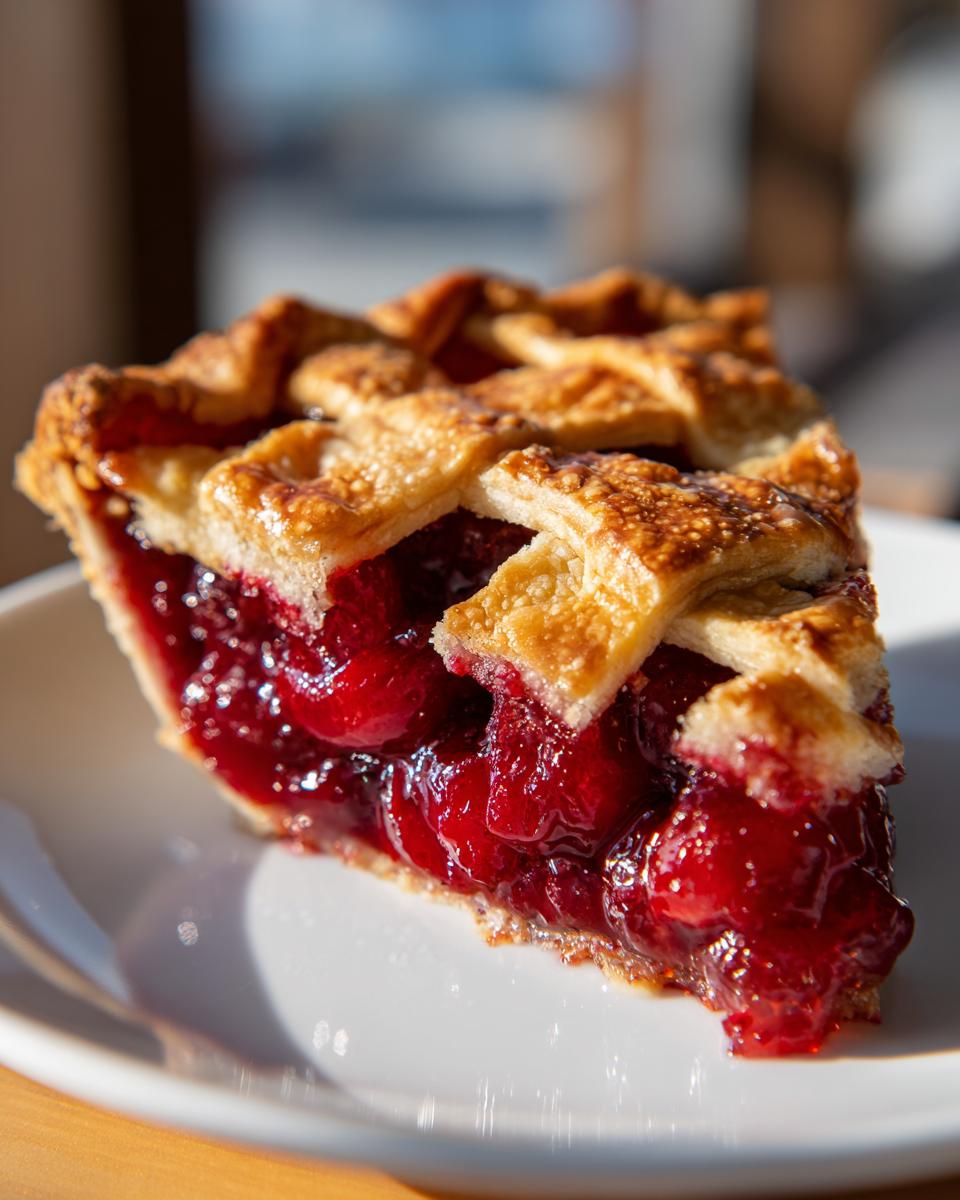
- Seriously Thick Filling: No more runny messes! We’ve perfected the filling so it’s wonderfully thick and jammy, perfect for slicing.
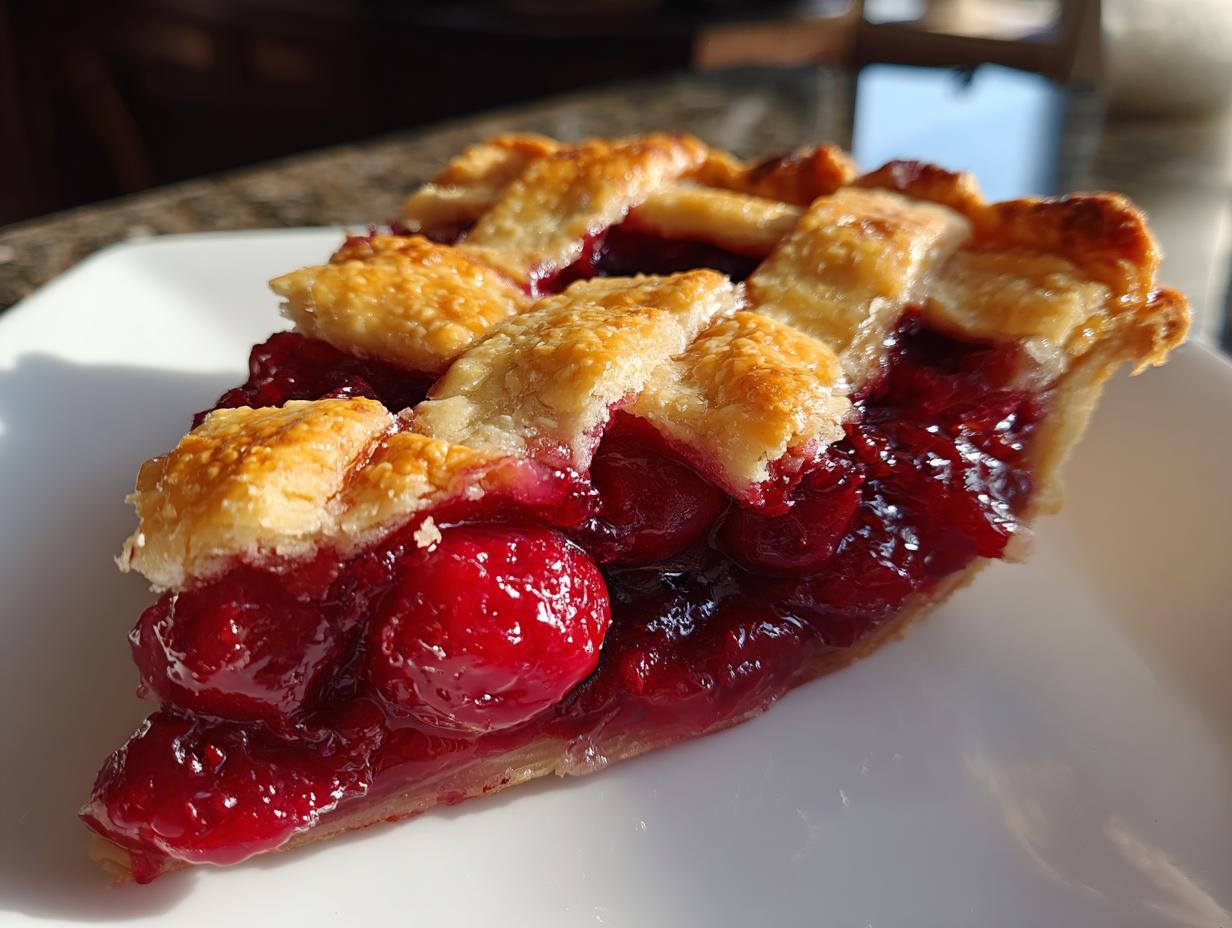
- Buttery, Flaky Crust: The lattice top isn’t just pretty; it’s a delicious testament to a truly buttery, flaky pie crust that just melts in your mouth.
- Easier Than You Think: While it looks impressive, this classic cherry pie recipe is totally achievable for home bakers. You’ll be amazed at how simple it is!
- Holiday Hero: This pie is an absolute showstopper for any holiday table or special occasion. It’s a real crowd-pleaser!
Ingredients for Your Homemade Cherry Pie
Alright, let’s talk about what you’ll need to make this absolute dream of a cherry pie. Getting the ingredients right is half the battle, and trust me, these are the stars of the show that create that perfect, thick filling and buttery crust.
When it comes to the cherries, you can totally go with fresh beautiful ones if they’re in season – just make sure they’re pitted! If not, don’t you worry, frozen pitted cherries are perfectly fine. Just a little tip from my kitchen: if you use frozen ones, let them thaw out and drain off any extra juice before you mix them into the filling. This little step is super important for getting that thick filling we’re all after.
And for that amazing crust and filling flavor? We’ve got:
- 3 cups fresh or frozen pitted cherries (remember to drain them if they’re frozen!)
- 1 cup granulated sugar – sweetness is key!
- 1/4 cup cornstarch – this is our secret weapon for that wonderfully thick cherry filling. You can even bump it up to 5 tablespoons if you like it extra jammy!
- 1 tablespoon lemon juice – just a little brightness to make the cherry flavor pop
- 1/2 teaspoon almond extract – oh, this is where the magic happens! It really gives it that lovely, sophisticated café-style taste that everyone raves about.
- 1/4 teaspoon ground cinnamon – just a whisper for warmth
- 1/4 teaspoon salt – it balances everything out
- 2 tablespoons unsalted butter, cut into small pieces – these little gems get dotted on top of the filling before baking, adding richness.
- 1 recipe for double pie crust – This is for your bottom crust and all those lovely lattice strips for the top. If you have a favorite homemade pie crust recipe, use that!
- 1 egg, beaten – this is for your egg wash to give that beautiful golden sheen
- 1 tablespoon coarse sugar, optional – for that extra sparkle and crunch on top!
Crafting the Perfect Lattice Cherry Pie: Step-by-Step
Alright, let’s get this beautiful cherry pie into the oven! It’s not too tricky, I promise. Just follow these steps and you’ll have a masterpiece.
Preparing the Cherry Filling
First things first, let’s make that gorgeous, thick filling. Grab a big bowl – you want plenty of room to toss everything around. Gently mix your cherries (remember, drained if they were frozen!), sugar, cornstarch, lemon juice, that lovely almond extract, cinnamon, and salt. Give it all a gentle stir until everything is combined and the cherries look coated. Make sure that cornstarch is mixed in well; it’s crucial for getting our filling nice and thick, not runny!
Assembling Your Lattice Cherry Pie
Now for the fun part – putting the pie together! Take your bottom crust and lay it into your pie plate. Gently pour that delicious cherry filling right into the crust. Try to spread it out evenly. Then, dot the top of the filling with those little cubes of butter. They melt down during baking and add such a wonderful richness. Now, for the lattice! You’ll lay your pie crust strips across the top in a criss-cross pattern. Once they’re all arranged, crimp the edges of the bottom crust around the lattice to seal everything up. It looks so pretty! Finally, give the whole top a brush with that beaten egg wash, and if you want that extra sparkle and crunch, sprinkle on some coarse sugar. So good!
Baking Your Classic Cherry Pie
Time to bake! Pop your pie onto a baking sheet – this is a lifesaver for catching any stray drips, trust me! We’re going to start it off hot: bake at 400°F (200°C) for about 20 minutes. This helps get that crust nice and golden right away plus gets the filling nice and bubbly. After those 20 minutes, reduce the oven temperature to 375°F (190°C) and let it bake for another 30 to 40 minutes. You’re looking for a really gorgeous golden-brown crust and to see that filling bubbling happily through the lattice. If the crust starts getting a bit too dark before the filling is ready, just loosely tent a piece of foil over the top. Easy fix!
The Crucial Cooling Period for Thick Cherry Filling
This is probably the *hardest* part, but you absolutely MUST let your pie cool completely. I know, I know, the smell is divine, and you just want to dive in! But seriously, let it sit on a wire rack for at least 3 to 4 hours. This cooling time is what allows that cherry filling to thicken up properly. If you cut into it too soon, you’ll have a beautiful soupy mess. Patience here is key for that perfect slice!
Tips for Baking a Perfect Homemade Cherry Pie
Okay, so you’ve got the general idea, but let me share a few of my tried-and-true secrets that really make this cherry pie sing. It’s all about those little details!
Achieving a Thick Cherry Filling
Want that gorgeously thick, spoonable cherry filling that holds its shape when you slice? It’s all about that cornstarch and handling your cherries right. If your cherries seem really juicy, definitely give them a good drain after thawing. And don’t be afraid to bump up the cornstarch to 5 tablespoons if you’re using really wet cherries or just love that super-thick, jammy consistency. It really is the key to avoiding any puddle-y pie disasters!
Tips for a Buttery Lattice Crust
A flaky, buttery crust is non-negotiable, right? My biggest secret is keeping everything nice and cold when you’re making your pie dough. Cold butter, cold water – it makes all the difference for flakiness. When you’re weaving those lattice strips, try to make them a consistent width so they look nice and uniform. Oh, and that egg wash? Don’t skip it! It gives the crust that beautiful golden glow, and a sprinkle of coarse sugar on top adds a lovely little crunch. It just feels so professional!
Make-Ahead and Storage for Your Holiday Cherry Pie
You know, one of the best things about this classic cherry pie recipe is how wonderfully adaptable it is, especially when you’re prepping for holidays or just want to get a head start! It means less stress on the big day, and more time for you to actually enjoy yourself.
You can totally get the pie crust made ahead of time. Just wrap it well in plastic wrap and keep it in the fridge for up to 2 days, or pop it in the freezer for longer storage. The cherry filling mixture? That can also be made a day or two in advance. Just keep it covered in the fridge. Then, when you’re ready, you just assemble everything in the pie plate and follow the baking instructions.
Have you ever thought about freezing the *whole* pie before baking? You actually can! Assemble the whole thing, cover it really tightly with plastic wrap and then foil, and freeze it. When you want to bake it, just pop it into the fridge overnight to thaw, and then bake it as directed, maybe adding just a few extra minutes. It’s perfect for those times when you just need a delicious pie on demand!
Frequently Asked Questions about Cherry Pie
I get asked a lot of questions about making the perfect cherry pie from scratch, and honestly, it’s the best! Here are some of the most common ones:
Can I use canned cherries for this recipe?
You know, while fresh or frozen cherries are really my preference for that authentic, thick cherry filling we talked about, you *can* use canned cherries in a pinch. Just make sure you drain them really, really well, and you might want to reduce the sugar a bit since canned cherries are often packed in syrup. It won’t be quite the same as the fresh-tasting pop of flavor, but it can still be a tasty cherry dessert!
How do I prevent my pie from being too runny?
This is such a common worry! The absolute key to a thick cherry filling that slices beautifully is getting the cornstarch ratio right. For this classic cherry pie recipe, 1/4 cup is usually good, but if you like it extra thick and jammy, go up to 5 tablespoons. Also, letting the pie cool *completely* is non-negotiable. That cooling time lets the filling set up perfectly. Seriously, let it sit!
Can I make the crust ahead of time?
Oh, absolutely! Making pie crust ahead of time is a lifesaver. You can prepare your double pie crust dough, wrap it up tight, and keep it in the refrigerator for up to 2 days. Or, for even longer, stash it in the freezer. When you’re ready to make your lattice cherry pie, just let the dough sit at room temperature for about 15-20 minutes to make it easier to roll out. Easy peasy!
What’s the best way to cut a slice of cherry pie?
After all that patience waiting for it to cool, you want a clean slice, right? Use a sharp knife and try to cut straight down. Sometimes, running the knife under hot water and drying it well between cuts can help you get those super clean slices, especially through that thick cherry filling. A gentle twist as you lift can also help it come out clean.

Estimated Nutritional Information
Now, I have to preface this by saying these numbers are just estimates, okay? That’s because everyone’s kitchen is a little different, and even how you slice your cherry pie can change things up! But generally, a generous slice of this homemade cherry pie is going to be around 400 calories. You’re looking at about 20g of fat, with 12g of that being saturated fat from that glorious butter in the crust. Expect around 55g of carbs, with 35g of natural sugar from those yummy cherries and added sweetener, and about 4g of protein. It’s a treat, for sure!
Share Your Homemade Cherry Pie Creation!
Okay, now that you’ve hopefully made this amazing cherry pie, I *really* want to hear all about it! Did you try the almond extract trick? How did your lattice turn out? Please, drop a comment below and tell me everything. Or even better, snap a picture of your beautiful creation and tag us on social media – I absolutely love seeing your kitchen triumphs!
PrintClassic Cherry Pie with Lattice Crust

A classic cherry pie recipe featuring a buttery lattice crust and a thick, flavorful cherry filling, perfect for any occasion.
- Prep Time: 30 min
- Cook Time: 50 min
- Total Time: 80 min
- Yield: 8 servings 1x
- Category: Dessert
- Method: Baking
- Cuisine: American
- Diet: Vegetarian
Ingredients
- 3 cups fresh or frozen pitted cherries
- 1 cup granulated sugar
- 1/4 cup cornstarch
- 1 tablespoon lemon juice
- 1/2 teaspoon almond extract
- 1/4 teaspoon ground cinnamon
- 1/4 teaspoon salt
- 2 tablespoons unsalted butter, cut into small pieces
- 1 recipe for double pie crust (for bottom and lattice top)
- 1 egg, beaten (for egg wash)
- 1 tablespoon coarse sugar (optional, for topping)
Instructions
- Preheat your oven to 400°F (200°C).
- If using frozen cherries, thaw them and drain any excess liquid.
- In a large bowl, combine the cherries, granulated sugar, cornstarch, lemon juice, almond extract, cinnamon, and salt. Toss gently to coat the cherries evenly.
- Pour the cherry mixture into the bottom pie crust. Dot the top of the filling with the small pieces of butter.
- Arrange the lattice strips over the filling. Crimp the edges of the pie crust to seal.
- Brush the lattice top with the beaten egg wash and sprinkle with coarse sugar, if desired.
- Place the pie on a baking sheet to catch any drips.
- Bake for 20 minutes at 400°F (200°C).
- Reduce the oven temperature to 375°F (190°C) and continue baking for another 30-40 minutes, or until the crust is golden brown and the filling is bubbly. If the crust starts to brown too quickly, loosely tent it with foil.
- Let the pie cool completely on a wire rack for at least 3-4 hours before slicing to allow the filling to set.
Notes
- For a thicker filling, you can increase the cornstarch to 5 tablespoons.
- To make ahead, you can prepare the pie crust and filling separately and store them in the refrigerator for up to 2 days. Assemble and bake when ready.
- This pie can be frozen before baking. Thaw overnight in the refrigerator and bake as directed, adding a few extra minutes to the baking time if needed.
- Using almond extract enhances the cherry flavor, giving it a café-style taste.
Nutrition
- Serving Size: 1 slice
- Calories: 400
- Sugar: 35g
- Sodium: 200mg
- Fat: 20g
- Saturated Fat: 12g
- Unsaturated Fat: 8g
- Trans Fat: 0g
- Carbohydrates: 55g
- Fiber: 4g
- Protein: 4g
- Cholesterol: 50mg