

There is just something irresistible about a tiny, perfect dessert that fits right on a stick, isn’t there? They pack all the flavor of a full cake into one adorable little package. If you have been dreaming of making your own, but thought it sounded too fussy, you are in exactly the right place! Today, I’m sharing my Easy, Foolproof Basic Cake Pop Recipe Using Cake Mix. Seriously, making perfect cake pops at home shouldn’t require a pastry degree. That’s why, here at MDLATDMM Recipes, I put my heart into testing every single step so you get clear, reliable instructions every time. This method is designed to work, so get ready to impress everyone! For more wonderfully simple baking ideas, you can always check out my favorite collection of delicious dessert recipes whenever you need inspiration.
- Why This is the Best Cake Pop Recipe for Home Cooks
- Gathering Ingredients for Easy Cake Pop Recipe Success
- How to Make Cake Pops: The Foolproof Method Instructions
- Cake Pop Decorating Tips for Party-Ready Treats
- Variations: From Starbucks Copycat Cake Pops to No Bake Options
- Storage and Make-Ahead Tips for Your Cake Pops
- Troubleshooting Common Issues When Making Cake Pops
- Estimated Nutritional Data for These Easy Dessert Bites
- Share Your Homemade Cake Pops Creations
Why This is the Best Cake Pop Recipe for Home Cooks
When I set out to create the ultimate recipe, I wanted something that even felt easy on a busy weeknight. My goal was always to share recipes that are straightforward and deliver those ‘wow’ results without any guesswork. This method, relying on a trusted cake mix and canned frosting, is absolutely the best starting point for beautiful cake pops.
- It’s incredibly fast because we skip baking completely from scratch!
- The texture is consistently dense and rollable—no crumbling mess.
- It’s practically impossible to dry these out, even if you get distracted.
- It works perfectly every time, which is what we all look for in a great recipe.
If you’re looking for other quick fixes for busy mornings, make sure you peek at my ideas for easy breakfast ideas while you’re here!
Achieving that Moist Cake Pop Texture
Nobody wants a sad, dry cake ball, right? That’s where the magic duo really shines. By mixing the pre-baked cake crumbs with good quality frosting, you are essentially re-moisturizing and binding the structure all at once. The fat and sugar in the frosting hold everything perfectly together.
This process creates a mixture that’s firm enough to roll tightly but still incredibly tender once you bite into it. It’s the secret to making treats that stay soft for days!
Gathering Ingredients for Easy Cake Pop Recipe Success
Okay, let’s get this party started! The beauty of this foolproof cake pop recipe is that most of what you need is probably hanging out in your pantry already. We rely on simplicity here. You’ll need that box of cake mix—I’ve had great luck with yellow or even chocolate mixes—and a full can of pre-made frosting to bind everything.
For the coating, grab about 12 ounces of candy wafers. Make sure they are actual melting wafers, not chocolate chips, or you’ll end up with a cracked mess! You’ll also need your sticks, of course, and any sprinkles you want on hand. If you want to see how I make my famous chewy chocolate chip cookies, that recipe is another great use of pantry staples!
Ingredient Notes and Substitutions for Cake Pops
When choosing your flavor, you can mix and match! A yellow cake mix with vanilla frosting is classic, but a chocolate cake mix with chocolate frosting makes amazing foundational cake pops. Remember, we are aiming for binding and moisture, not flavor fireworks here, as the coating does most of the heavy lifting.
The one thing I highly recommend is having a tiny bit of coconut oil or shortening on hand. If your melted candy coating seems too thick to work with—and trust me, it often does!—stirring in a half teaspoon of oil thins it out perfectly for dipping. Don’t skip that little helper!
How to Make Cake Pops: The Foolproof Method Instructions
This is where the magic happens, but don’t stress out! We’re going step-by-step, and I’ll tell you exactly when to pause and wait. Remember, rushing the process—especially the cooling parts—is the number one way to sabotage your beautiful cake pops. We’re taking our time now so we can enjoy the perfect result later. Whether you’re aiming for a simple vanilla flavor or trying to nail that homemade cake pops tutorial look, the base preparation is key. Don’t forget that after we finish the steps below, you can always find more fun ideas in my main collection of delicious dessert recipes!
Preparing the Cake Base and Forming Balls
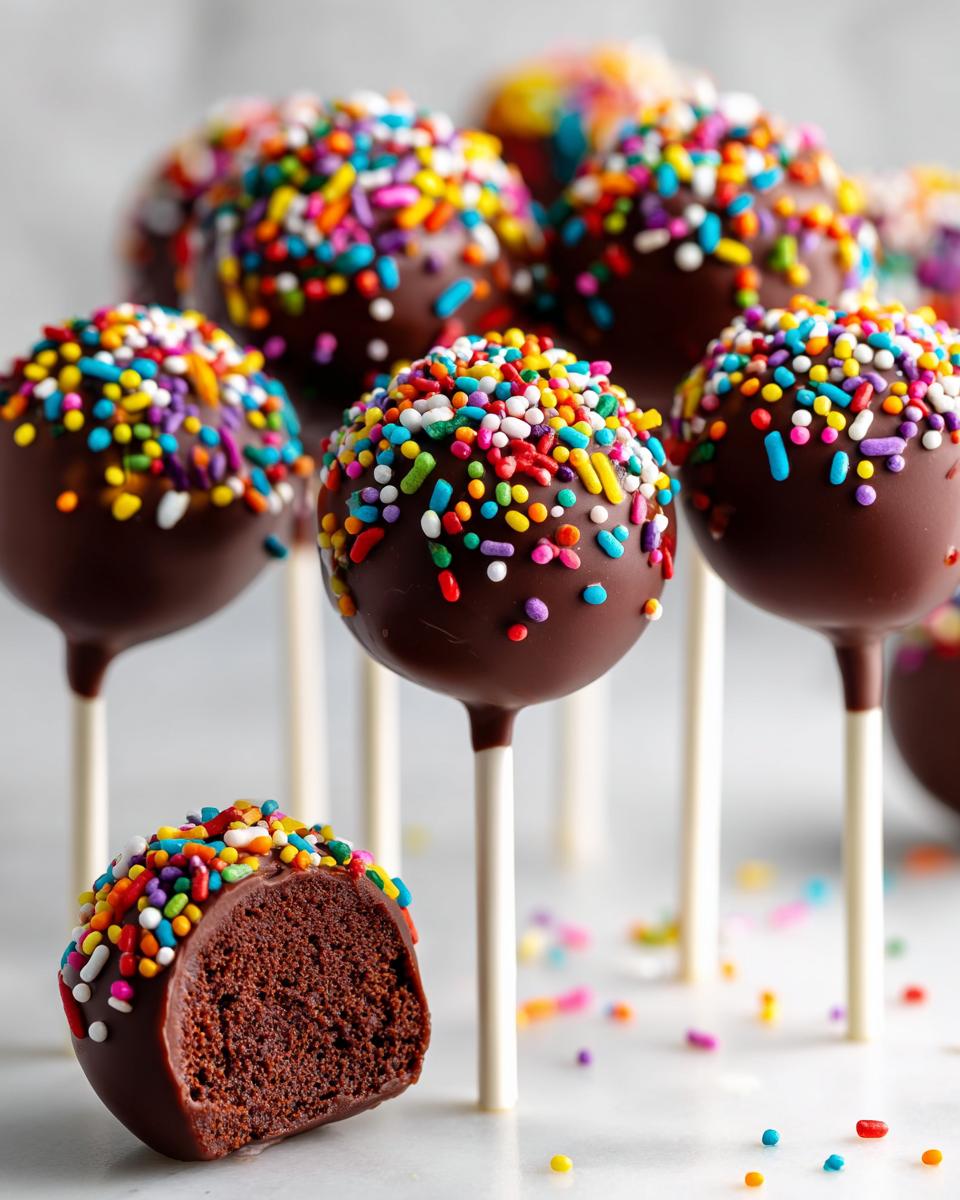
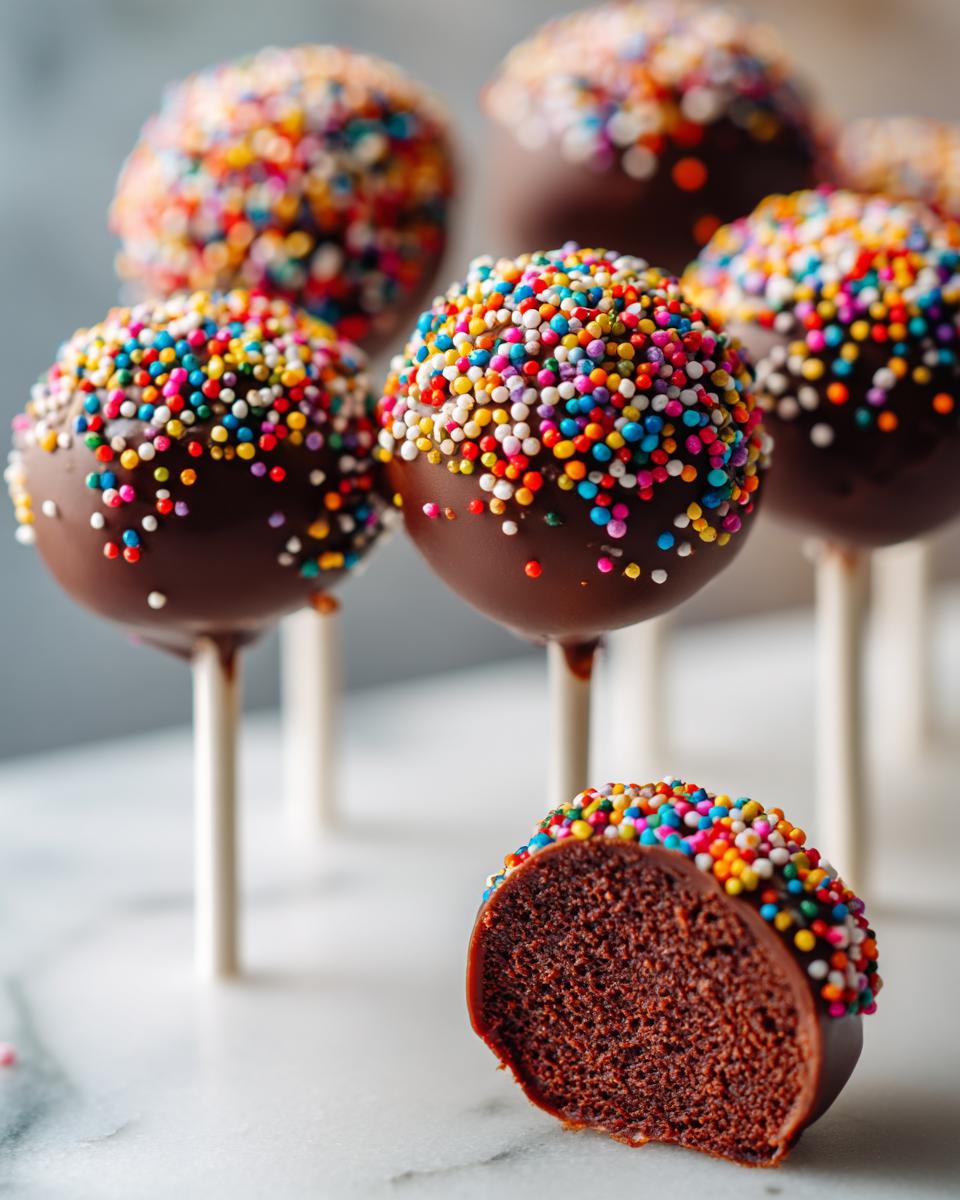
First things first: bake your cake mix according to the box, but try to use just a tiny bit less liquid than they say. That helps get that denser structure we need. Once it’s totally cooled down—and I mean zero warmth left—crumble it up super fine. This is a great job for your hands if you want to feel the texture, or just use your mixer on low. Next, toss in the whole can of frosting. Mix it until it looks unified, like thick, slightly sticky cookie dough. Roll these into even little balls, about an inch and a half across. Uniformity is important so they dip nicely later on!
The Crucial Chill and Stick Dipping for Perfect Cake Pops
Now listen closely, because this next step saves careers: you must chill those balls for at least 30 minutes. If they are even a tiny bit warm, they will slide right off the stick! While they are getting frosty, melt your candy coating wafers slowly. When they are chilled hard, take a pop stick, dip the very tip into the melted candy, and stick it into the ball. That candy tip acts like cement! Pop them back in the fridge for about 10 minutes so the stick glue sets up. This is the secret to professional-looking cake pops.

Cake Pop Decorating Tips for Party-Ready Treats
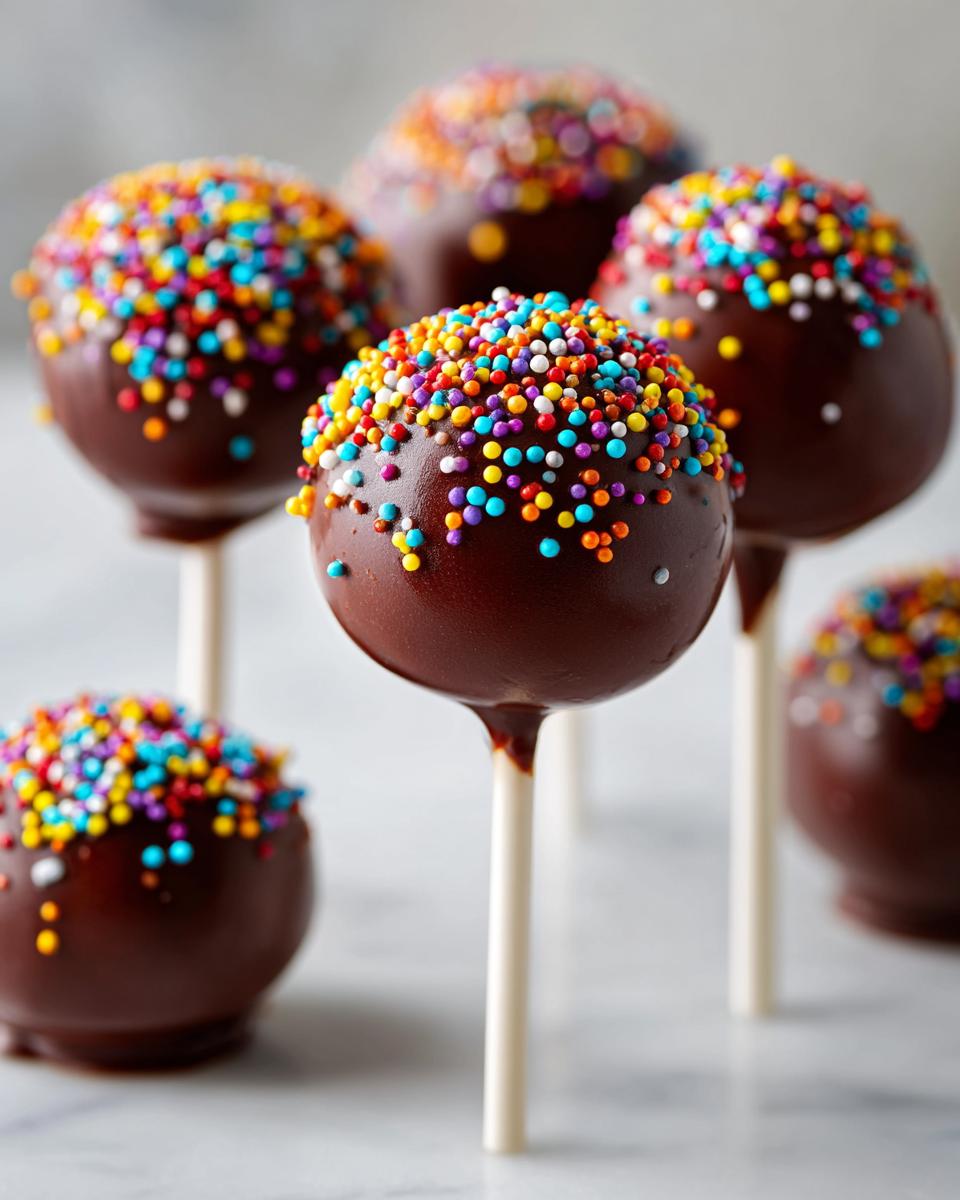
We’ve set our glue, the balls are cold, and the coating is melted perfectly—now for the fun part! Once those sticks are set in place, you’re ready for the full dip. Slowly submerge the entire cake ball into the warm coating. As soon as it’s covered, gently lift it out. Here’s a trick that makes a huge difference: lightly tap the stick against the side of the bowl. Don’t hit it hard, just a soft tap, tap, tap to encourage that extra coating to drip off. That tapping motion is key for achieving a smooth shell.
You must work fast! Before that shell even starts to look dull, that’s when you want to add your sprinkles or any other bling. Seriously, throw the sprinkles on immediately. For drying, forget balancing them precariously! Have a piece of styrofoam block ready, or even some dried floral foam, and stick them straight up. This ensures even drying without puddles of candy forming at the bottom. If you follow these cake pop decorating tips, your treats will look professionally made for any of your easy celebration desserts needs!
If you want to see how other bloggers manage their decorating, check out this inspiring post on deliciously easy basic cake pop recipe for sweet treats for more visual ideas!
Variations: From Starbucks Copycat Cake Pops to No Bake Options
I love that this basic recipe is so versatile! It’s like a perfect blank canvas for trying out different flavors. If you’re chasing that famous little round treat from the coffee shop, getting the Starbucks copycat cake pops right is actually super easy with this method.
For that classic vanilla version they sell literally everywhere, just make sure you start with a good yellow or white cake mix and pair it with vanilla frosting. It gives you that perfect pale interior flavor. I’ve seen people love using chocolate mix too, which mimics their chocolate offerings nicely.
Now, I know sometimes you want something even faster, and I hear you! While this recipe requires baking the cake base first, plenty of people love true no bake cake pops, usually using crushed cookies like Oreos bound with cream cheese instead of cake. It’s a different texture, but still fun!
No matter which way you go, remember you can always find more wonderful inspiration for baked goods over on my lemon cream cheese dump cake page. If you want to dive deep into making the very best coffee shop dupe, this guide on making homemade Starbucks copycat cake pops breaks down the specific vanilla flavor profiles perfectly!
Storage and Make-Ahead Tips for Your Cake Pops
Planning ahead for parties is essential, and luckily, these little gems are fantastic make-ahead desserts! I usually make the cake balls—just the chilled, uncoated balls—a day ahead. You can wrap them tightly in plastic wrap and keep them in the fridge. They hold up beautifully!
Once they are fully dipped and decorated, I prefer to store the finished sweet treats on a stick at cool room temperature, lightly covered, for about 24 hours. That keeps the candy coating crisp but the cake soft. If you must refrigerate them for longer storage, just be sure to let them sit out for about 30 minutes before serving so they lose that fridge chill.
If you want to get ahead, check out my tips for making my hash brown egg casserole make-ahead; the concept of prepping components early is always smart!
Troubleshooting Common Issues When Making Cake Pops
Even with the most foolproof recipe, sometimes things go a little sideways in the kitchen. Don’t panic! I’ve fought all these battles myself making batches of cake pops until I figured out the fixes. If your cake balls are feeling too soft after chilling, it means they need more binder or more cold time. Pop them back in the fridge until they can handle rolling without squishing.
If your coating is acting thick and gloppy, remember that little teaspoon of coconut oil we talked about? That’s your rescue plan! Slowly stir it in until it flows nicely. The biggest bummer is when the pop slides right off the stick; that’s why we use the candy ‘glue’ dip first. If that fails, ensure your cold cake balls hit the melted candy quickly and that you aren’t shaking the stick too hard when tapping off the excess coating.
For more simple baking fixes for unexpected problems, take a look at my guide on making pumpkin banana bread. Sometimes a little extra patience solves everything!
Estimated Nutritional Data for These Easy Dessert Bites
I always try to keep things general since ingredient brands change everything, but here is a general snapshot of what you can expect per serving from these easy dessert bites. Please remember this is just an estimate based on standard cake mix and candy coating! Things like heavy sprinkles or different frosting flavors will shift the totals.
- Calories: ~250
- Total Fat: ~14g
- Carbohydrates: ~30g
- Protein: ~3g
For a full breakdown of macro and micronutrients, always refer to the original packaging of your ingredients. If you’re looking for lighter fare earlier in the day, you might want to peek at my ideas for healthy lunch recipes!
Share Your Homemade Cake Pops Creations
I truly hope this recipe gives you the confidence to make the most adorable, delicious cake pops ever! Once you’ve finished dipping and decorating those sweet treats on a stick, please, please come back and tell me how it went! Drop me a comment below—I absolutely love seeing your pictures and hearing your ratings. Did you stick to vanilla, or did you try a fun birthday flavor?
Don’t forget, if you need anything else, or just want to say hello, my contact page is always open for you here!
PrintEasy, Foolproof Cake Pops Using Cake Mix

Make delicious, moist cake pops at home using a simple cake mix. This basic recipe is foolproof and perfect for parties or any celebration.
- Prep Time: 30 min
- Cook Time: 30 min
- Total Time: 70 min
- Yield: 24 servings 1x
- Category: Dessert
- Method: No-Bake Assembly
- Cuisine: American
- Diet: Vegetarian
Ingredients
- 1 box (15.25 oz) cake mix (any flavor, e.g., vanilla or chocolate)
- Ingredients listed on cake mix box (usually eggs, oil, water)
- 1 can (16 oz) pre-made frosting (e.g., vanilla or chocolate)
- 12 oz candy coating wafers (e.g., chocolate or vanilla melting wafers)
- 1 teaspoon coconut oil or vegetable shortening (optional, for thinning coating)
- Cake pop sticks
- Sprinkles or other decorations (optional)
Instructions
- Bake the cake according to the package directions, but reduce the liquid slightly as directed on the box if you want a denser cake for rolling. Let the cake cool completely.
- Crumble the cooled cake into fine crumbs in a large bowl. You can use your hands or a stand mixer with the paddle attachment on low speed.
- Add the entire can of frosting to the cake crumbs. Mix on low speed until the mixture is fully combined and holds together when pressed. It should resemble thick cookie dough.
- Roll the mixture into uniform balls, about 1 to 1.5 inches in diameter. Place the balls on a parchment-lined baking sheet.
- Chill the cake balls in the refrigerator for at least 30 minutes. This step is crucial for preventing them from falling off the sticks.
- While the balls chill, prepare the candy coating. Melt the candy coating wafers according to package directions. If the coating is too thick, stir in the coconut oil or shortening, a half teaspoon at a time, until you reach a smooth, dipping consistency.
- Dip the tip of a cake pop stick about half an inch into the melted coating and then gently insert the stick about halfway into a chilled cake ball. This acts as glue.
- Return the dipped pops to the refrigerator for about 10 minutes to let the coating on the stick set.
- Dip the entire cake ball into the melted coating, rotating it to cover completely. Gently tap the stick against the side of the bowl to allow excess coating to drip off.
- Immediately apply sprinkles or decorations before the coating sets.
- Place the finished cake pops upright in a styrofoam block or a dedicated cake pop stand to dry completely.
Notes
- For a Starbucks copycat vanilla cake pop, use a yellow or white cake mix and vanilla frosting.
- If your cake balls are too soft after chilling, chill them longer or roll them slightly smaller.
- To get a perfectly smooth coating, make sure your cake balls are very cold and your melted candy is the correct consistency.
Nutrition
- Serving Size: 1 pop
- Calories: 250
- Sugar: 28
- Sodium: 150
- Fat: 14
- Saturated Fat: 7
- Unsaturated Fat: 7
- Trans Fat: 0.5
- Carbohydrates: 30
- Fiber: 1
- Protein: 3
- Cholesterol: 25