
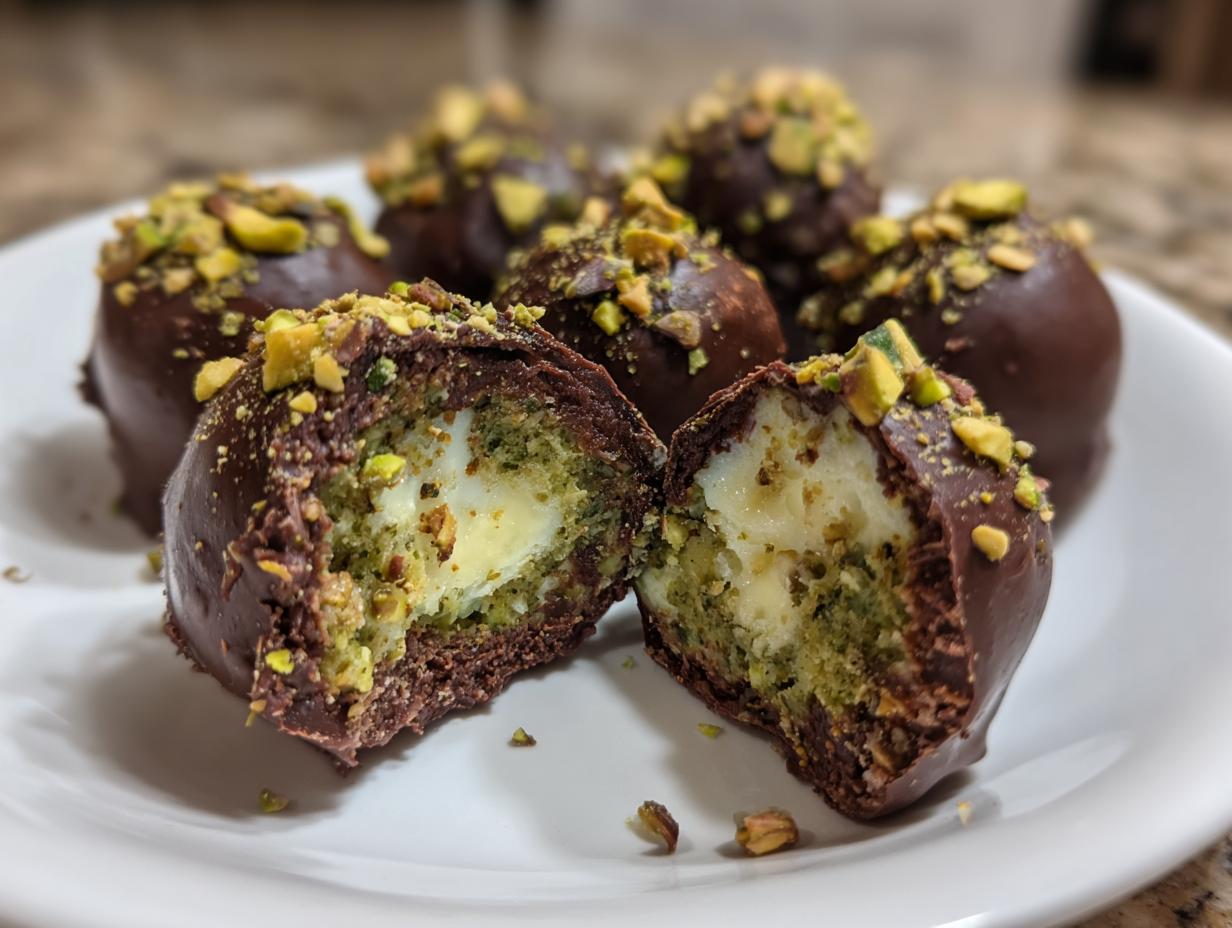
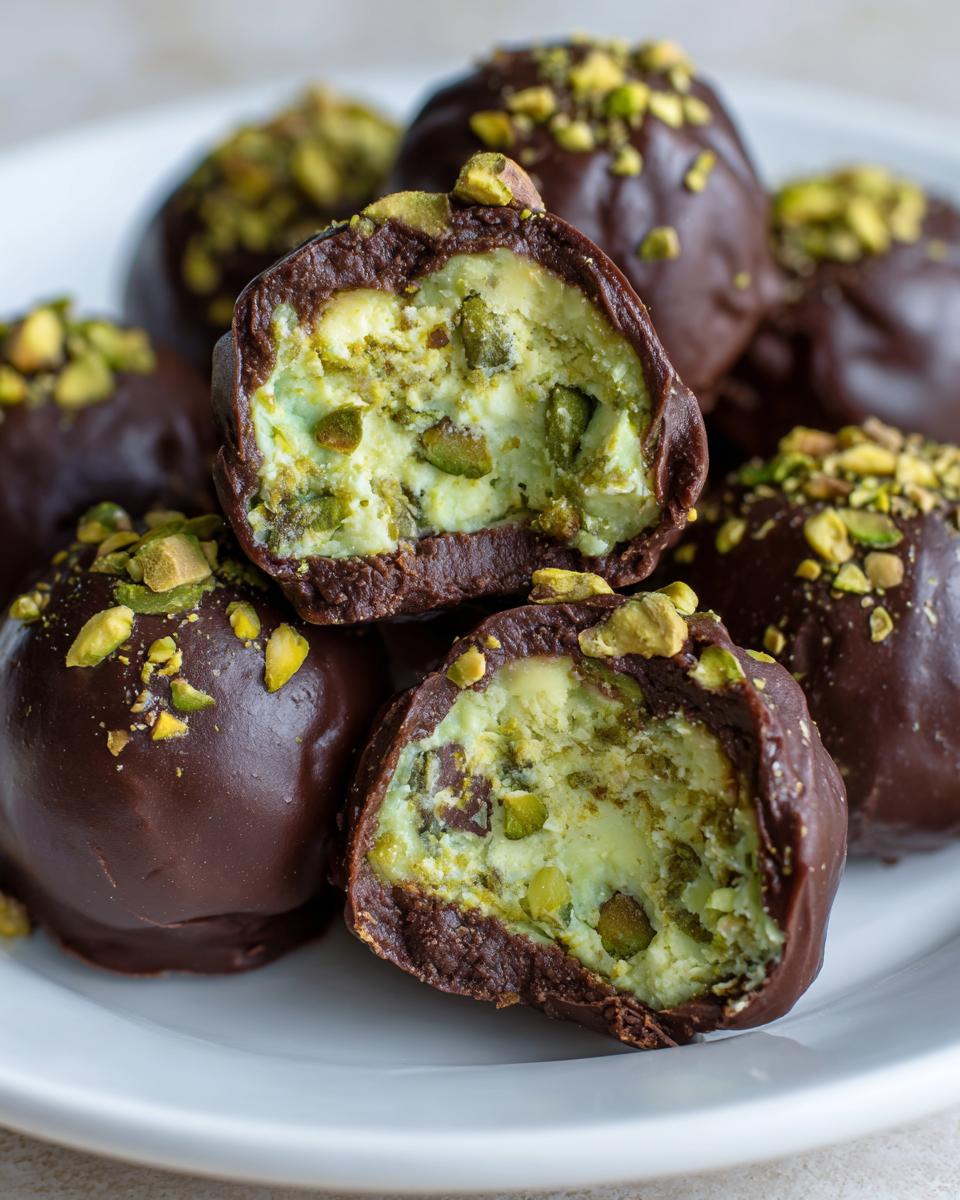
Oh my goodness, have you seen those incredible, glossy confections popping up everywhere? They look like something straight out of a royal treasury, right? Well, I’m here today because I cracked the code on making those showstopper **Dubai Chocolate Balls** right here in my own kitchen, and guess what? It’s shockingly easy! I know they look like they take days of intricate work, but trust me, we’re skipping the oven entirely. My whole philosophy here at the blog is that luxury shouldn’t mean complexity. We’re taking those creamy, pistachio-centered, perfectly coated treats and turning them into an accessible, no-bake wonder. Get ready to impress everyone—I promise they’ll think you bought these from a gourmet shop!
- Why You Will Love These No Bake Dubai Chocolate Balls
- Gathering Ingredients for Your Dubai Chocolate Balls
- Essential Equipment for Perfect Dubai Chocolate Balls
- Step-by-Step Guide: Making the Creamy Dubai Chocolate Balls Filling
- Creating the Chocolate Biscuit Base for Your Dubai Chocolate Balls
- Achieving the Perfect Chocolate Coating for Dubai Chocolate Balls
- Tips for Success with Your Homemade Chocolate Candy
- Storing and Serving Your Decadent Chocolate Balls Recipe
- Frequently Asked Questions About Dubai Chocolate Balls
Why You Will Love These No Bake Dubai Chocolate Balls
Honestly, what’s not to love? These beautiful bites hit every single sweet spot:
- They are completely no bake, which means no fuss and no waiting for the oven!
- Decadent? Absolutely. That creamy center wrapped in dark chocolate just screams luxury.
- They scream Middle Eastern Inspired Desserts with that hint of pistachio and spice.
- They are incredibly easy to prepare, even for a weeknight treat.
Gathering Ingredients for Your Dubai Chocolate Balls
Okay, let’s talk supplies. Because these are no bake chocolate truffles, the quality of the few items we use really shines through! I’ve laid everything out clearly below so you don’t have any mid-mix surprises. For the base, we’re using finely ground biscuits—think digestive or graham crackers—mixed with unsalted butter that’s nicely melted. Don’t skimp on the cocoa powder; it gives us that deep, rich chocolate flavor that makes these spectacular.
The star, of course, is that creamy center. You need shelled pistachios, and you must grind them up super fine so they incorporate beautifully with the heavy cream and a touch of powdered sugar. Honestly, a whisper of cardamom powder takes this right over the top into true gourmet chocolate treats territory, but it’s totally optional if you’re not feeling adventurous. And for the coating? High-quality dark chocolate mixed with a tiny bit of coconut oil ensures the smoothest, glossiest shell that snaps just right!
If you’re curious about balancing flavors, I have a great recipe for moist date nut bread that uses some similar warm spices!
- 1 cup finely ground biscuits (like digestive or graham crackers)
- 1/2 cup unsalted butter, melted
- 1/4 cup cocoa powder
- 1/4 cup powdered sugar
- 1 teaspoon vanilla extract
- 1/2 cup shelled pistachios, finely ground
- 1/4 cup heavy cream
- 2 tablespoons powdered sugar (for filling)
- 1/4 teaspoon cardamom powder (optional)
- 12 ounces dark chocolate, chopped (for coating)
- 1 tablespoon coconut oil (for coating)
- 2 tablespoons finely chopped pistachios or kataifi threads (for garnish)
Essential Equipment for Perfect Dubai Chocolate Balls
You don’t need a fancy candy maker for these, which is why I love them so much! The equipment list for these easy homemade chocolate candy pieces is super straightforward—it’s mostly just mixing bowls, which I know everyone has cluttering up their cabinets, haha.
First up, you’ll need a couple of good mixing bowls. One for making the crumbly base and a smaller one for whipping up that rich pistachio cream filling. Don’t use giant bowls; you want something where you can really get in there and mix firmly!
For melting the coating, definitely use a microwave-safe bowl. I cannot stress this enough: melt the chocolate using short bursts—maybe 20 or 30 seconds at a time—and stir in between. If you just blast it, trust me, you’ll end up with seized, sad chocolate.
When it comes time to dip, you’ll want a tray lined completely with parchment paper. This is non-negotiable; we need easy release! And you need a regular kitchen fork, or maybe a candy dipping tool if you’re feeling fancy. The fork is great because you can tap off all that extra melted chocolate before placing the ball down. That’s how you get those nice, neat shells!
Step-by-Step Guide: Making the Creamy Dubai Chocolate Balls Filling
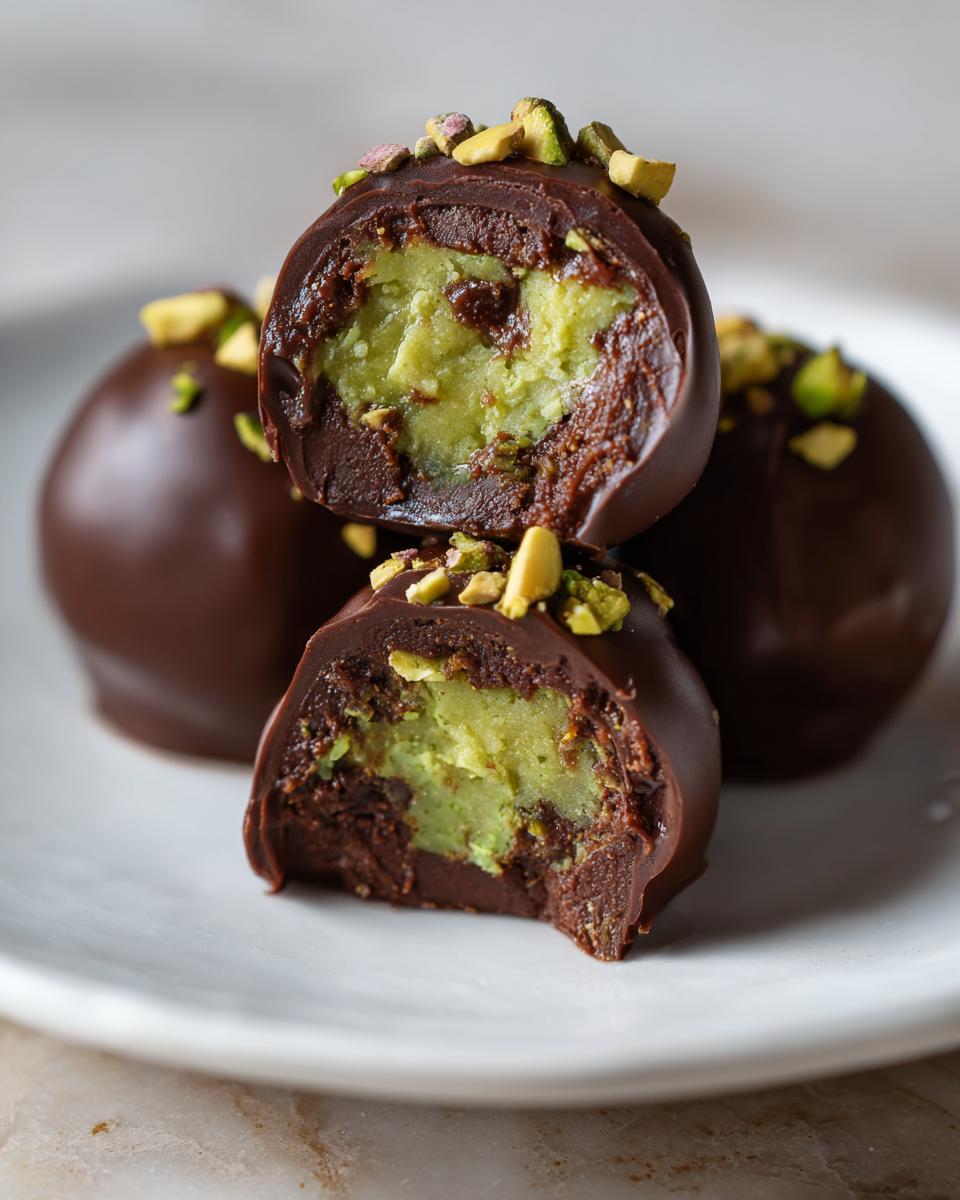
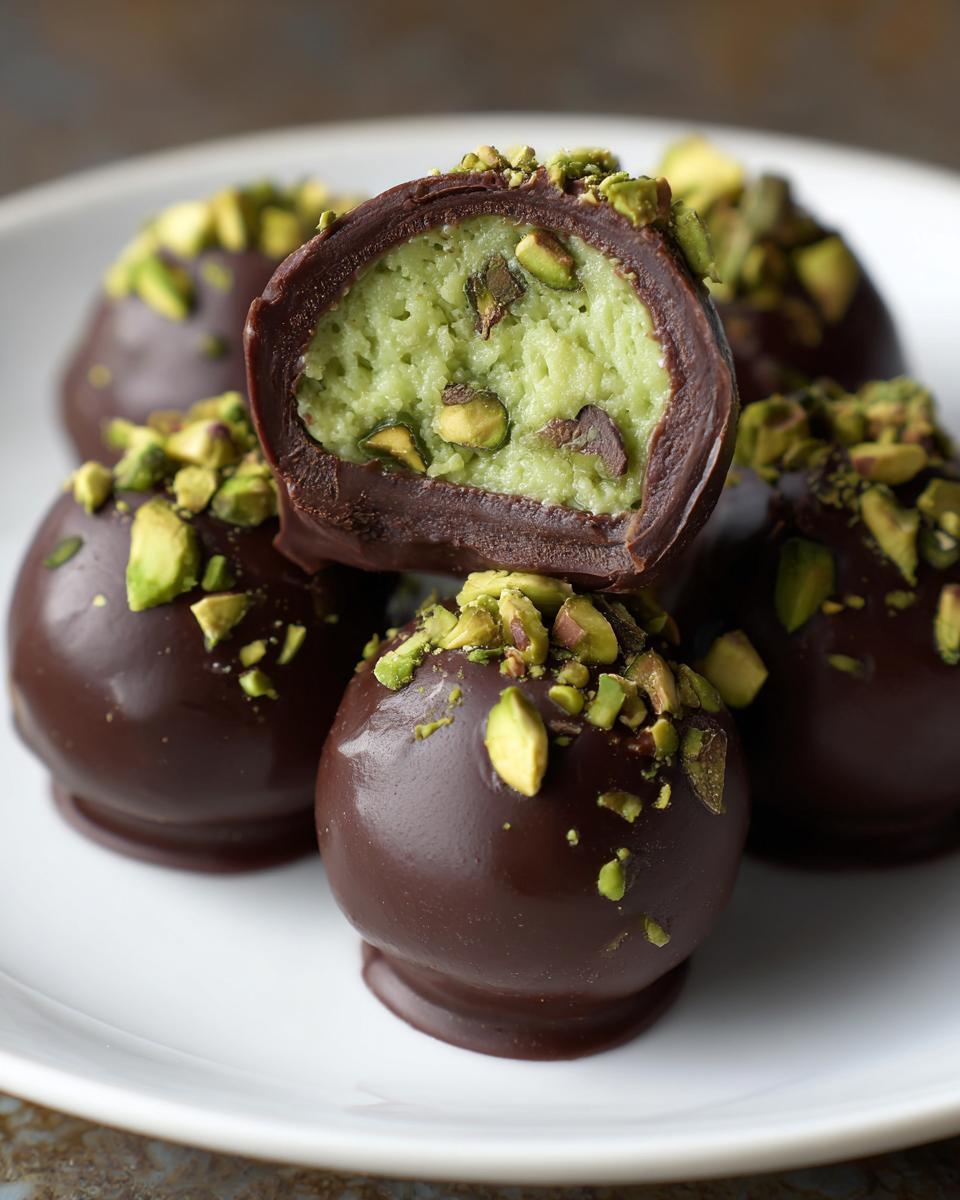
Alright, this is where the magic starts! We’re mixing up the heart of our decadent Dubai Chocolate Balls—that vibrant, creamy pistachio filling. Grab your smallest mixing bowl for this part. Into the bowl goes your finely ground pistachios, the heavy cream, two tablespoons of powdered sugar, and if you’re feeling that international flair, your tiny pinch of cardamom powder. Don’t go overboard with the cardamom; it should be a gentle background note, not a shouting match!
Mix this together slowly. You want everything to just combine until you have a thick, spreadable paste. Now, here is my little bit of expertise—if you find it’s a little too loose or runny, don’t panic! Just add a tiny sprinkle more ground pistachio or even a pinch of powdered sugar. We’re aiming for something stiff enough that it holds its shape when you scoop it, not a loose custard. This consistency is key for the next step!
Chilling the Pistachio Cream
Once you have that perfect paste, you absolutely have to cover it and pop it straight into the refrigerator. Seriously, don’t skip this! This pistachio cream needs to chill for at least 30 minutes, maybe a little longer if your kitchen is warm. Why? Because it needs to firm up! If it’s soft when we try to wrap it in the biscuit base, it’s going to squish out the sides the second you touch it, and nobody wants that messy situation.
Creating the Chocolate Biscuit Base for Your Dubai Chocolate Balls
Now it’s time to build the structure around that beautiful chilled filling. This base is what gives our Dubai Chocolate Balls that satisfying, truffle-like heft. Head over to your larger mixing bowl. We’re combining the dry goods first: that cup of finely ground biscuits, the cocoa powder, and that quarter cup of powdered sugar. Give that a quick whisk just to make sure the sugar is evenly distributed so we don’t get any clumps later.
Next, we add the wet ingredients: the melted butter and the vanilla extract. Now, this is where technique matters! Don’t dump everything in and mix wildly. You want to work this mixture with a sturdy spoon or even your hands until it comes together perfectly. What are we looking for? I always tell people, you need to press the mixture until it truly resembles wet sand. If you grab a handful and squeeze it, it should hold its shape when you open your palm. If it crumbles, add maybe half a teaspoon more melted butter until it binds up!
If you’re wondering how this compares to my chewy chocolate chip cookies, the ratios are completely different—we need density here, not fluff! Once it’s sand-like, we start rolling.
Forming and Freezing the Dubai Chocolate Balls
Alright, time to marry the filling and the base! Pull that pistachio cream out of the fridge—it should be nice and firm now. Take about one tablespoon of that chocolate biscuit base, flatten it gently in your palm until it makes a disk shape. Then, scoop a tiny bit—maybe a teaspoon—of that chilled pistachio filling right into the center.
This part takes a tiny bit of gentle coaxing. You fold the base around the filling, sealing it completely. Then, you roll it delicately between both palms until you have a smooth, perfect sphere. Remember, we aren’t trying to break the sound barrier here; be tender! Repeat this until all your gorgeous Dubai Chocolate Balls are formed.
The very next step is arguably the most important before we get to the dipping chocolate: freezing! Place these formed balls onto your prepared parchment-lined tray and shove them into the freezer for at least one hour. They need to be rock solid! Why? Because if they are even slightly soft when they hit that warm melted coating, they will melt into chocolate puddles on your tray. We want a clean dip, so freeze them hard!
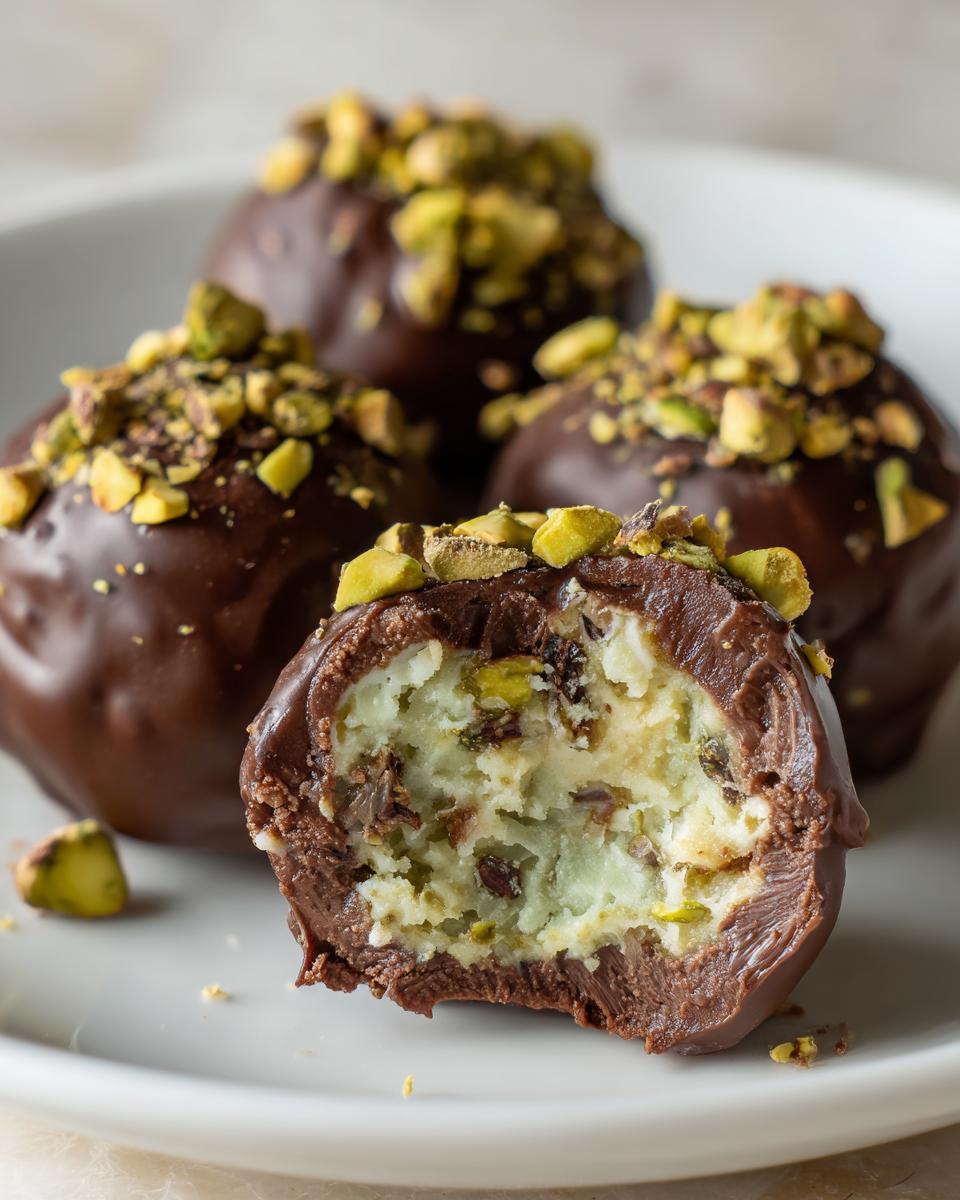
Achieving the Perfect Chocolate Coating for Dubai Chocolate Balls
Okay, the cores are frozen solid—perfect! Now comes the glamorous part: coating these beauties to make them official Dubai Chocolate Balls. Remember that coconut oil I listed? That little bit of fat is our secret weapon because it helps the chocolate melt down smooth as silk and gives us that amazing shine when it sets up. It makes all the difference between a dull shell and a mirror finish!
Get your melted dark chocolate and coconut oil into that microwave-safe bowl. Set your microwave to 50% power, or even lower if you can. We are melting this in 30-second intervals, tops. After every 30 seconds, take it out and stir it around aggressively, even if it doesn’t look melted yet. This gentle method prevents the chocolate from seizing up on you. Trust me, nobody wants to deal with hardened chocolate when they are trying to coat a dozen frozen centers! You just keep stirring and microwaving in short bursts until it’s completely smooth and glossy, and then you’re ready for dipping.
It’s time to work fast! Pull those frozen balls out and grab your dipping fork. Dip one ball completely into the warm chocolate. Use the fork to turn it around and around quickly to get full coverage. Then, gently tap the side of the bowl with that fork a few times to let all the extra, runny chocolate drip back into the bowl. You don’t want excess pooling at the bottom. As soon as you’re done tapping, slide it gently onto your waiting parchment-lined tray.
If you want to see a trick for keeping your regular chocolate chip cookies soft and chewy, check out my thoughts on ingredient ratios over here; similar principles apply to getting a thin, even coat!
Garnishing Your Gourmet Chocolate Treats
This is where we amp up the look to truly qualify these as gourmet chocolate treats! As soon as you set that chocolate-coated ball onto the parchment paper, you have mere seconds before that dark chocolate shell starts to firm up. You need to act fast!
Take your finely chopped pistachios or, if you’re feeling extra fancy, those tiny, crispy kataifi threads, and sprinkle them lightly over the top of the chocolate. That little bit of crunch and color elevates these from simple truffles to something truly special. If you’re using the kataifi, I highly recommend giving them a quick toast beforehand to enhance that crunch factor! This detail takes your homemade candy from good to absolutely unforgettable.
For another great source of drizzling inspiration with Middle Eastern vibes, check out this recipe for pistachio kunefe filling inspiration!
Tips for Success with Your Homemade Chocolate Candy
You know how it is—even with the simplest no bake chocolate truffles, sometimes little hiccups happen in the kitchen! Because we want these Dubai Chocolate Balls to look glossy and taste perfect, I wrote down a few things I learned the hard way. Think of these as the little nudges that push your treats from good to truly professional looking!
First, let’s talk chocolate quality. Since the coating is essentially the whole outer layer, using a decent quality dark chocolate bar that you chop yourself makes a world of difference over chips. Chips have stabilizers that make them harder to melt smoothly. When you melt yours down—and remember that slow, gentle microwave approach!—if it seems a little thick, that’s when you add that tiny splash of coconut oil. It’s the secret to getting that incredible, glossy snap when you bite into it.
What if your filling warmed up too fast while you were rolling? Don’t panic and keep working with it! That’s okay. I always keep a small bowl of ice water handy or just pop the whole filling bowl back into the fridge for exactly ten minutes. You just need it stiff enough so that when you wrap the biscuit base around it, the pistachio cream stays put inside. It’s all about temperature control when you’re making these creamy chocolate balls!
And I can’t say this enough: you need those centers absolutely rock-solid frozen. If they aren’t frozen solid, they’ll start leaching moisture into that warm coating you just made, resulting in a soft, dull shell instead of that fabulous, crisp coating everyone raves about when they try the delicious Dubai chocolate balls recipe.
Storing and Serving Your Decadent Chocolate Balls Recipe
Now that you’ve made these gorgeous treats, you need to know how to keep them perfect! Since these are decadent chocolate balls recipe-level good, we want to maintain that perfect snap on the shell. For long-term storage, you absolutely must keep these in the refrigerator. Pop them into an airtight container—I like to place a sheet of parchment between layers just in case—and they’ll be lovely for up to a week.
However, and this is important for enjoying the texture: don’t serve them straight from the cold! If they are fridge-cold, that chocolate shell will be rock hard and you won’t taste the creamy center. Always, always let your chocolate dessert for parties sit out on the counter for about 15 to 20 minutes before you serve them. That slight warming allows the filling to soften up beautifully, just like a perfect bonbon. It’s amazing how much better they taste when they aren’t ice-cold! If you’re serving a tray, pop them out while you’re mixing up some coffee, like when I make my lemon cream cheese dump cake!
Frequently Asked Questions About Dubai Chocolate Balls
I know sometimes you have questions bouncing around after you finish a recipe, especially when you’re trying something new and chic like these! That’s totally normal. Since we skipped the oven with these Middle Eastern Inspired Desserts, they behave a little differently than regular baked goods. Here are the things I hear folks asking most often about making these stunning treats!
Can I substitute the pistachios in these Dubai Chocolate Balls?
That’s a great question! The pistachio is really what gives these their signature luxurious flavor, but you can certainly get creative if you have a nut allergy or just need to swap things up. You could try using finely ground blanched almonds, which will give you a softer, milder filling texture. Another really fun alternative, especially if you want to lean into that warm, spiced flavor profile we talked about, is using a thick date paste blended with a hint of cardamom. Just make sure whatever you substitute for the nuts is quite thick so it doesn’t ooze out when you’re wrapping it in the chocolate base!
Are these considered Easy Homemade Chocolate Candy?
Oh, absolutely! That’s one of the biggest selling points! Because we are keeping this a no bake recipe from start to finish—the base is pressed, the filling is mixed, and the coating just melts—these totally qualify as Easy Homemade Chocolate Candy. The only thing that takes more than a few minutes is the mandatory chilling time. If you want a really fast chocolate fix, these are perfect. You just need about 35 minutes of active work, and the rest is just waiting for things to get firm!
What is the best chocolate to use for coating?
For the best snap and the glossiest look, you really want to use a good quality dark chocolate, usually around 60% to 70% cocoa content. Skip the standard chocolate chips if you can manage it! Chips have added stabilizers that make them harder to melt smoothly. When you melt yours down—and remember that slow, gentle microwave approach!—if it seems a little thick, that’s when you add that tiny splash of coconut oil. It’s the secret to getting that incredible, glossy snap when you bite into it. For the best snap and the glossiest look, you really want to use a good quality dark chocolate, usually around 60% to 70% cocoa content. Skip the standard chocolate chips if you can manage it! Chips have added stabilizers that make them harder to melt smoothly. When you melt yours down—and remember that slow, gentle microwave approach!—if it seems a little thick, that’s when you add that tiny splash of coconut oil. It’s the secret to getting that incredible, glossy snap when you bite into it.
Need some ideas for what to serve alongside these beauties? Check out my recipe for creamy coconut chicken curry—a totally different vibe, but so comforting!
For more great ideas on easy, no-fuss chocolate treats, take a peek at what the lovely people at Nurtured Homes are doing!
PrintNo-Bake Dubai Chocolate Balls with Pistachio Filling
Make these decadent, no-bake Dubai Chocolate Balls at home. This recipe features a rich chocolate coating around a creamy pistachio filling, offering a luxurious, Middle Eastern-inspired sweet treat that is simple to prepare for any occasion.
- Prep Time: 30 min
- Cook Time: 5 min
- Total Time: 35 min
- Yield: About 18 balls 1x
- Category: Dessert
- Method: No Bake
- Cuisine: Middle Eastern Inspired
- Diet: Vegetarian
Ingredients
- 1 cup finely ground biscuits (like digestive or graham crackers)
- 1/2 cup unsalted butter, melted
- 1/4 cup cocoa powder
- 1/4 cup powdered sugar
- 1 teaspoon vanilla extract
- 1/2 cup shelled pistachios, finely ground
- 1/4 cup heavy cream
- 2 tablespoons powdered sugar (for filling)
- 1/4 teaspoon cardamom powder (optional)
- 12 ounces dark chocolate, chopped (for coating)
- 1 tablespoon coconut oil (for coating)
- 2 tablespoons finely chopped pistachios or kataifi threads (for garnish)
Instructions
- Prepare the filling: In a small bowl, combine the ground pistachios, heavy cream, 2 tablespoons of powdered sugar, and cardamom powder if you are using it. Mix until a thick, spreadable paste forms. Chill this pistachio cream for at least 30 minutes.
- Make the base: In a separate medium bowl, mix the ground biscuits, melted butter, cocoa powder, 1/4 cup powdered sugar, and vanilla extract. Press the mixture together until it resembles wet sand.
- Form the balls: Take about 1 tablespoon of the biscuit base mixture and flatten it in your palm. Place a small teaspoon of the chilled pistachio filling in the center. Gently wrap the base mixture around the filling, rolling it carefully between your palms to form a smooth ball. Repeat until all the mixture is used.
- Chill the balls: Place the formed chocolate balls on a parchment-lined tray and freeze for at least 1 hour until very firm. This step is crucial for easy dipping.
- Melt the chocolate coating: Place the chopped dark chocolate and coconut oil in a microwave-safe bowl. Microwave in 30-second intervals, stirring well after each, until the chocolate is completely smooth.
- Coat the balls: Working quickly, remove the balls from the freezer. Dip each frozen ball into the melted chocolate, using a fork to turn it and ensure full coverage. Tap the fork gently on the side of the bowl to remove excess chocolate.
- Garnish: Immediately place the coated ball back onto the parchment paper. Sprinkle the top with chopped pistachios or kataifi threads before the chocolate sets.
- Set the coating: Allow the chocolate balls to set completely at room temperature or chill briefly in the refrigerator until the chocolate shell is hard.
Notes
- For a truly luxurious texture, use high-quality dark chocolate for the coating.
- If you want a crunchier texture, lightly toast the kataifi threads before using them as a garnish.
- If the pistachio filling becomes too soft while rolling, return it to the refrigerator for 10 minutes.
Nutrition
- Serving Size: 1 ball
- Calories: 210
- Sugar: 18
- Sodium: 35
- Fat: 15
- Saturated Fat: 7
- Unsaturated Fat: 8
- Trans Fat: 0
- Carbohydrates: 18
- Fiber: 2
- Protein: 3
- Cholesterol: 15