
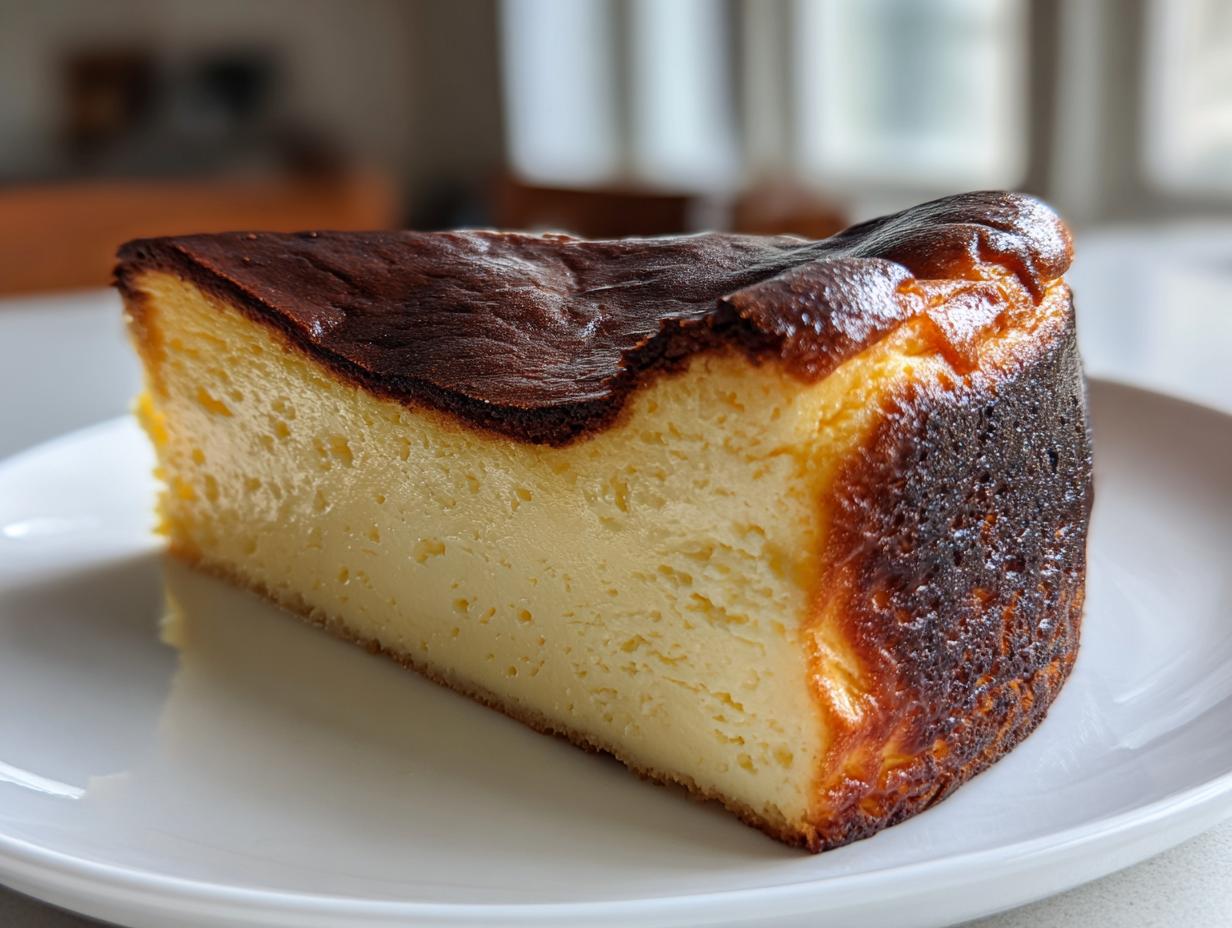
Oh, that gorgeous, almost intimidating, blackened top! Doesn’t that rustic, scorched look just scream indulgent flavor? I absolutely adore desserts that look like they took hours but secretly come together in minutes, and that’s exactly what we have here with the incredible Basque burnt cheesecake. Forget fussy water baths and fragile crusts; this is the ultimate effortless gourmet dessert for your next dinner party. Here at MDLATDMM, my philosophy is rooted in bringing you simple, reliable results, and this crustless cheesecake proves that decadence doesn’t require complication. Trust me, this recipe is fine-tuned to guarantee that signature beautifully caramelized top while keeping that luscious, velvety center perfectly creamy every single time.
- Why This is the Best Basque Burnt Cheesecake Recipe You Will Make
- Gather Your Minimal Ingredient List for Basque Burnt Cheesecake
- Step-by-Step Guide to Your Burnt Basque Cheesecake Recipe
- Tips for the Perfect Creamy Cheesecake Texture
- Variations on the Classic Basque Burnt Cheesecake
- Serving Suggestions for Your Simple Basque Cake
- Storage and Reheating Instructions for Leftover Basque Burnt Cheesecake
- Frequently Asked Questions About Making Basque Burnt Cheesecake
- Your Next Culinary Adventure
Why This is the Best Basque Burnt Cheesecake Recipe You Will Make
Look, folks, I’ve tested enough desserts to know what wastes your time and what delivers pure magic. This Burnt Basque Cheesecake Recipe cuts out all the frustrating bits and delivers exactly what you want: rich, creamy, and completely foolproof. If you’re looking for an Easy Cheesecake Recipe that tastes gourmet, stop looking, because you’ve found it right here! It’s ready for the oven in about fifteen minutes flat. I know you’ll love the results. Check out the incredible simplicity below!
- Zero fuss, zero crust, maximum flavor. This is the definition of a Simple Basque Cake!
- The ingredient list is painfully short—we are keeping it minimal here.
- Guaranteed soft, velvety texture every single time you bake it.
For more amazing, straightforward baking joy, check out all my delicious dessert recipes!
Effortless Preparation for a Creamy Cheesecake Center
This is why I love this San Sebastian Cheesecake so much! There is absolutely no finicky water bath needed. None! We skip the crust entirely, which saves you a whole step of unnecessary pressing and chilling. To nail that beautiful, smooth texture you see online, the key is just making sure your cream cheese, eggs, and cream are truly at room temperature. When they are soft, they blend into that luxurious, smooth batter without any effort, avoiding those dreaded lumps!
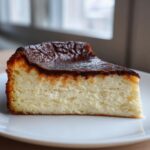
Achieving the Signature Caramelized Cheesecake Top
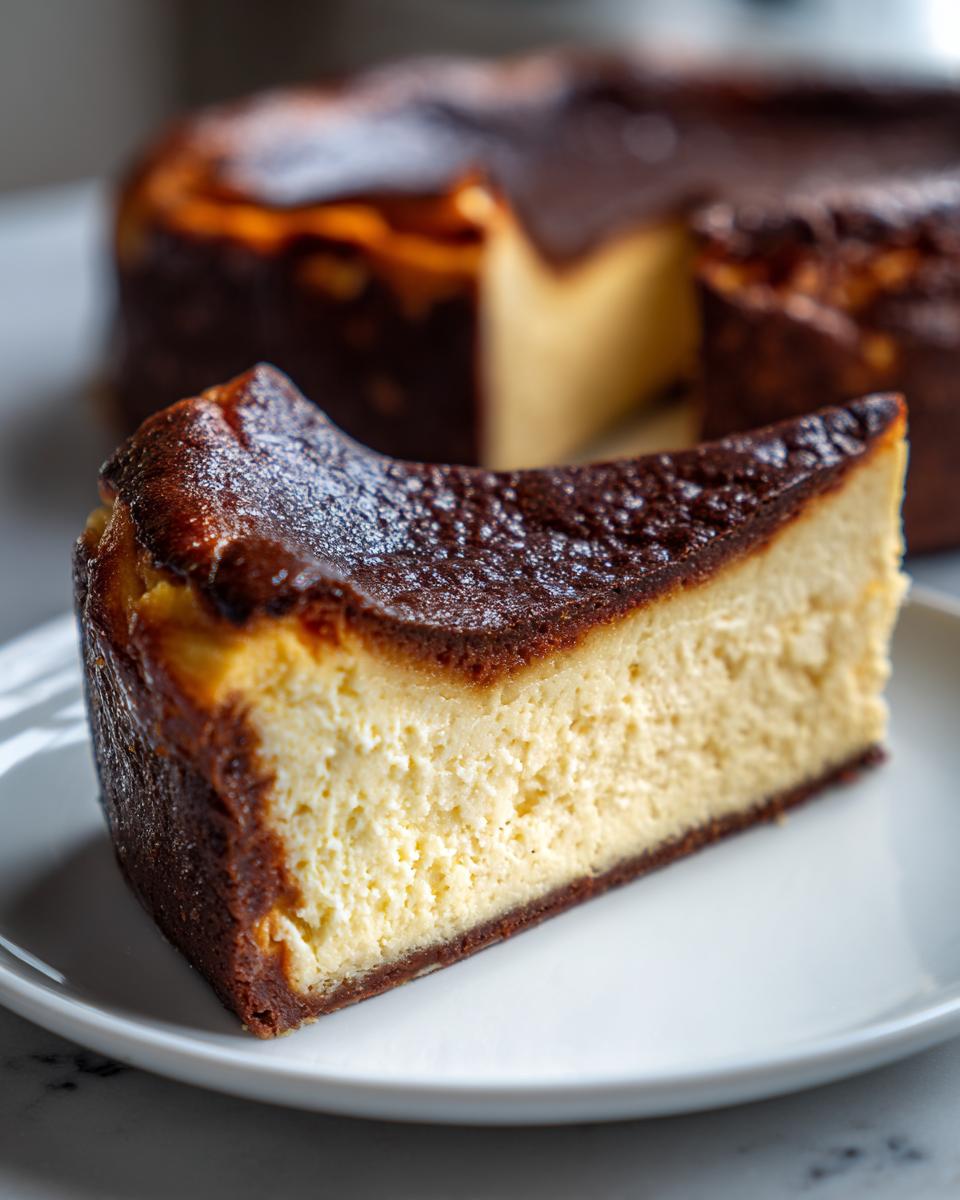
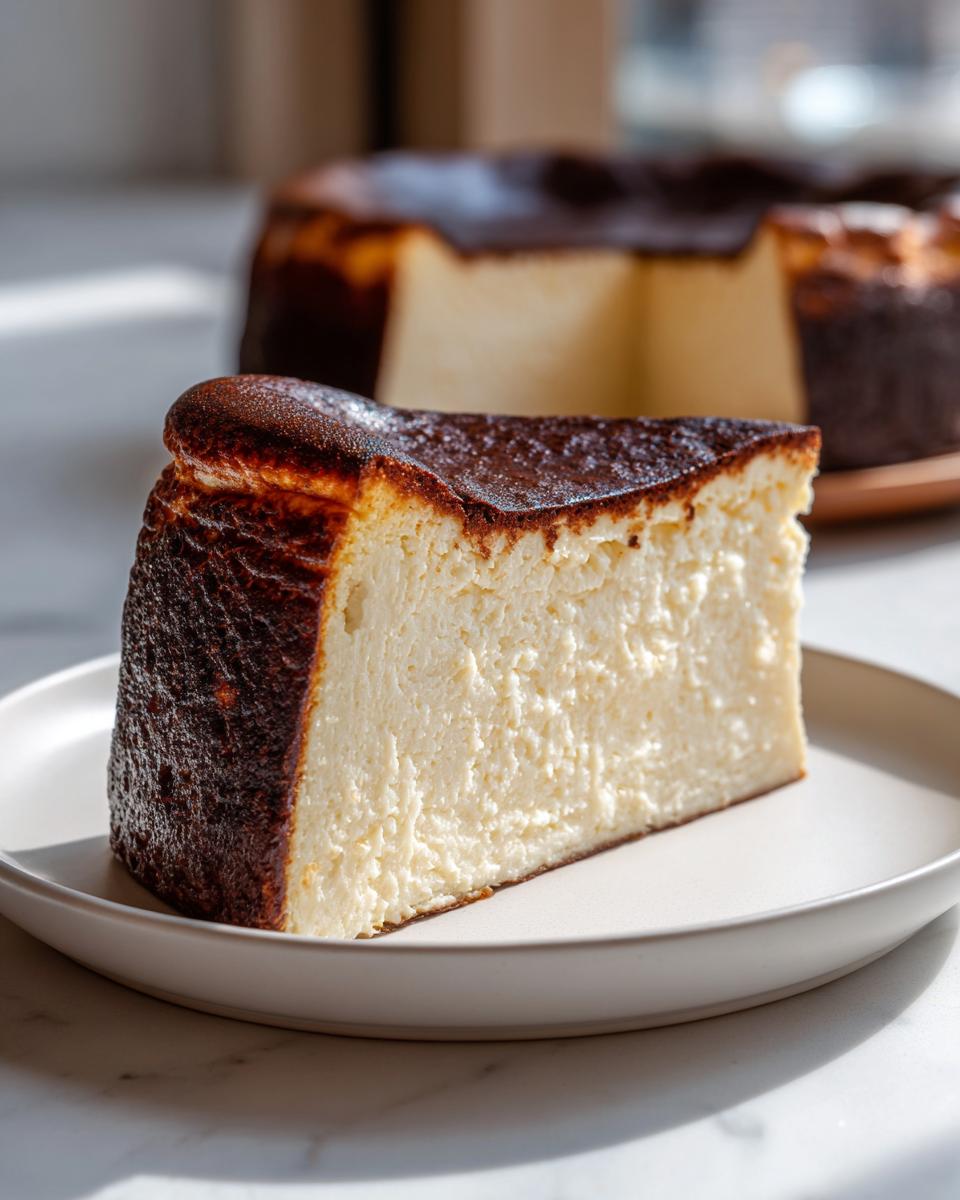
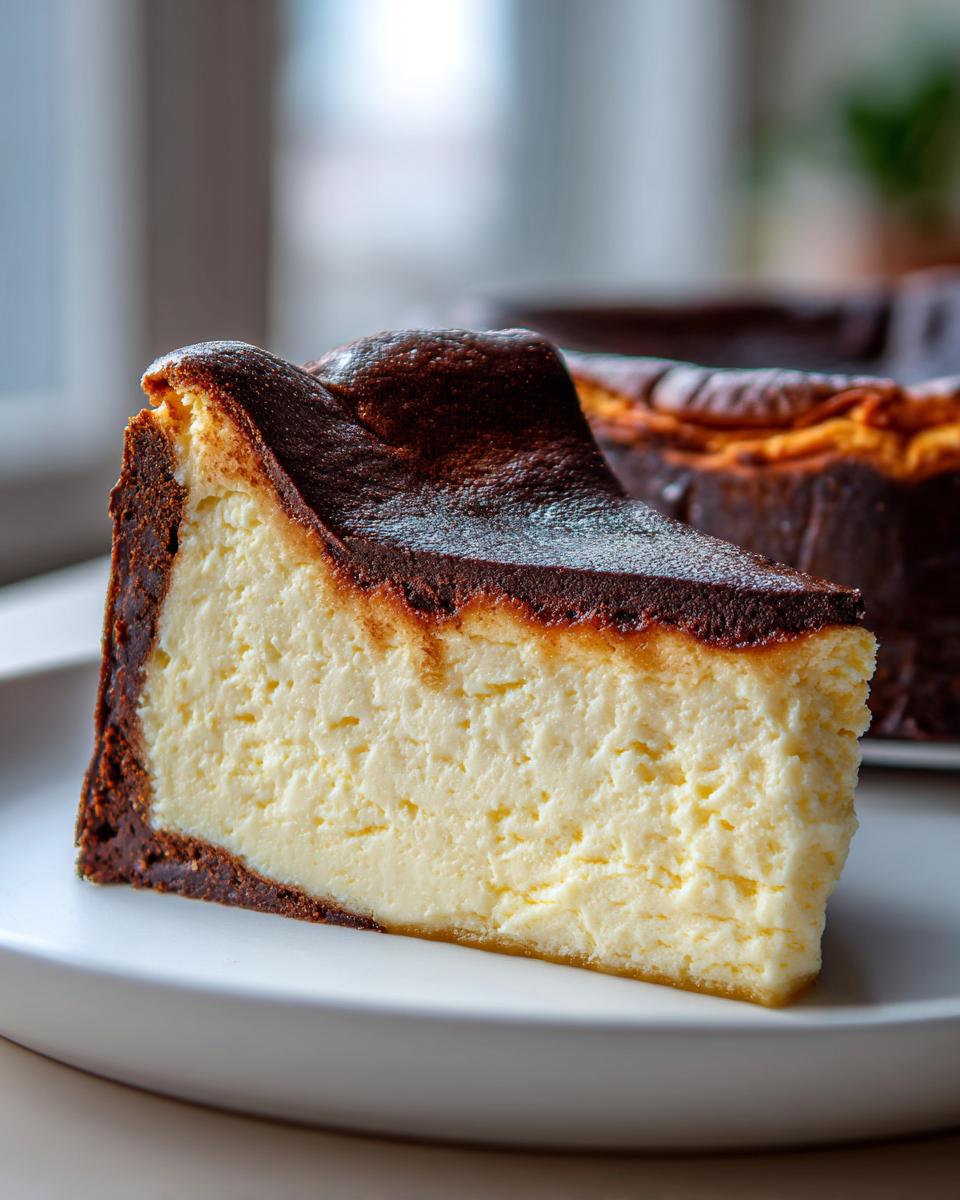
That dark, almost black surface isn’t a mistake—it’s the whole point! We use a high oven temperature right at the start. This blast of heat caramelizes the sugar quickly on the outside, creating that distinct, slightly bitter-sweet crust you crave. The trick I learned, and that I stress in the instructions, is that the center *must* still wobble when you pull it out. That wobble is your insurance policy that the inside stays perfectly soft and custardy while the top gets spectacularly scorched. You just can’t beat that contrast!
Gather Your Minimal Ingredient List for Basque Burnt Cheesecake
Honestly, when I first saw a recipe that claimed to be the best Basque Cheesecake but needed twenty different things, I rolled my eyes. Not this one! This is what I love about it—it’s a wonderfully simple, Minimal Ingredient Cheesecake that delivers huge flavor. You likely have most of this already! Just make sure everything is at room temperature, okay? That’s the one thing you absolutely can’t skip for the smooth batter.
- 1.5 lbs cream cheese, room temperature
- 1 1/4 cups granulated sugar
- 4 large eggs, room temperature
- 2 large egg yolks, room temperature
- 1 3/4 cups heavy cream
- 1 tablespoon all-purpose flour
- Pinch fine sea salt
Step-by-Step Guide to Your Burnt Basque Cheesecake Recipe
Okay, let’s get this beautiful, rustic Spanish dessert into your oven! Even though this is the easiest cheesecake recipe out there, a couple of these steps are non-negotiable if you want that perfect interior. Remember, we are aiming for that ‘whoa’ factor when people see the top, but all the magic is really in how soft the center stays. Don’t worry about making things neat or pretty; that crinkled parchment paper is part of its charm, so embrace the mess!
Preparing the Pan and Oven for the Basque Burnt Cheesecake
First things first—get that oven roaring hot! We need 400°F (200°C) ready to go. For the pan, this is important: grab an 8-inch springform and line it with *two* layers of parchment paper. Seriously, use two sheets, crisscrossing them, and let them stick up way over the sides. That extra paper helps create those gorgeous, uneven edges we love on our Dessert with Charred Top. It’s kind of like giving your cheesecake room to grow tall, and it keeps cleanup nearly non-existent. You can read more about the traditional way to handle this over here, but I promise the double-layer parchment is my secret to not having it stick!
Mixing the Batter for a Velvety Cheesecake Center
Now for the mixing. We need smooth, not fluffy! Start with your room-temperature cream cheese. Beat it until it’s totally slick—no visible lumps, that’s goal number one. Next, add your sugar and mix until just combined. Here’s where you gotta hold back: when you add those eggs (one at a time!), mix only until they disappear. Don’t whip it! Over-mixing incorporates air, and air creates an airier cake, which is the exact opposite of the dense, creamy cheesecake we want. After the eggs, gently stream in the cream. Mix just until it looks like one uniform, pourable batter. I like to follow up by gently folding in the flour by hand just to be sure I don’t stir too much air in. Keep those arms gentle for this step!
Baking Time and Checking for the Perfect Basque Burnt Cheesecake
Pour that smooth batter into your prepared pan. Bake for about 45 to 55 minutes. How do you know it’s done? You don’t use a toothpick! You watch the top turn dark brown, even black in spots—that’s your beautiful char developing. When you gently shake the pan, the outer ring should look set, but the very center must still have a distinct, nervous wobble, like soft Jell-O. If it’s firm across the top, you’ve overbaked it, and it won’t have that luxurious center. Trust the wobble! Grab my favorite pie recipe if you’re looking for another easy winner later!

Tips for the Perfect Creamy Cheesecake Texture
I know the high heat might scare you into thinking the center will turn rubbery, but if you respect the cooling process, you’ll get that incredible, velvety texture we’re aiming for. Achieving that perfect melt-in-your-mouth consistency isn’t just about the mix; it’s about letting the cheesecake settle down gently after the oven does its hot work. I’ve learned that patience here is the final, most important secret ingredient.
When you are ready to bake other rich desserts, don’t forget my recipe for carrot cake cream cheese frosting!
Room Temperature Ingredients: The Secret to Basque Burnt Cheesecake Success
If you take away only one thing from this entire post, let it be this: don’t rush warming up your cream cheese or eggs! Cold ingredients resist mixing. If you try to beat cold cream cheese, you end up over-beating it trying to smash out the lumps, and that incorporates air. Air is the enemy of the creamy cheesecake center. Room temperature dairy and eggs mix smoothly with the sugar almost instantly, creating that glossy, gorgeous batter you need before it even sees the oven.
Cooling and Setting Your Crustless Cheesecake
Once it comes out wobbling, you must leave this No Crust Dessert completely alone on the counter to cool for a minimum of three hours. Seriously, don’t touch it! It deflates dramatically, and that’s normal; it’s just releasing steam. If you try to move it too soon, it might collapse in a weird way. After it’s totally cool on the rack, cover it gently and move it to the fridge for at least six hours, or overnight if you can manage! That chill time is what transforms it from a warm custard into that dense, rich, truly velvety texture. A final tip from me: serve it closer to room temperature for the ultimate ooey-gooey experience!
Variations on the Classic Basque Burnt Cheesecake
Now that you’ve mastered the basic version of this incredible Basque burnt cheesecake—the one that’s the simplest route to sheer indulgence—you might be wondering if you can shake things up a bit! I love knowing I can tweak a reliable recipe without destroying the texture. This is such a wonderful base, and because it’s so rustic and forgiving, it handles small changes really well. If you’re tired of the standard round shape or just don’t have a springform pan handy, I have the perfect solution for you that keeps the creamy center intact.
Making a Loaf Pan Cheesecake Recipe Version
If you saw pictures of the Burnt Basque Cheesecake in a Loaf Pan (and I know many of you did, that’s a huge trend!), you can absolutely do that! Using a loaf pan gives you an even taller, more dramatic look, which is fun, right? It keeps that rustic feel but trades the round shape for something a little more unexpected. The main thing you have to watch is the baking time. Since the loaf pan is usually deeper than the 8-inch round I called for, the heat takes longer to get to the middle. So, when you make this Easy Cheesecake Recipe in a loaf pan, start checking around the 50-minute mark and listen for the wobble. You might need an extra 5 to 10 minutes since it’s thicker. I highly recommend checking out the process people use for that loaf pan version for the best pan prep advice! If you’re looking for other recipes great for loaf pans, check out my pumpkin banana bread sometime!
Serving Suggestions for Your Simple Basque Cake
This Simple Basque Cake is so wonderfully rich, it truly doesn’t need much help, but adding a little something on the side elevates it instantly for your guests. I love serving slices of this decadent Spanish dessert slightly cool, not straight from the fridge—that’s when the center is perfectly velvety. Think of it as the ultimate light ending to a heavy meal!
For a wonderful contrast to the richness, try placing a spoonful of fresh raspberries or blackberries right next to the slice. The slight tartness cuts through the sweetness beautifully. Or, if you’re having it for an afternoon treat, a strong, dark cup of coffee is just unbeatable alongside that charred top. It really makes this a perfect Dinner Party Cheesecake Idea. Want to try another sweet pairing? You might enjoy my recipe for apple cider braised pork shoulder if you need main course inspiration!
Storage and Reheating Instructions for Leftover Basque Burnt Cheesecake
This is the hard part—having leftovers of this rich, homemade burnt cheesecake! Good news, though: it keeps wonderfully well, and honestly, some people think it tastes even better the second day once the flavors have really settled in. You definitely don’t want to waste any of this simple goodness. Since this is a giant, glorious block of cream cheese—a true Rich Cream Cheese Cake—it just needs simple care to last.
To store it, cover the pan (or the slice itself) tightly with plastic wrap, making sure the wrap doesn’t actually touch the surface of the cheesecake if you can help it. It’s perfectly happy chilling in the refrigerator for up to five days. I never really know it makes it that long, though! If you’re looking for other ways to save savory leftovers, my meatloaf recipe has some great fridge tips too!
Now, the crucial part: serving. Remember how I kept telling you that room temperature gives you that perfect, soft, almost soufflé-like interior? If you slice it directly from the fridge, it will be too firm—a bit denser than we want for the ultimate creamy result. So, pull the portion you plan to eat out of the refrigerator about 45 minutes to an hour before you serve it. Let it sit on the counter; the dairy needs time to soften up again. This little bit of patience brings back that spectacular, melt-in-your-mouth texture we worked so hard to create!
Frequently Asked Questions About Making Basque Burnt Cheesecake
I get so many sweet notes from people trying this recipe out, and usually, the questions circle back to texture and that beautiful burnt crust. That’s totally fair! This isn’t your grandma’s standard New York cheesecake, so the rules change a little bit. I’ve gathered the most common things folks ask me about making this spectacular San Sebastian Cheesecake at home. If you follow the main recipe, you should be fine, but here are the quick answers to anything that might cause last-minute panic!
Why is my Basque Burnt Cheesecake not browning on top?
If your top is pale when the edges look set, your oven is probably running too cool, or maybe the rack position isn’t quite right. Remember, we need that high heat! If your oven rack is way too low, the heat source is too far away from the top of the cheesecake to get that crucial char. For a stunning Caramelized Cheesecake Top, make sure your oven is fully preheated to 400°F (200°C) before it goes in, and try placing the rack in the middle or even slightly higher if you think your oven runs cool. Don’t be afraid of the heat; it’s what makes this dessert!
Can I substitute the heavy cream in this Easy Cheesecake Recipe?
Oh, I wish you could, but please don’t try to swap the heavy cream! I know sometimes we run out, but this is where the recipe earns that ‘velvety center’ promise. Heavy cream brings necessary fat content that helps the texture set up perfectly around those eggs. If you swap it for whole milk or half-and-half, you risk the cheesecake becoming too loose or even grainy when it cools. It won’t give you that signature dense, Creamy Cheesecake quality. Stick with the heavy cream for the best results, even if it means running to the store!
What is the correct internal temperature for a San Sebastian Cheesecake?
This is the biggest difference between this Spanish version and the classic American style! With traditional cheesecake, we worry about getting to 150°F or whatever the chart says. With the Basque Burnt Cheesecake, forget the thermometer! We are cooking it hot and fast. The goal isn’t a specific internal temperature; the goal is the *wobble*. If you pull it out and the middle is still liquidy enough to slosh when you gently nudge the pan, that’s perfect! It will firm up beautifully as it cools on the counter and then chills in the fridge. If you wait until it looks firm in the oven, you’ve gone too far already. Trust the visual cue!
If you are looking for another recipe that proves comfort food doesn’t have to be complicated, you should check out my recipe for creamy coconut chicken curry—it’s shockingly fast!
Your Next Culinary Adventure
Wow, you made it! Now that you have the secrets to this incredible, rustic, and surprisingly simple Basque burnt cheesecake, I really hope you give it a try. Don’t let that dark top intimidate you; it’s the best part! When you do bake it up, please come back and let me know how that creamy, velvety center turned out for you. A picture is worth a thousand words, so share your scorched masterpiece!
If you’re already planning your next baking project, I have a wonderfully easy recipe for chewy chocolate chip cookies that might be calling your name next!
PrintULTRA EASY Basque Burnt Cheesecake Recipe with Perfect Creamy Center
Make the best Basque Burnt Cheesecake with this simple, crustless recipe. You get a rich, velvety center and a signature caramelized top without complicated steps. This is the effortless gourmet dessert you need.
- Prep Time: 15 min
- Cook Time: 55 min
- Total Time: 70 min
- Yield: 8 servings 1x
- Category: Dessert
- Method: Baking
- Cuisine: Spanish
- Diet: Vegetarian
Ingredients
- 1.5 lbs cream cheese, room temperature
- 1 1/4 cups granulated sugar
- 4 large eggs, room temperature
- 2 large egg yolks, room temperature
- 1 3/4 cups heavy cream
- 1 tablespoon all-purpose flour
- Pinch fine sea salt
Instructions
- Line an 8-inch springform pan with two layers of parchment paper, allowing the paper to extend high above the rim. This rustic look is part of the charm.
- Preheat your oven to 400°F (200°C).
- In a large bowl, use an electric mixer on medium speed to beat the room-temperature cream cheese until it is completely smooth. Scrape down the sides of the bowl.
- Add the granulated sugar and mix until just combined and smooth. Do not overmix.
- Beat in the eggs one at a time, mixing only until each egg is incorporated before adding the next. Mix in the egg yolks.
- Slowly pour in the heavy cream while mixing on low speed until the batter is uniform.
- Sift the flour and salt over the batter. Mix briefly on low speed until just combined. You want a smooth, pourable batter.
- Pour the batter into the prepared pan.
- Bake for 45 to 55 minutes. The top should be deeply caramelized, almost black in spots, and the center should still wobble significantly when gently shaken. This wobble guarantees your creamy texture.
- Remove the cheesecake from the oven. It will deflate as it cools. Let it cool completely on a wire rack at room temperature for at least 3 hours.
- Chill the cheesecake in the refrigerator for at least 6 hours, or preferably overnight, before serving. Serve at room temperature for the best velvety texture.
Notes
- Use room temperature ingredients for the smoothest, creamiest cheesecake batter.
- For a deeper char, increase the oven temperature to 425°F (220°C) for the last 5 minutes of baking, watching closely.
- If you want to make this in a loaf pan, use a smaller recipe ratio and adjust baking time down.
- This crustless cheesecake tastes best when served slightly warmer than refrigerator temperature.
Nutrition
- Serving Size: 1 slice
- Calories: 450
- Sugar: 35g
- Sodium: 250mg
- Fat: 35g
- Saturated Fat: 22g
- Unsaturated Fat: 13g
- Trans Fat: 0g
- Carbohydrates: 28g
- Fiber: 0g
- Protein: 8g
- Cholesterol: 180mg