
If you’re anything like me, you live for that moment when two of your favorite things crash together—think pizza and pasta, or maybe a cozy movie night and a spontaneous weekend trip. Well, I’ve found the dessert equivalent of that perfect collision: the tiramisu cheesecake!
For me, finding recipes that feel both incredibly comforting and beautifully elegant is huge. After those draining weeks in the city, I craved something that used the deep, complex flavors I love, like espresso, but with that unbelievably silky smooth cheesecake texture. That’s exactly what we are making today.
Forget turning on the oven! This is my ultimate no bake tiramisu cheesecake recipe. It flawlessly marries the richness of Italian tradition—think mascarpone and cocoa—with the creamy, cool satisfaction of a classic cheesecake. It sets up perfectly in the fridge and tastes like pure sophistication.
- Why This No Bake Tiramisu Cheesecake is Your New Favorite Dessert
- Gathering Ingredients for Your Decadent Coffee Lovers Dessert
- Step-by-Step Guide to Making the No Bake Tiramisu Cheesecake
- Pro Tips for the Best Tiramisu Cheesecake Texture
- Serving Suggestions for Your Italian Cheesecake Fusion
- Storage and Make-Ahead Instructions for Tiramisu Cheesecake
- Frequently Asked Questions About This Tiramisu Cheesecake Recipe
- Estimated Nutritional Snapshot for Tiramisu Cheesecake
- Share Your Decadent Coffee Dessert Experience
Why This No Bake Tiramisu Cheesecake is Your New Favorite Dessert
I know what you’re thinking—another dessert to add to the rotation? Trust me on this one. This no bake tiramisu cheesecake hits every single requirement for a truly relaxing dessert experience. It’s designed to impress without demanding your entire afternoon.
- This is the ultimate easy make ahead dessert. Prep it completely the day before, and you’re done! No last-minute panic required.
- It develops such a silky smooth cheesecake texture because we let the cold do all the heavy lifting for us.
Effortless Elegance: The No Bake Advantage
The best part about skipping the oven? Zero stress about cracks or water baths! Since this recipe doesn’t require baking, your kitchen stays cool, and you avoid all that oven drama. All the magic happens while it chills, which is just my kind of cooking.
Perfect Textures in Every Layer of Your Tiramisu Cheesecake
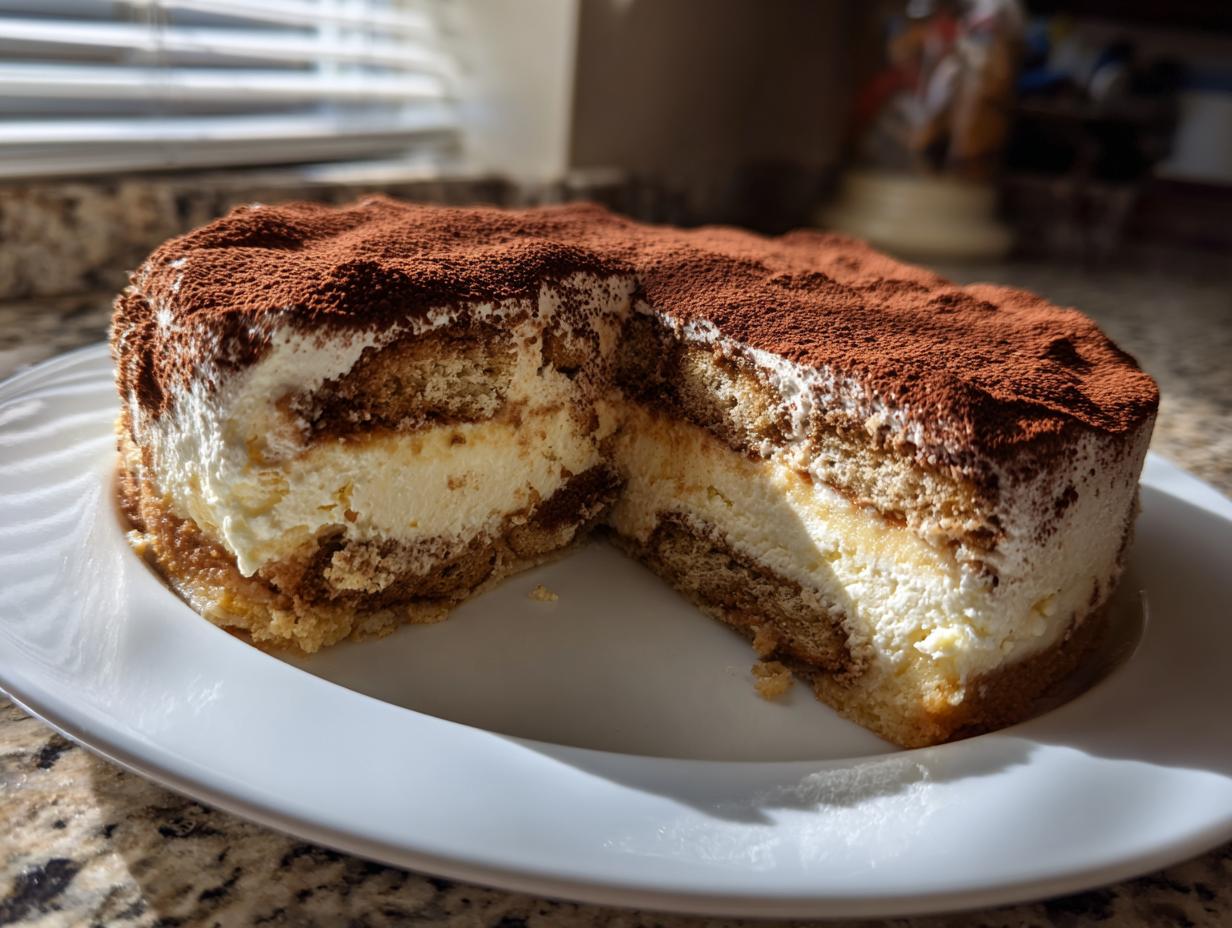
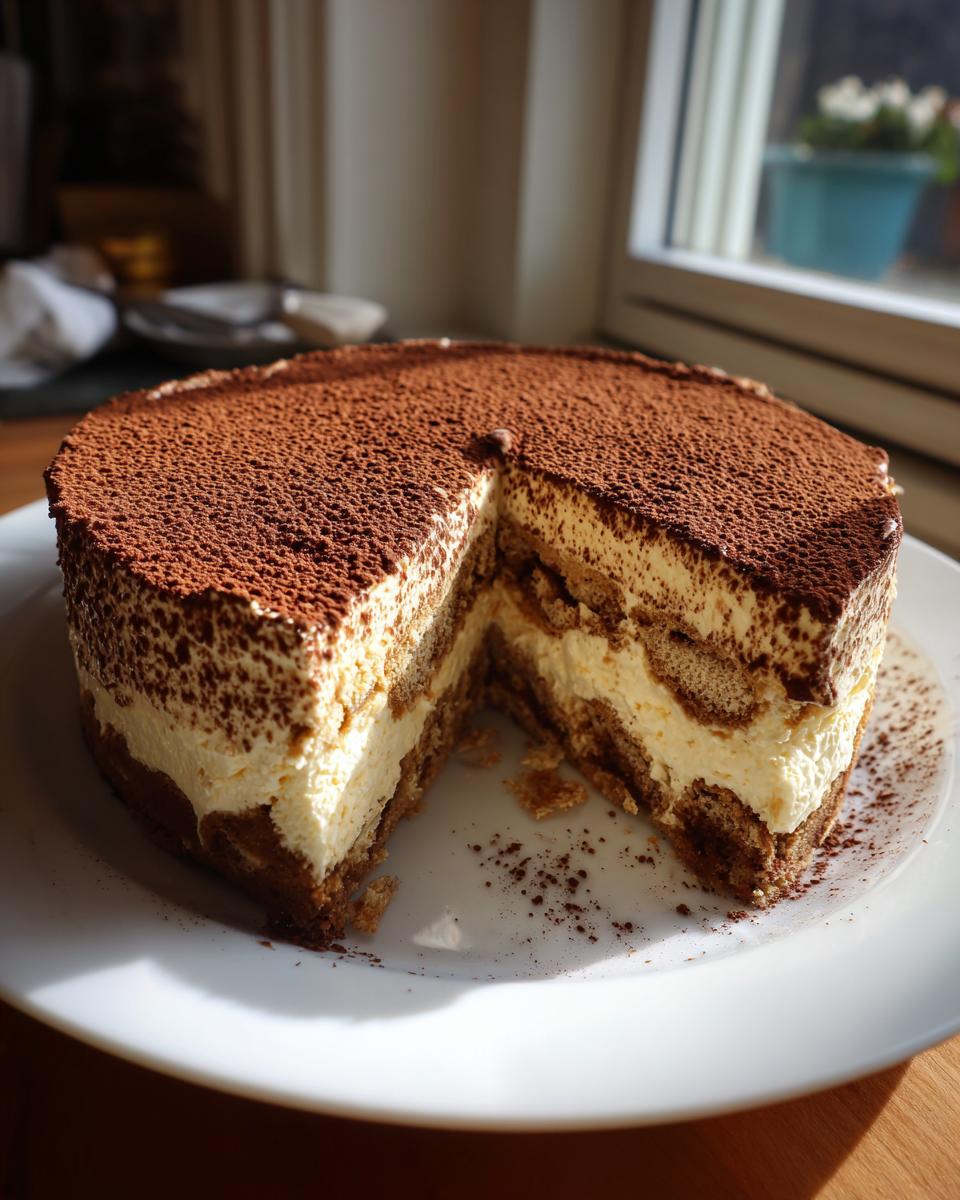
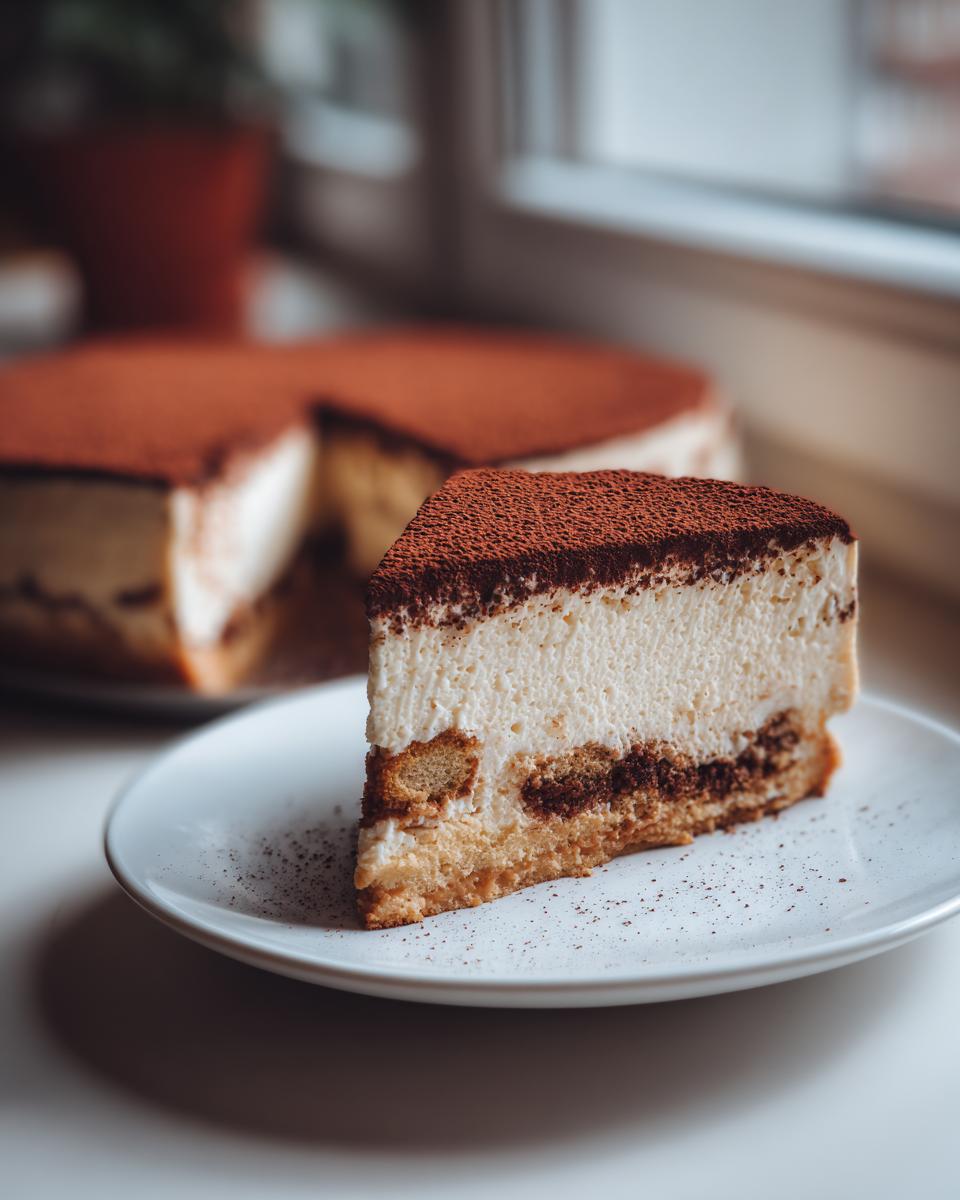
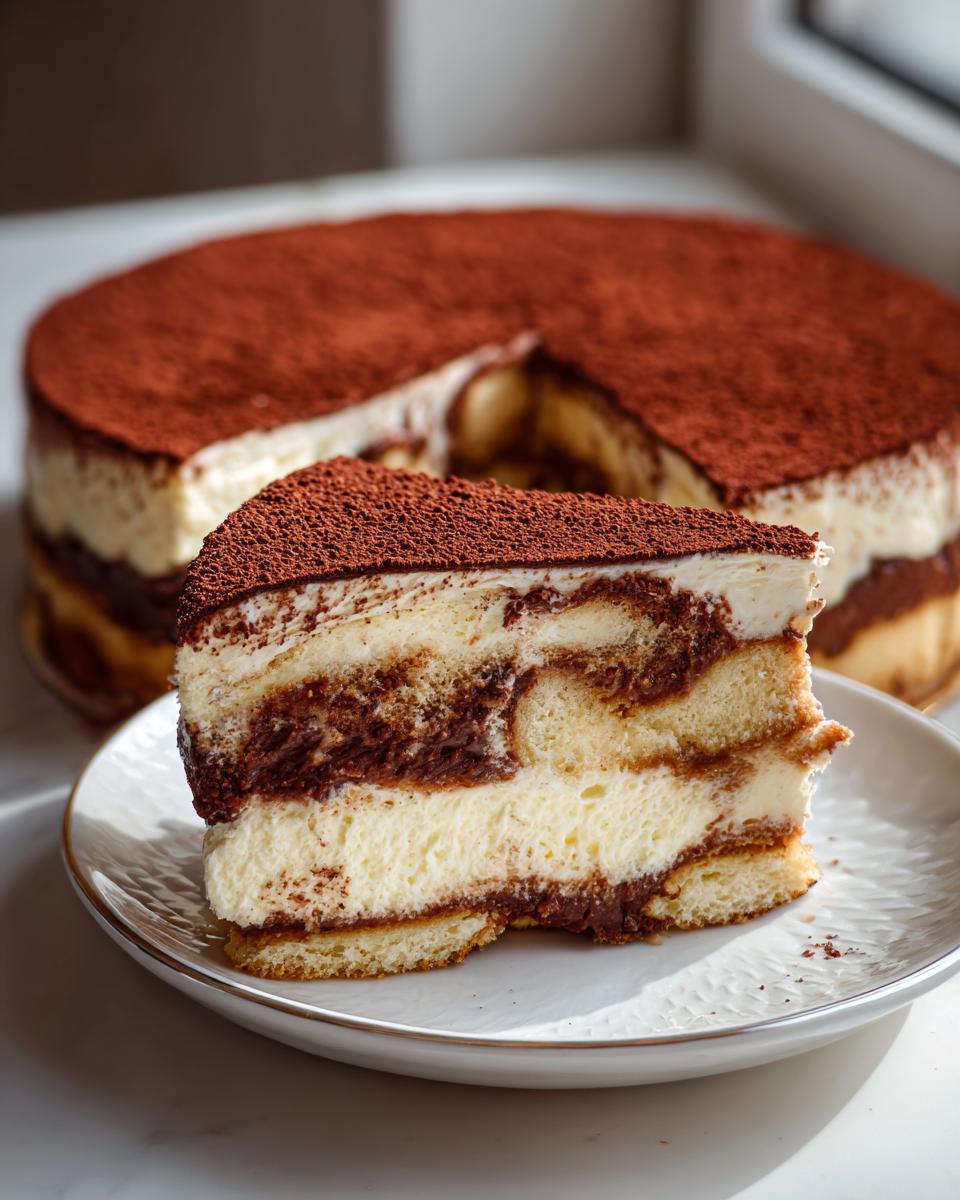
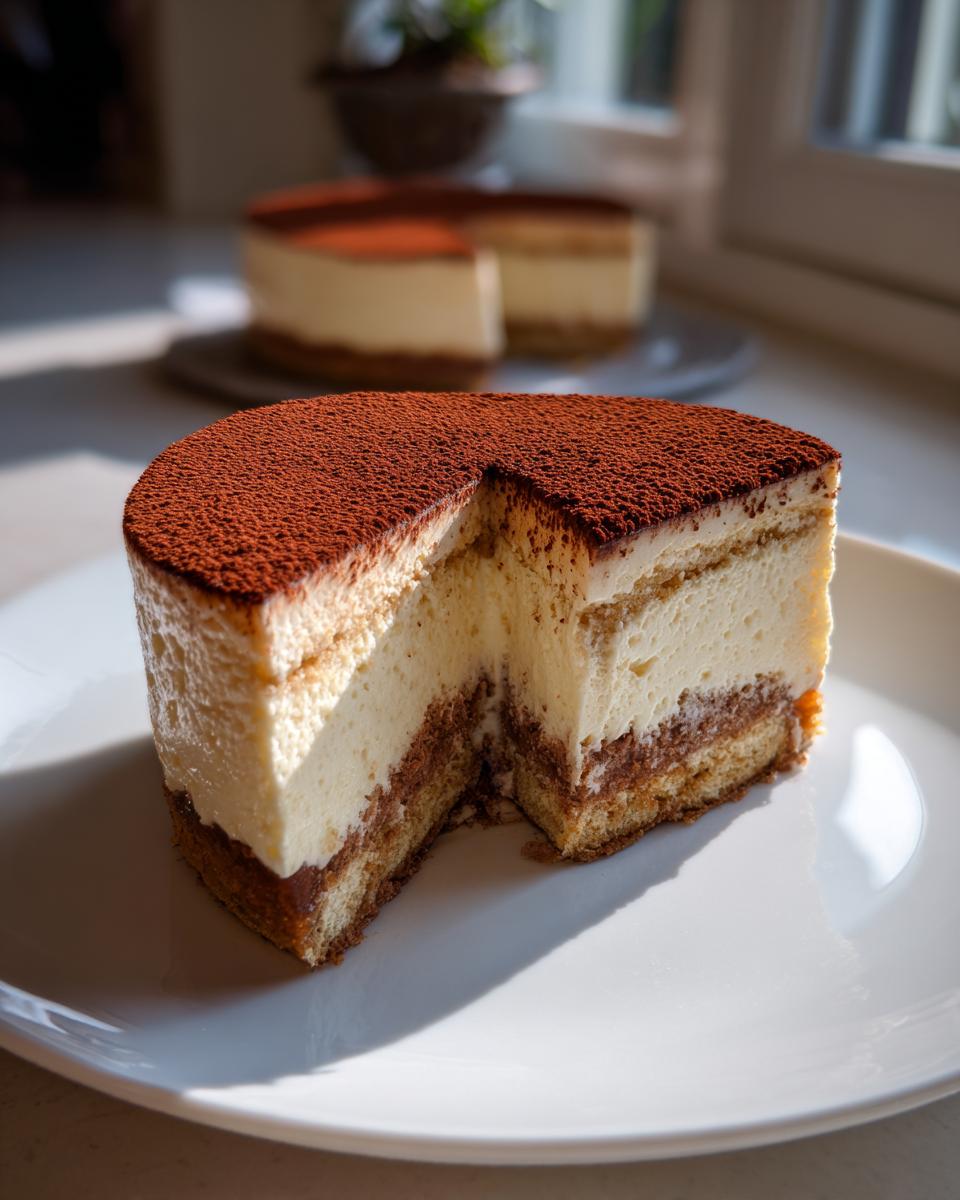
This isn’t just a flat flavor experience; it’s a textural journey! We get that beautiful contrast: the crisp, slightly bitter chocolate crust, followed by the soft, espresso-soaked ladyfingers, all held together by that cool, cloud-like layer of creamy mascarpone dessert. It truly feels like fine dining right from your fridge!
Gathering Ingredients for Your Decadent Coffee Lovers Dessert
You can’t rush magic, especially when blending two iconic desserts! Getting the ingredients ready is half the battle for this fabulous tiramisu cheesecake. I’ve given you the exact list based on the perfect ratios I landed on. Just make sure you check the preparation details—they really matter for that wonderfully silky smooth cheesecake result.
Crust Components for the Tiramisu Cheesecake Base
For the base, we need that slightly bitter, sturdy foundation that contrasts so nicely with the creamy filling. I always use chocolate wafer crumbs, but Oreos work great too if you crush them finely!
- 1 1/2 cups chocolate wafer crumbs (or Oreo crumbs)
- 1/4 cup granulated sugar
- 6 tablespoons unsalted butter, melted
The Silky Smooth Cheesecake Filling Ingredients
The main event! Remember, for the creamiest filling possible, your cream cheese and mascarpone absolutely have to be softened—room temperature is your best friend here. Don’t try to hurry this part up; cold cheese yields lumpy filling, and we are striving for perfection!
- 1 package (8 ounces) cream cheese, softened
- 1 cup powdered sugar
- 1 teaspoon vanilla extract
- 1 cup heavy whipping cream, cold
- 8 ounces mascarpone cheese, softened
Essential Tiramisu Elements: Coffee and Ladyfingers
This is where the Italian soul of the dessert comes in! The key is quickly dipping the ladyfingers. If you leave them in the coffee too long, your whole dessert turns soggy, and nobody wants that!
- 1/2 cup strong brewed espresso, cooled
- 1 tablespoon coffee liqueur (optional, but wow, does it add depth!)
- 1 package (7 ounces) ladyfingers
- Unsweetened cocoa powder, for dusting
Step-by-Step Guide to Making the No Bake Tiramisu Cheesecake
Now for the fun part! We are putting this glorious tiramisu cheesecake together. Because this is a no-bake recipe, the steps are incredibly straightforward, but timing is everything. Pay attention to the chilling periods—they are non-negotiable for that creamy set we love!
Creating and Chilling the Crust
First things first, get that base ready. You’re just combining those chocolate crumbs, sugar, and melted butter until it looks like wet sand. Press it down firmly into your 9-inch springform pan. I like to use the flat bottom of a measuring cup so it gets super compact. Pop that little beauty in the fridge immediately. It needs to chill while we focus on the filling, so about 15 minutes is a good placeholder!
Assembling the Creamy Mascarpone Filling
This step makes the filling so light! In one bowl, use an electric mixer to whip your cold heavy cream until it holds stiff peaks. Set that aside for a moment. In a separate bowl, beat your softened cream cheese, powdered sugar, and vanilla until it’s totally smooth—no lumps allowed! Then, gently fold in the room-temperature mascarpone. Finally, fold in the whipped cream gently. Remember, if you stir too hard, you deflate the air we just whipped in. We want that silky smooth cheesecake texture!
Layering the Espresso Coffee Dessert
Time for the coffee immersion! Mix your cooled espresso and liqueur (if using) in a shallow dish. Have your soaked ladyfingers ready. This is key: dip each ladyfinger for literally one second on each side—don’t let them swim! Start by laying a layer of those dipped ladies over your chilled crust. Spread half that gorgeous filling over them. Then, repeat the soaking and layering with the second batch of ladies, and top it all off with the remaining filling. Smooth the top nicely and get it ready for its long chill. For the best result, you need that overnight rest to let this layered tiramisu cake structure stabilize!
Pro Tips for the Best Tiramisu Cheesecake Texture
Okay, we’ve put in all the work mixing and layering, but honestly, the next 6-18 hours are just as crucial as the prep work! I learned quickly that with no-bake desserts, patience is truly the secret ingredient. If you rush the chilling, you’ll end up with what is essentially a tasty mascarpone soup, and nobody wants that when they’re expecting a slice of tiramisu cheesecake.
Achieving the Perfect Set for Your Tiramisu Cheesecake
You absolutely must dedicate at least 6 hours of fridge time. I’m not even kidding; overnight is when this thing becomes legendary. That long, slow chill allows the cream cheese and mascarpone to firm up properly around those espresso-soaked ladyfingers. That’s the magic trick that guarantees you get that perfect, silky smooth cheesecake slice that holds its shape beautifully when you lift the springform pan. Don’t compromise on this chill time—it’s the difference between good and absolutely unforgettable!
Flavor Adjustments for Your Espresso Coffee Dessert
I know some of you reading this are serious coffee lovers dessert fanatics, and I totally get it. The standard amount of espresso soak is perfect for a balanced flavor, but if you like that bold, slightly bitter punch, here’s my trick: use a stronger brew! You can also bump up that optional coffee liqueur to two tablespoons, or even use a dark rum if you’re feeling spirited. Just remember, even if you boost the flavor in the soak, the filling itself stays creamy and mellow, which keeps everything in beautiful balance.
If you’re looking for other ways to make sure your cream cheese texture is top-notch for your next big bake—whether it’s for frosting or a different cheesecake recipe—I have a fantastic tip over on my guide for working with cream cheese that might help you out!
Serving Suggestions for Your Italian Cheesecake Fusion
If you’ve made it this far, you have created an absolute showstopper! This tiramisu cheesecake is stunning just with that dusting of cocoa powder, but because it’s such a perfect special occasion dessert, sometimes you want to give it an extra little flourish before it hits the table. Trust me, presentation makes all the difference!
When I serve this, I like to get a little artistic. Since the top is currently matte from the cocoa, adding something shiny or textured really makes it pop. My favorite, easiest trick is grabbing a vegetable peeler and shaving off thin ribbons of dark, good-quality chocolate right over the top. The curls melt slightly on the cool surface of the cocoa, which looks just divine.
Another really simple idea that screams sophisticated? Just scatter a few toasted, whole espresso beans artistically across one side of the top. They give a little crunch and remind everyone exactly what amazing flavors are hiding inside. If you want an even more luxurious look, a tiny dollop of unsweetened whipped cream right before serving on each slice works wonders.
As for pairing, you really don’t need much! This Italian cheesecake fusion is rich enough on its own. However, if you’re serving it after a big dinner, a small glass of Vin Santo or, perhaps, a digestif on the side enhances those gorgeous coffee and creamy notes. You can see how beautiful other people have made their presentations when they made this tiramisu cheesecake for their own gatherings!
Storage and Make-Ahead Instructions for Tiramisu Cheesecake
Isn’t it wonderful when you can finish a spectacular dessert days before you actually need to serve it? That’s one of the best qualities of this tiramisu cheesecake! Since this is a no-bake recipe, we actually *want* it to chill for a long time, which makes it the perfect candidate for planning ahead for dinner parties or holiday events.
I rely on this recipe when I have a busy weekend coming up because it fits perfectly into my schedule. You prepare it, cover it up tightly, and essentially forget about it until party time. It’s the definition of a stress-free impressive dessert!
For the best results (meaning the absolute creamiest, most stable slice you can imagine), you need to let this set up for at least 6 hours, but honestly, 12 to 24 hours is ideal. That overnight rest allows the espresso to fully meld with the cheese layers without making the ladyfingers mushy. This is something I always plan for when I make my easy make ahead dessert rotation!
How long does it last once it’s set? Kept tightly covered in the refrigerator, this no bake tiramisu cheesecake stays wonderfully fresh for up to 4 days. Because of the delicate texture created by the whipped cream and mascarpone, I really don’t recommend freezing it. Freezing and thawing can sometimes cause the textures to separate or become grainy once they warm up, which ruins that beautiful silkiness we worked so hard to achieve.
Frequently Asked Questions About This Tiramisu Cheesecake Recipe
I get so many questions whenever I post pictures of this tiramisu cheesecake online, and honestly, I love hearing how many people want to try making their own fusion dessert! Sometimes the smallest tweaks can feel like huge roadblocks, so I pulled together answers to the most common things people ask me about this specific recipe.
Can I substitute the chocolate wafer crumbs in the crust?
That’s a great question about customizing the base! You definitely can change things up, but be aware it changes the deep, slightly bitter background flavor that really sets off the coffee notes. If you don’t have chocolate wafers, the next best thing for flavor integrity is using Oreo crumbs (just make sure you scrape out the white filling if you want a drier, firmer crust—the filling adds too much fat to this no-bake recipe!).
If you only have plain graham crackers, use those! They make a prettier, lighter base, but you lose some of that rich cocoa punch. If you opt for graham crackers, I sometimes add an extra teaspoon of cocoa powder to the graham cracker mixture just to mimic that deeper flavor profile you are aiming for in an Italian cheesecake fusion.
Is the coffee liqueur necessary for the Ladyfinger Cheesecake Recipe?
Nope, it is absolutely not necessary! I call for it because that little bit of Kahlua or similar coffee liqueur really amps up the depth and makes this taste authentically like tiramisu. If you’re avoiding alcohol entirely, don’t worry one bit. Just increase your cooled espresso soak slightly—maybe up that 1/2 cup to 3/4 cup, or even a full cup if that sounds good to you.
If you skip the liqueur and want a flavor punch without the alcohol, try adding 1/4 teaspoon of almond extract to the mascarpone filling. Almond and coffee are just divine together, and it gives you that special, unexpected note that everyone will ask you about!
What if I only have instant coffee powder, not brewed espresso?
Oh, I’ve been there! You don’t need to brew a whole pot of espresso just for the soak. You can absolutely use instant coffee granules. The key here is concentration. Instead of boiling water, just dissolve about two heaping teaspoons of instant coffee powder into about 1/2 cup of very hot water—let it cool completely, of course! This gives you a strong, concentrated shot of coffee that works perfectly for dipping those ladyfingers. It ensures you get that strong espresso coffee dessert flavor without watering down your filling mixture.
Can I bake this? Or should I look for a Baked Tiramisu Cheesecake?
That’s funny, because I bet you didn’t even have to glance at a baked tiramisu cheesecake recipe to land here! This recipe is specifically formulated to be an easy, no-bake option. If you try to bake this mix, it will definitely separate and get grainy because of the high amount of whipped cream we fold in for lightness. If you’re set on baking, you need a different recipe that relies more on whole eggs for structure. Stick to the chilling time for this one; it’s our ticket to a creamy mascarpone dessert!
Estimated Nutritional Snapshot for Tiramisu Cheesecake
Now, I know some of you are tracking macros or just curious about what you’re bringing to the dinner party, so here is a ballpark look at what’s in one slice of this magnificent no-bake tiramisu cheesecake. Keep in mind, this is just an estimate based on the ingredients list, especially how much cocoa powder you use for that final dusting!
Because we’ve skipped the oven and the heavy layer of traditional cheesecake batter, we get a lovely, rich but manageable slice. Even with the crust and the mascarpone, it’s a truly impressive dessert considering how luxurious it tastes. For the purposes of this decadent coffee dessert, the nutrition is broken down below, serving 10 wonderful people.
- Serving Size: 1 slice
- Calories: About 450 of pure happiness!
- Total Fat: Around 30g (Hello, beautiful mascarpone and butter!)
- Total Carbohydrates: Roughly 40g
- Protein: About 7g
It’s a treat, absolutely, but what a treat it is! Enjoy that slice—you deserve it after putting together such a stunning fusion dessert. This is one make ahead dessert where you don’t need to feel guilty about enjoying the process.
Share Your Decadent Coffee Dessert Experience
Alright, now that your luscious, coffee-infused tiramisu cheesecake is setting up, or maybe you’ve already dug into that beautiful first slice, I really, really want to see what you created! Sharing food is the best part of cooking, right?
I pour my heart into making sure these recipes work smoothly in a real kitchen, just like yours. So, if you tried this no bake tiramisu cheesecake, please, please head back up to the recipe card and give it a rating. Five stars is always my favorite, but honest feedback helps everyone who comes after you!
And if you took a picture—and I bet you did, because this dessert is gorgeous—snap a photo and share it on Instagram or Facebook! Tag me so I can see your gorgeous layers and that perfect dusting of cocoa. It’s so rewarding seeing your triumphs, whether you stuck strictly to the directions or made a fun little switch!
If you’re looking for even more recipes that bring a bit of cozy comfort and elegance to your table, you know where to find me! Check out my collection of delicious dessert recipes—I’m sure we can find your next favorite creation together!
PrintNo-Bake Tiramisu Cheesecake: A Creamy Italian Fusion Dessert

Create this decadent No Bake Tiramisu Cheesecake, a perfect fusion of creamy cheesecake and classic Italian tiramisu flavors. This recipe features espresso-soaked ladyfingers and a rich mascarpone filling, making it an elegant, make-ahead dessert for any special occasion.
- Prep Time: 30 min
- Cook Time: 0 min
- Total Time: 6 hr 30 min
- Yield: 10 servings 1x
- Category: Dessert
- Method: No-Bake
- Cuisine: Italian Fusion
- Diet: Vegetarian
Ingredients
- 1 1/2 cups chocolate wafer crumbs (or Oreo crumbs)
- 1/4 cup granulated sugar
- 6 tablespoons unsalted butter, melted
- 1 package (8 ounces) cream cheese, softened
- 1 cup powdered sugar
- 1 teaspoon vanilla extract
- 1 cup heavy whipping cream, cold
- 8 ounces mascarpone cheese, softened
- 1/2 cup strong brewed espresso, cooled
- 1 tablespoon coffee liqueur (optional, for flavor boost)
- 1 package (7 ounces) ladyfingers
- Unsweetened cocoa powder, for dusting
Instructions
- Prepare the crust: Mix the chocolate wafer crumbs, 1/4 cup granulated sugar, and melted butter until combined. Press the mixture firmly into the bottom of a 9-inch springform pan. Chill the crust while you prepare the filling.
- Make the cream cheese base: In a large bowl, beat the softened cream cheese, powdered sugar, and vanilla extract until smooth. Set aside.
- Whip the cream: In a separate, clean bowl, beat the cold heavy whipping cream until stiff peaks form. Gently fold the whipped cream into the cream cheese mixture.
- Incorporate mascarpone: Add the softened mascarpone cheese to the cream cheese mixture and fold until just combined and smooth. Do not overmix.
- Prepare the coffee soak: In a shallow dish, combine the cooled espresso and coffee liqueur, if using.
- Assemble the layers: Quickly dip each ladyfinger into the espresso mixture, soaking for just a second or two per side. Arrange a single layer of soaked ladyfingers over the chilled crust.
- Layer the filling: Spread half of the mascarpone cheesecake filling evenly over the ladyfingers. Add a second layer of espresso-soaked ladyfingers on top of the filling. Cover with the remaining filling, smoothing the top with a spatula.
- Chill: Cover the pan tightly with plastic wrap and refrigerate for at least 6 hours, or preferably overnight, to allow the cheesecake to set completely. This chilling time is essential for a silky texture.
- Serve: Before serving, carefully remove the sides of the springform pan. Dust the top generously with unsweetened cocoa powder using a fine-mesh sieve. Slice and serve this decadent coffee dessert.
Notes
- For the best texture, ensure your cream cheese and mascarpone are fully softened to room temperature before mixing.
- If you prefer a stronger coffee flavor without alcohol, increase the espresso in the soak to 3/4 cup.
- This No Bake Tiramisu Cheesecake is an excellent make-ahead dessert; it tastes even better the second day.
Nutrition
- Serving Size: 1 slice
- Calories: 450
- Sugar: 35g
- Sodium: 250mg
- Fat: 30g
- Saturated Fat: 18g
- Unsaturated Fat: 12g
- Trans Fat: 0g
- Carbohydrates: 40g
- Fiber: 1g
- Protein: 7g
- Cholesterol: 95mg