
Oh, the holidays! Everything smells like cinnamon and pine needles, but honestly, sometimes you just need something that takes five minutes and tastes intensely festive. That’s where my absolute favorite confection comes in: **peppermint bark**. Forget complicated baking; this treat is the hero when you need a gorgeous, crunchy, chocolatey centerpiece for a party platter or a gift basket, and you’re already running low on time.
This recipe is pure magic because it’s no-bake, requires just three core ingredients, and perfectly embodies what we stand for here at MDLATDMM Recipes. Maddie always says the best food comes from reliable, simple foundations, and this bark is proof! It’s reliable, it’s stunning, and it tastes like Christmas morning.
Read more about our philosophy to see why simple is always best.
- Why This Easy Peppermint Bark Recipe is a Holiday Must-Have
- Gathering Ingredients for Your Simple Peppermint Bark
- How To Make Peppermint Bark: Step-by-Step Candy Cane Bark Tutorial
- Tips for Perfect No Bake Chocolate Bark Success
- Variations on Classic Peppermint Bark
- Storage & Reheating Instructions for Homemade Peppermint Bark
- Frequently Asked Questions About Peppermint Bark
- Estimated Nutritional Information for Peppermint Bark
- Share Your Simple Peppermint Bark Creations
Why This Easy Peppermint Bark Recipe is a Holiday Must-Have
When the holiday rush hits, you need treats that deliver big flavor without needing the oven. This **peppermint bark** is my secret weapon because it checks every box for quick, impressive holiday confectionery. It truly is one of the best Christmas chocolate treats!
- It’s a genuine 3-ingredient holiday dream!
- Absolutely no baking required—it sets right up in the fridge.
- It looks way fancier than the few minutes it actually takes.
Quick Festive Desserts Ready in Minutes
Seriously, the active time on this is barely 15 minutes! You’re just melting and pouring. When you need a last-minute contribution to the office party or just crave something festive right now, this is your answer. You can have perfect **peppermint bark** sitting in the fridge setting up before you even finish making your second cup of cocoa.

Perfect for Homemade Candy Gifts
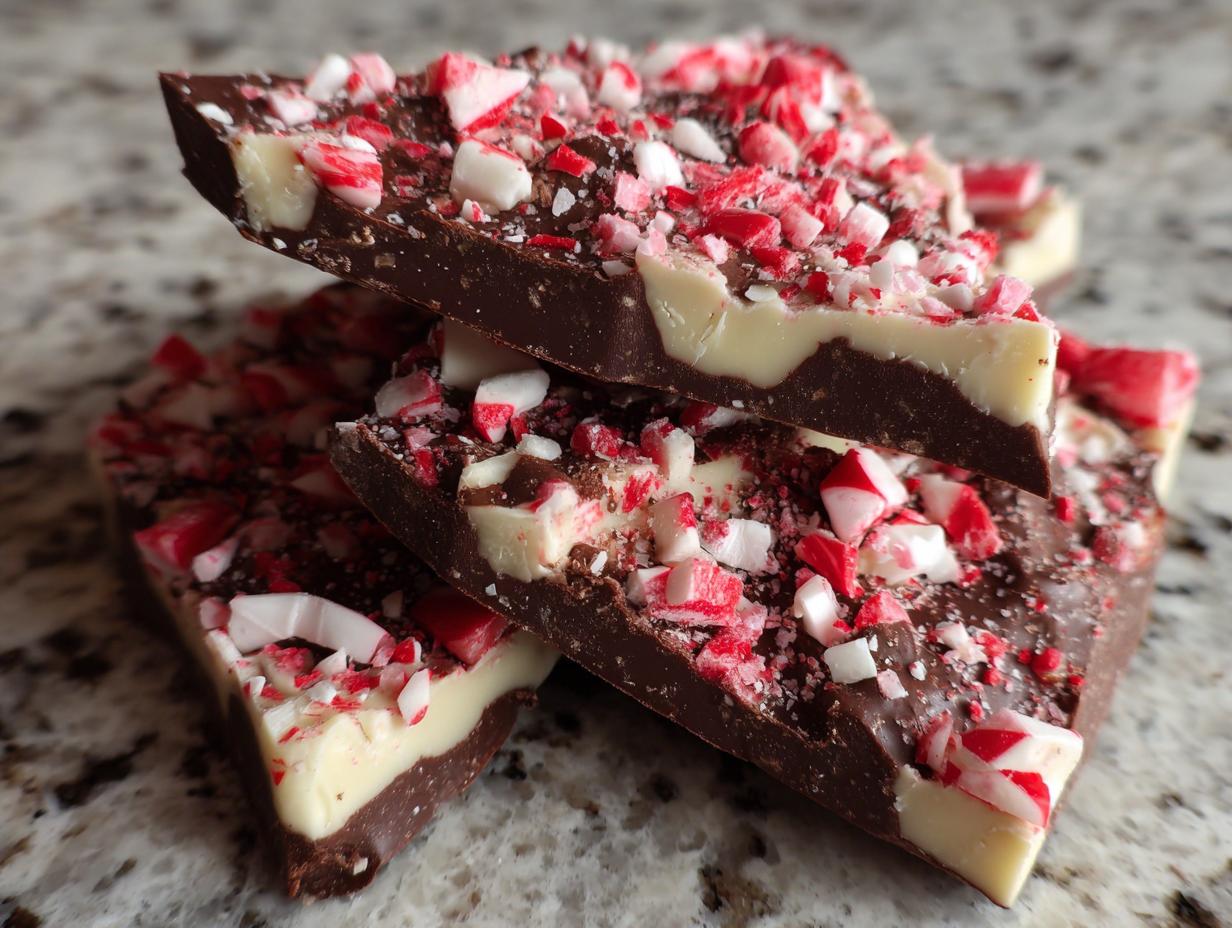
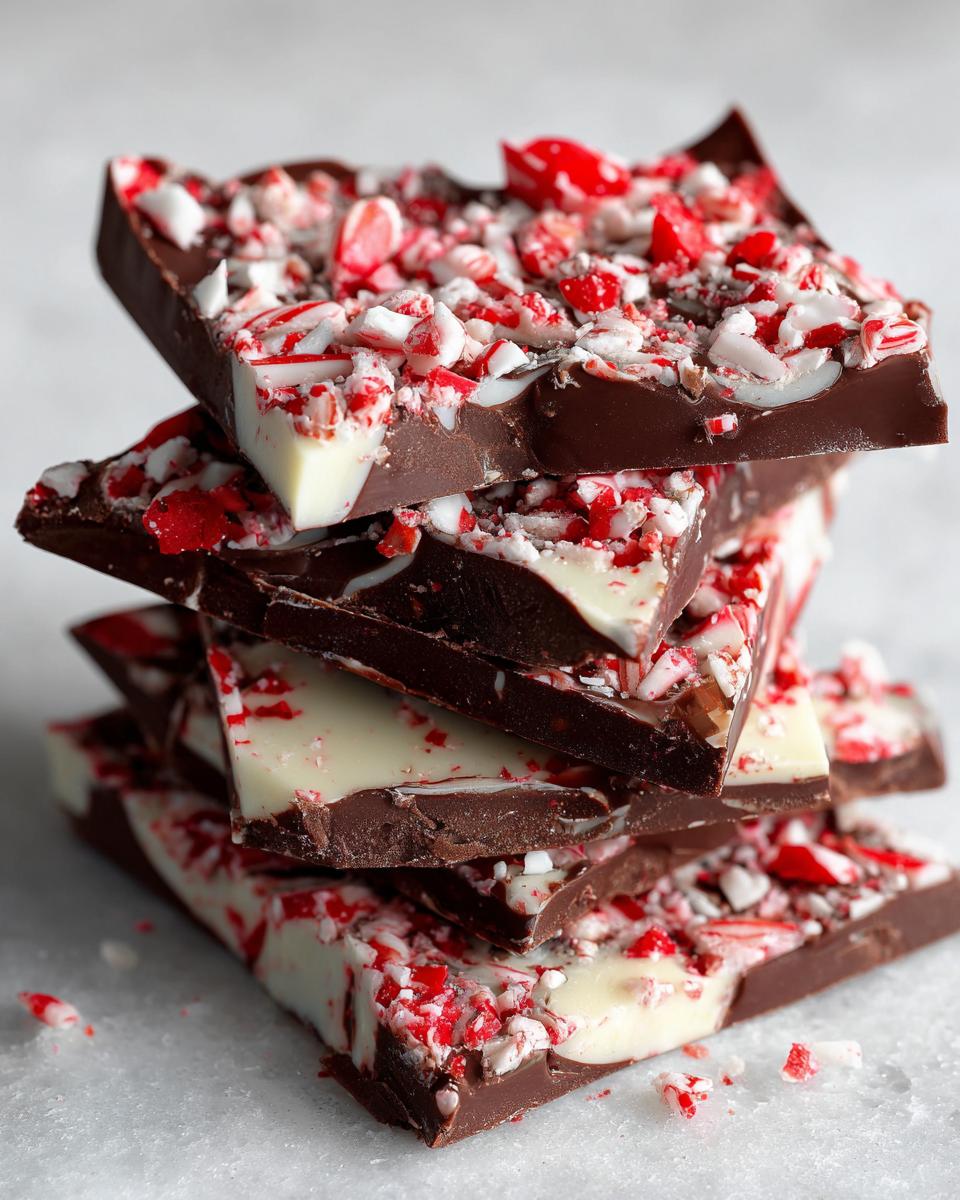
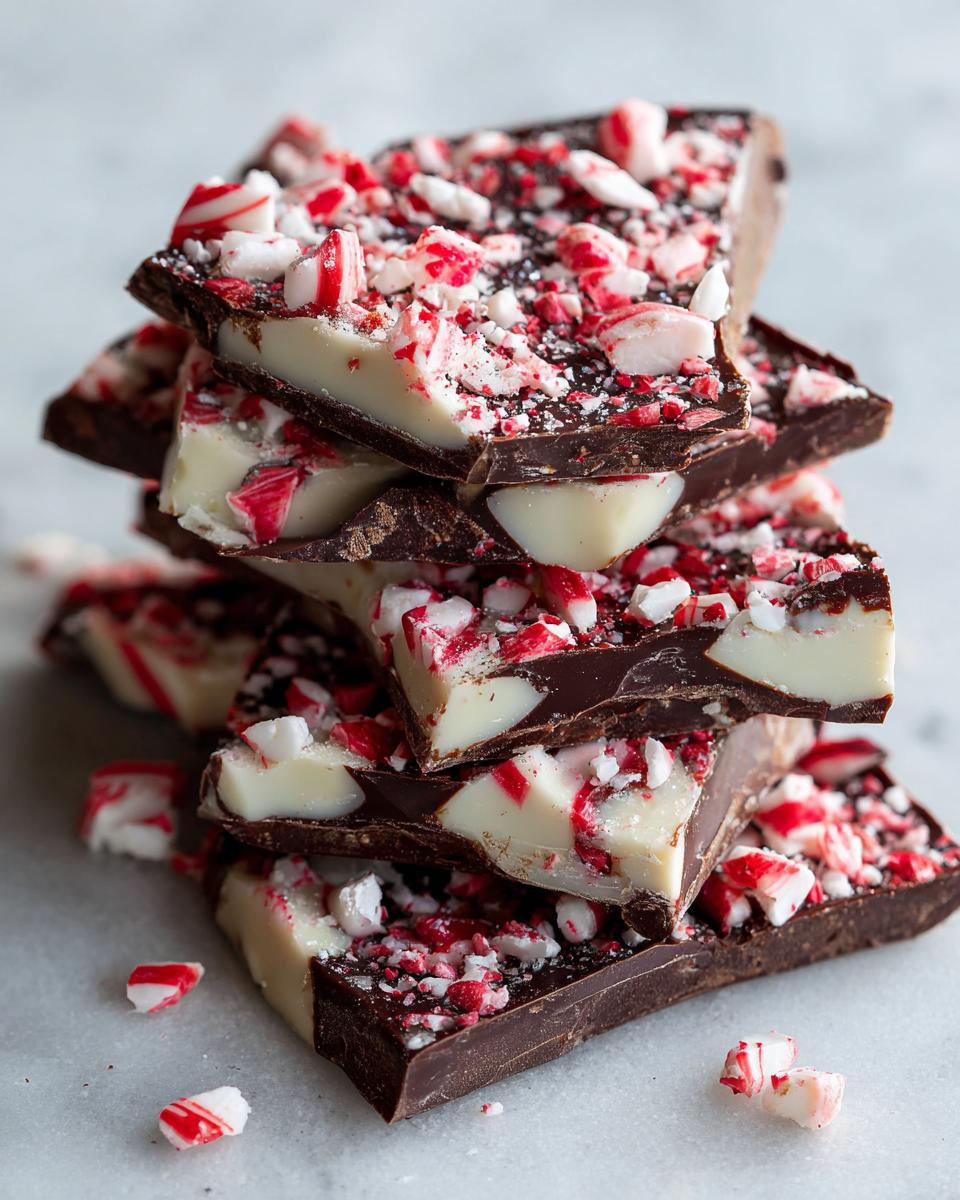
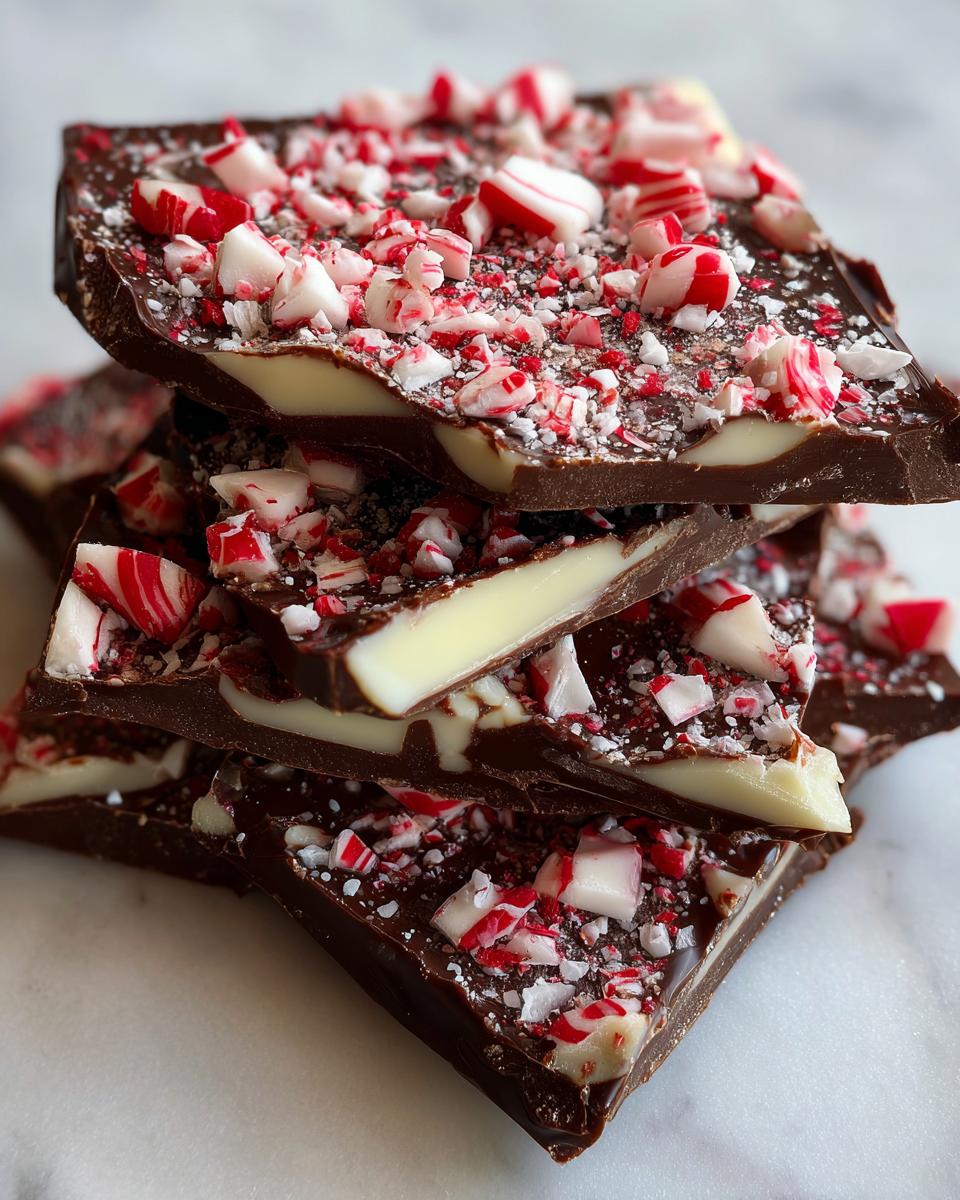
This is the absolute best for homemade candy gifts. Once it’s completely firm, you just break it into sharp, uneven shards—that’s why they call it bark! The contrast between the dark layer and the snowy white layer, topped with those bright red candy bits, looks incredible packed into cellophane bags. Everyone loves getting a piece of homemade goodness.
Gathering Ingredients for Your Simple Peppermint Bark
You know I love recipes where I can empty out the pantry, but for this **peppermint bark**, we need three absolute stars. Trust me, keeping this to just three core components is what makes it such a phenomenal quick festive dessert. When things are simple, the quality of what you use really matters, right?
Essential Components for Classic Peppermint Bark
We aren’t messing around here; these are the only three things you need to gather before you start melting! Every piece of this **peppermint bark** relies on these components.
- Dark Chocolate (about 12 ounces): Make sure it’s good quality—this is where almost all your deep flavor comes from!
- White Chocolate (about 12 ounces): This is what gives us that beautiful, creamy contrast layer.
- Crushed Candy Canes (1 cup minimum): You need about ten or twelve of those big, traditional red-and-white canes ready to crush up.
Ingredient Notes and Simple Peppermint Bark Substitutions
Because we are keeping this recipe so tight, don’t cheap out on the chocolate! If the chocolate tastes waxy, your bark will taste waxy. If you feel like you absolutely must substitute, you can try using peppermint extract in the white chocolate layer instead of crushing the canes directly on top, but honestly, the crunch is half the fun. The recipe notes mention that flaky sea salt is a great addition if you want to elevate it later, but for the basic, classic version, the three items above are all you need.
How To Make Peppermint Bark: Step-by-Step Candy Cane Bark Tutorial
Alright, let’s get down to business! This is the main event—the actual assembly of your amazing **peppermint bark**. Don’t let the term “tutorial” scare you; this is fun, fast work. The secret to getting that clean layer separation is all about controlling your chill times. This entire process is what separates a great batch of candy cane bark from one that turns into a messy pile.
Preparing the Base Layer of Dark Chocolate Peppermint Bark
First thing: line that baking sheet with parchment paper. No exceptions! Now grab your dark chocolate. I melt mine very carefully in the microwave. Use short bursts—30 seconds at a time—stirring well in between each burst. You don’t want to scorch it; that makes chocolate seize up, and we can’t have that! Pour the smooth dark chocolate onto your sheet and spread it out evenly. It only needs to be about a quarter-inch thick. Pop that pan into the fridge while you work on the next layer—about 10 minutes should do the trick. It needs to be set but still slightly tacky for the white chocolate to stick properly.
Layering White Chocolate Peppermint Bark and Topping
Next up, melt your white chocolate just like you did the dark, using those gentle, short zaps of microwave power. Pour that creamy goodness right over your set dark layer and spread it fast and smooth. The very second it’s covered, you have to work quickly! Immediately scatter those crushed candy canes all over the top. Give them a very light pat down so they lock into the warm white chocolate. That’s the final step before sending the whole pan back to chill until it’s completely firm. If you wait too long, the peppermint just rolls off! Don’t forget to check out my apple cinnamon muffins if you need a warm, baked contrast to this cold treat!
Tips for Perfect No Bake Chocolate Bark Success
Okay, so while this is an easy **peppermint bark** recipe, there are a couple of tiny things that can go wrong if you rush it. We are aiming for those beautiful, sturdy shards, so listen to Auntie and avoid these few pitfalls! The biggest danger is overheating the chips when melting. If you scorch your chocolate, it gets grainy, and that ruins that smooth mouthfeel we’re chasing for the ‘Best Peppermint Bark’.
Remember that first chill? It’s crucial! You need the dark layer set enough so the white layer doesn’t mix right into it, but not so cold that it cracks when you pour the warm white chocolate on top. That 10-minute timeframe is usually perfect, but watch it! Also, if your candy canes seem to be floating or rolling off the top layer, you waited too long to sprinkle them on. They need that melted white chocolate surface to adhere to. For more tips on handling chocolate, check out my secrets for my classic chocolate chip cookies—the low-and-slow melting method is the same!
Variations on Classic Peppermint Bark
While this 3-ingredient recipe is perfect as-is for quick festive desserts, I know you folks love to play around! Don’t worry; we can definitely give this classic **peppermint bark** some fun twists without losing that crucial ‘easy’ factor. We want delicious, but we also want it fast for all those holiday parties.
Making Salted Peppermint Bark Ideas
If you want to try a little something extra that really punches up the flavor profile, you absolutely need to try making **salted peppermint bark**. It’s my favorite little trick! After you pour and smooth out that white chocolate layer—but *before* you sprinkle the candy canes—grab some flaky sea salt. Just a small sprinkle, about half a teaspoon for this amount of chocolate, right over the top. That hit of salt against the sweet white chocolate and cool peppermint? Divine! It balances out the sweetness perfectly.
If you’re looking for another idea, you could try using milk chocolate for the base instead of dark, though you might want to use slightly less of it because milk chocolate melts a bit quicker. If you love creamy dips, you should absolutely check out my recipe for easy pumpkin dip for another no-bake winner!
Storage & Reheating Instructions for Homemade Peppermint Bark
Since this is a no-bake candy, storing your **peppermint bark** is super easy, which is another reason it’s perfect for gifting! Once it’s completely firm—and I mean *firm*—you need to break it up and tuck it into an airtight container. I always keep mine in the fridge because the chocolate stays snappy and the peppermint stays crisp. It’ll stay wonderfully fresh for about two weeks this way. Honestly, it rarely lasts that long in my house, though!
Frequently Asked Questions About Peppermint Bark
I always get so many questions when people see this recipe because it seems too easy to be true! Don’t let that stop you. Here are a few things I hear a lot when folks start making their own **peppermint bark**.
How long does homemade peppermint bark last?
Because we are keeping this in the fridge and it has no perishable dairy other than the chocolate itself, this candy is quite stable. I tell everyone to keep it stored in an airtight container in the refrigerator, and it stays fantastic for up to two weeks! If you store it in a cooler spot, sometimes it lasts longer, but I wouldn’t push past three weeks, just to be safe and keep that peppermint flavor bright.
Can I use only white chocolate for this peppermint bark recipe?
Oh, I know that creamy **White Chocolate Peppermint Bark** is tempting! But listen, I strongly advise against it if you want a sturdy bark. The dark chocolate melts down first and creates a firm structural base. If you only use white chocolate, it gets too soft and soupy once you pour the second layer, and you won’t get those nice, clean breaks you want. Stick with both layers for the best result!
Also, if you are looking for quick ideas for the morning after, check out my list of easy breakfast ideas—you need fuel after all that holiday snacking!
Estimated Nutritional Information for Peppermint Bark
Now, I know some of you are tracking ingredients, and that’s totally fine! But I have to give you my usual friendly disclaimer before you look at these numbers. Because this **peppermint bark** relies so heavily on whatever brand of dark and white chocolate you grab off the shelf, these numbers—Calories, Fat, Sugar—are just a best guess based on the standard recipe ratios.
Think of this as ballpark information, not a strict diet plan requirement. We’re cooking from the heart in a real kitchen, not a lab! If you use high-quality, higher-cacao dark chocolate, your sugar might be a touch lower, for instance. It’s all about ingredient choice.
Here’s a general breakdown for one serving piece:
- Serving Size: 1 piece
- Calories: 180
- Sugar: 18g
- Sodium: 25mg
- Total Fat: 12g
- Protein: 2g
So, grab your baking chips, remember that these figures are estimated, and let’s enjoy the treats guilt-free! After all, balance is what home cooking is all about.
Share Your Simple Peppermint Bark Creations
See? That’s all there is to it! You’ve made some stunning, simple **peppermint bark** that took hardly any time at all. I truly hope this recipe brings a little bit of that easy, no-fuss holiday magic into your kitchen. Now, the best part of my job is hearing from you!
Please, please hop down to the comments below and let me know what you thought of these three ingredients. Did you try the salted variation, or did you stick to the classic? Rate the recipe so others know what a solid, quick festive dessert this is! If you took a picture of your beautiful broken shards, you can always reach out via my contact page to share it. We love seeing our community bringing these simple, heartfelt recipes to life!
PrintEasy 3-Ingredient Peppermint Bark

Make this simple, no-bake peppermint bark using only three ingredients. This recipe layers dark and white chocolate with crushed candy canes for a quick holiday treat perfect for gifting.
- Prep Time: 10 min
- Cook Time: 5 min
- Total Time: 45 min
- Yield: About 24 servings 1x
- Category: Dessert
- Method: No Bake
- Cuisine: American
- Diet: Vegetarian
Ingredients
- 12 ounces dark chocolate, chopped or chips
- 12 ounces white chocolate, chopped or chips
- 1 cup crushed candy canes (about 10–12 large canes)
Instructions
- Line a baking sheet with parchment paper.
- Melt the dark chocolate in a microwave-safe bowl in 30-second intervals, stirring between each, until smooth. Do not overheat.
- Pour the melted dark chocolate onto the prepared baking sheet. Spread it into an even layer, about 1/4 inch thick.
- Place the sheet in the refrigerator for 10 minutes, or until the dark chocolate is set but not completely hard.
- While the dark chocolate sets, melt the white chocolate using the same method as the dark chocolate.
- Pour the melted white chocolate over the set dark chocolate layer. Spread it evenly.
- Immediately sprinkle the crushed candy canes evenly over the white chocolate layer. Press them down lightly so they stick.
- Return the bark to the refrigerator for at least 30 minutes, or until completely firm.
- Once firm, break the peppermint bark into irregular pieces. Store in an airtight container.
Notes
- For a salted peppermint bark variation, sprinkle 1/2 teaspoon of flaky sea salt over the white chocolate layer before chilling.
- If you want a thinner layer, use a larger baking sheet or divide the chocolate between two sheets.
- Use good quality chocolate for the best flavor in this simple peppermint bark recipe.
Nutrition
- Serving Size: 1 piece
- Calories: 180
- Sugar: 18
- Sodium: 25
- Fat: 12
- Saturated Fat: 7
- Unsaturated Fat: 5
- Trans Fat: 0
- Carbohydrates: 19
- Fiber: 1
- Protein: 2
- Cholesterol: 10