

You know that moment when you’re sitting down to a big bowl of pasta, and all you can think about is that warm, pillowy side dish they serve at your favorite Italian chain? I get it. Those restaurant-style breadsticks are seriously addictive! Well, I’ve spent entirely too much time fussing in my kitchen, and I’ve cracked the code. These homemade breadsticks are unbelievably soft, fluffy, and drenched in that perfect garlic butter. Forget the effort—this is one of those simple, reliable recipes I always talk about. We aren’t compromising on flavor or texture here, but we are absolutely making it easier for you to get that amazing appetizer quality breadsticks right at home!
- Why You Will Love These Soft and Fluffy Breadsticks
- Gathering Ingredients for Homemade Breadsticks Recipe
- Dough Recipe for Breadsticks: Mixing and Rising
- Shaping and Baking Your Homemade Breadsticks
- Creating the Garlic Butter Topping for Breadsticks
- Optional Cheesy Breadsticks Variation
- Serving Suggestions for Your Appetizer Breadsticks
- Storing and Reheating Your Delicious Breadsticks
- Frequently Asked Questions About Making Breadsticks
- Share Your Homemade Breadsticks Creations
Why You Will Love These Soft and Fluffy Breadsticks
Making bread from scratch usually sounds like an all-day commitment, but trust me, that’s not the case here. When I tested this recipe, I was obsessed with how quickly we could get these soft babies from the mixing bowl to the oven. That salty, garlicky goodness waits for no one!
- They are genuinely soft and fluffy—not tough or dry like some homemade attempts.
- The garlic butter topping is incredibly rich, truly hitting that savory note everyone craves.
- We skip complicated techniques; this is a fantastic Easy Breadsticks recipe for weekend baking or weeknight sides.
- They work beautifully warm right out of the oven, making them the perfect appetizer.
Quick Breadsticks Recipe Timeline
I know many of you are scrolling Pinterest or Googling late at night thinking, “I need breadsticks NOW.” I hear you! While we do need to account for rising time, we are looking at a total timeline that fits easily into an afternoon. If you start mixing around 4 PM, you’ll be pulling these beauties out around 6 PM. Seriously, most versions of this Olive Garden copycat recipe clock in under two hours total, which is lightning speed for yeast breadsticks!
The Ultimate Olive Garden Breadsticks Copycat Experience
Let’s just get this out in the open: this is designed to copycat those famous, slightly chewy, perfectly tender restaurant breadsticks. The secret sauce is in the dough layering and that final butter bath. We aren’t making hard, crusty Italian breadsticks here; we are aiming for that pillowy texture that practically melts in your mouth. When you brush that garlic butter on right out of the oven, the smell alone tells you you’ve nailed the Olive Garden Breadsticks Copycat experience. You’ll be fighting your family over the last one!

Gathering Ingredients for Homemade Breadsticks Recipe
Okay, now that you are totally sold on how fluffy these are going to be, we need to talk supplies! While this is an Easy Breadsticks recipe, remember that baking—especially with yeast—demands a little bit of precision. Don’t just eyeball that water or the flour; getting the balance right in the dough is key to ensuring we get that perfect tender crumb, not a dense brick!
Don’t panic if you don’t have everything on hand. Most of this is standard pantry stuff, but a few details really crank up the flavor factor. Take a look at what you need before you start mixing. This Homemade Breadsticks Recipe relies on a few core items working together perfectly.
Ingredient Notes and Substitutions for Perfect Breadsticks
Let’s go over the non-negotiables first. The biggest thing when dealing with yeast is the water temperature. We need it warm enough to wake up our little yeast buddies, but not so hot that we kill them! Aim for that sweet spot between 105 to 115°F. If you don’t have a thermometer, test it with your wrist—it should feel comfortably warm, not scalding.
You’ll also notice we use vegetable oil in the dough itself, not just butter in the topping. That oil is vital; it coats the flour particles just enough to keep these breadsticks soft and light, even after they cool down a bit. It really helps maintain that pillowy texture! For the herb topping, the recipe calls for dried Italian seasoning. If you happen to have fresh herbs on hand, feel free to chop up a tiny bit of fresh oregano and basil, mince it very fine, and use that instead. Fresh herbs always pack a bigger punch, which is one of those little tricks that makes a recipe feel more expert.
Dough Recipe for Breadsticks: Mixing and Rising
Alright, this is where the real magic of Yeast Breadsticks begins! We’re turning simple water and yeast into a beautiful, pliable dough that promises those light, airy interiors we’re aiming for. Getting the yeast happy is the #1 priority here. If the yeast doesn’t foam up, stop right there because your breadsticks won’t rise, and you’ll end up with flat, dense disks. I learned that the hard way during a chaotic Christmas baking session years ago—wasted an hour just because the water was too cold!
Once the yeast is happy, we move into mixing and then the most important part for texture: kneading. This step is what transforms a shaggy mess into the perfect foundation for Soft and Fluffy Breadsticks that pull apart beautifully.
Activating the Yeast: The Key to Fluffy Breadsticks
Remember that warm water? Grab your large bowl—seriously, use a big one, because it’s going to grow! You just combine the warm water (get that temperature right, between 105 and 115°F!), the active dry yeast, and the sugar. The sugar is like a little treat for the yeast, kicking it into high gear. Now, you just walk away for about five to ten minutes. Don’t peek constantly! When you come back, the surface needs to look foamy, almost like the head on a perfect root beer float. If it’s foamy and smells a little yeasty, you are golden. If it’s just sitting there looking like plain water, toss it out and start over with warmer water. That foam is the proof that you’re on your way to the Best Homemade Breadsticks!
If you ever want to dive deep into alternative dough starters, I have a whole guide on nurturing a sourdough starter, but for these quick breadsticks, just focus on waking up the instant yeast!
Kneading Techniques for Smooth Breadsticks Dough
Once the flour and oil go in, you’ll stir until it comes together in a messy ball. That’s normal! Turn that shaggy mess out onto a lightly floured countertop. Now for the work—kneading! You want to push the dough away from you with the heel of your hand, fold it over, give it a quarter turn, and repeat. Keep going for a solid 5 to 7 minutes. Don’t rush this part, even if you’re tempted to cheat because your arms are getting tired. You are building the gluten structure here. When you’re done, the dough should feel completely smooth, kind of satiny, and when you poke it, it should slowly spring back. That smooth, elastic feel is what guarantees light, airy breadsticks and not something that needs to be used as a doorstop later!
After kneading, pop it in that oiled bowl, cover it up tight, and let it rest. It needs about an hour and a half in a warm spot to double. Patience pays off here, even though I know it’s hard to wait when you smell that potential deliciousness drifting into the living room!
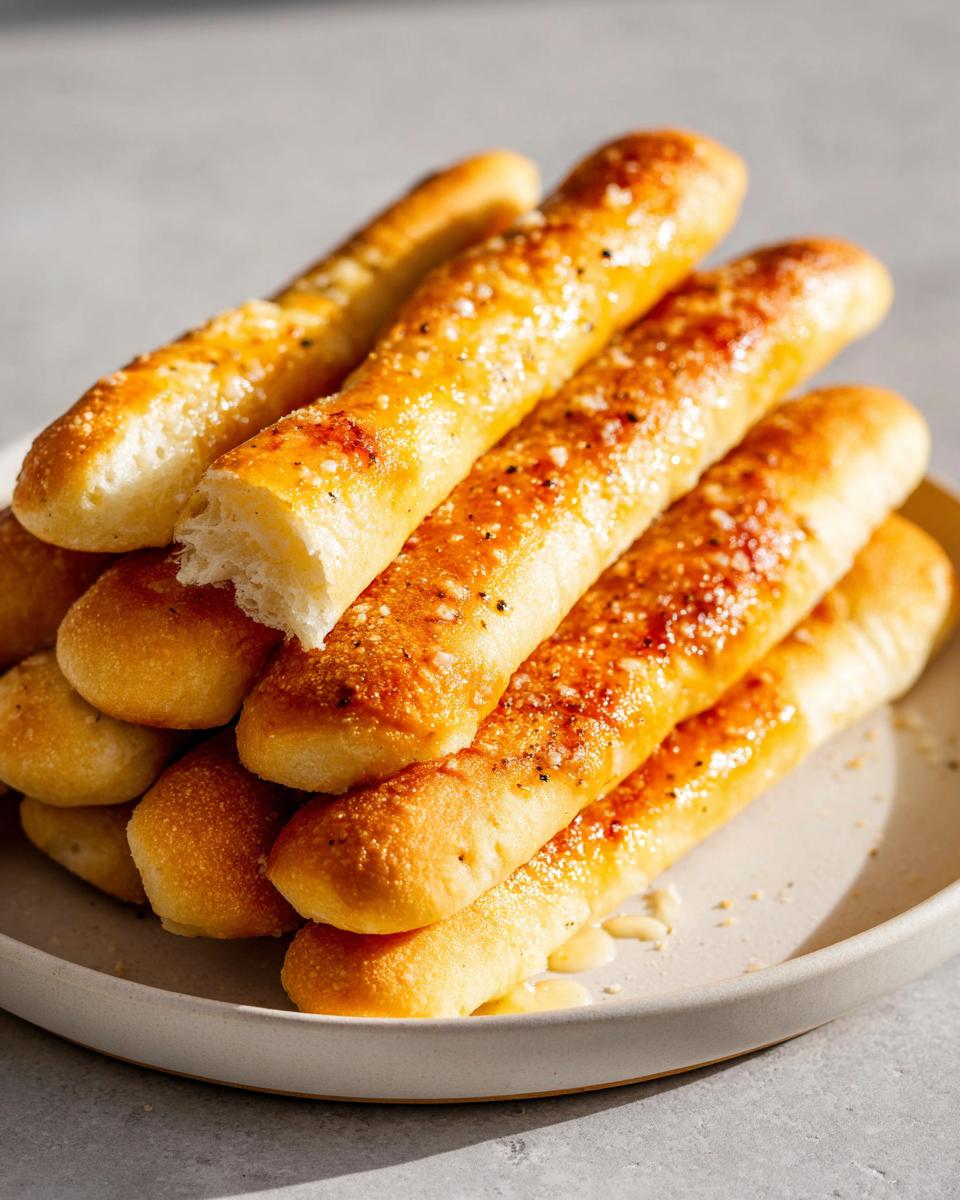
Shaping and Baking Your Homemade Breadsticks
Now that the dough has puffed up beautifully—seriously, give it a gentle punch down to release all that built-up air—it’s time to turn it into actual breadsticks! This is where the fun really starts, and quickly, because we want to get them in the oven ASAP. Make sure your oven is preheated to 400°F (200°C) before you start pulling them apart. This ensures they get that nice puff when they hit the heat instead of sitting around cooling down.
I like to use a large baking sheet, and trust me on this: line it with parchment paper. This keeps cleanup ridiculously easy, which is always a win in my book. Once the sheet is ready, gently divide your dough into twelve equal pieces. I usually just cut it into three rows of four, then eyeball the pieces. You don’t need a scale for this part!
Take each piece and gently roll it out between your palms or on a lightly floured surface until you have a long rope, about 10 to 12 inches long. They should look nicely thin. Lay them on your prepared sheet, but this is important: leave a little space between them! They will swell up a bit as they bake, so we don’t want them fusing into one giant bread slab.
They go into the hot oven for about 10 to 12 minutes. Keep an eye on them! We aren’t looking for deep brown; just a nice, light golden color. If you want to see a great example of the timing and technique, check out this 1-Hour Garlic Breadsticks guide, which really nails the quick turnaround.
Baking Tips for Perfect Golden Brown Breadsticks
If you want these to achieve peak Soft and Fluffy Breadsticks heaven, the absolute best trick comes right after they leave the oven. Seriously, don’t let them just sit on the counter cooling uncovered! As soon as you pull that hot sheet out, grab a clean, dry kitchen towel—the fluffier the better—lay it right over the top of the hot breadsticks, and just let them sit there while you mix your finishing butter. Covering them traps that residual heat and moisture, essentially steaming them slightly as they cool. This stops them from firming up too quickly. It’s a tiny step that makes the biggest difference in achieving that melt-in-your-mouth texture! It’s very similar to how I handle my garlic naan bread to keep it tender.
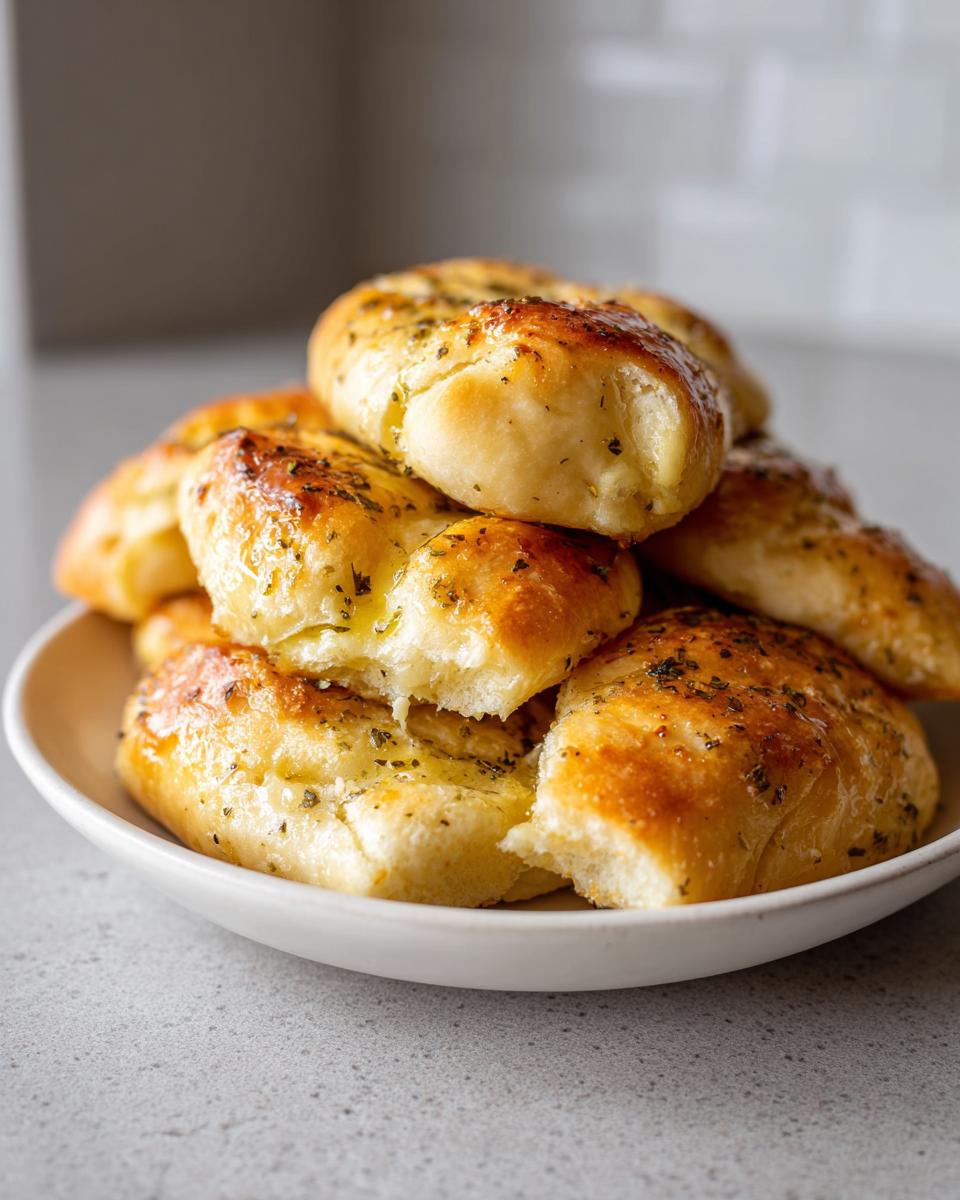
Creating the Garlic Butter Topping for Breadsticks
This is it—the part that makes these breadsticks taste like they came straight from a restaurant basket! While the breadsticks are baking, you need to get your finishing sauce ready. The star here is melted butter, obviously, but the seasoning blend is what makes ours taste like the ultimate Garlic Butter Breadsticks.
In a small bowl, melt about half a cup of good quality unsalted butter. You can do this on the stove on super low heat, or just nuke it in the microwave for 30-second intervals until it’s totally liquid. Once melted, whisk in the garlic powder and the dried Italian seasoning. Don’t skip the Italian seasoning—it adds that subtle herbaceous depth that cuts through the richness of the butter. Finally, add just a little bit of extra salt. Remember, we want these flavorful, but not overly salty.
Trust me when I say the timing here is everything. You want the butter mixture ready to go the *second* those golden breadsticks slide out of the oven. You brush it on when they are piping hot so the butter soaks in beautifully, instead of just sliding off the top. If you want to see how I use garlic and Parmesan in savory sides, check out my recipe for Garlic Parmesan Mashed Potatoes—it uses a similar infusion technique!
If you’re looking for more inspiration on quick, super flavorful garlic sides, this easy garlic breadsticks recipe guide is fantastic inspiration too. But for now, get that butter ready!
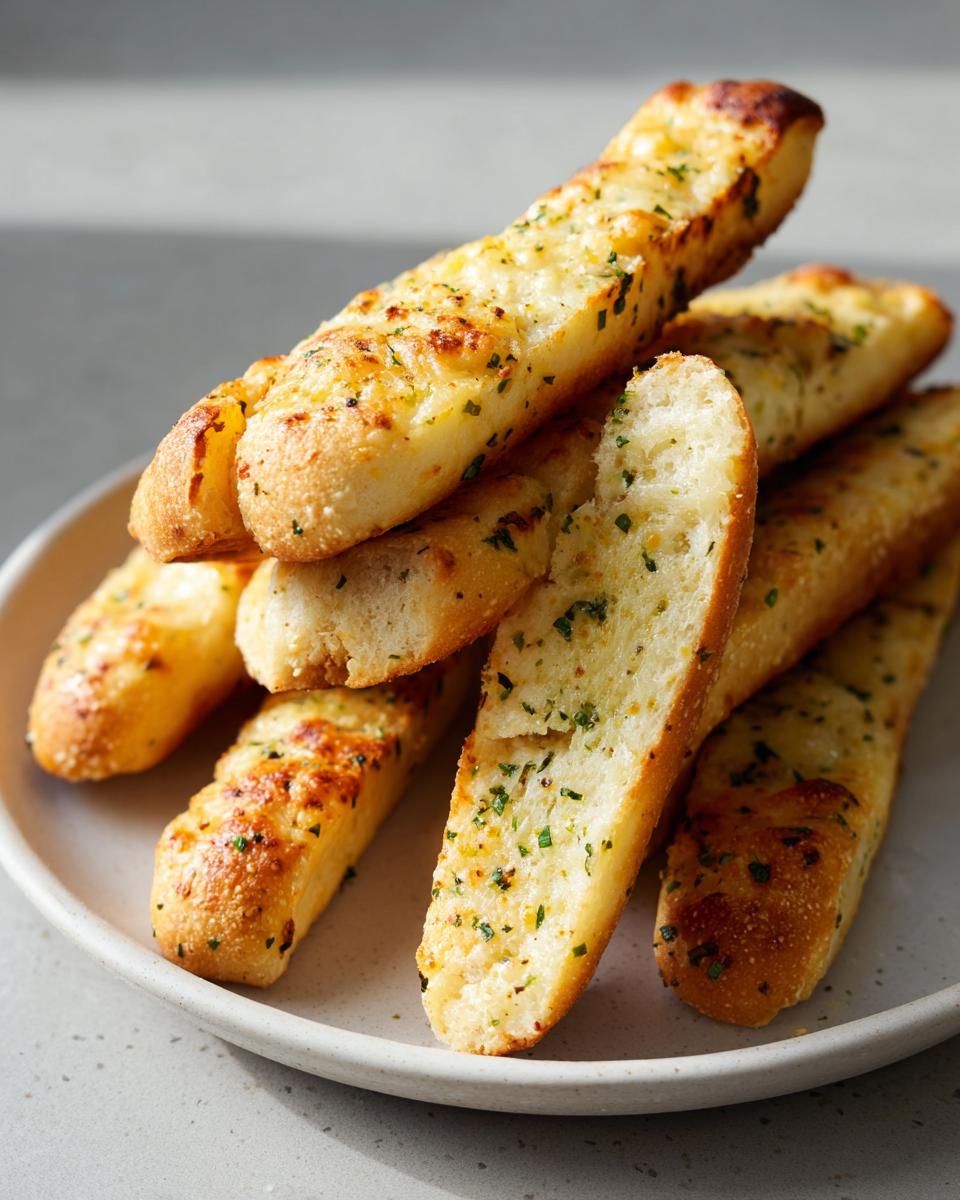
Optional Cheesy Breadsticks Variation
So, you made it this far, and your kitchen smells like an Italian bakery heaven, right? Fantastic! But maybe you’re looking at those delicious, buttery breadsticks and thinking, “These are great, but they need a little *oomph*.” If that’s you, we are absolutely turning these into Cheesy Breadsticks!
This variation is so easy I almost didn’t put it behind a complicated heading, but since it’s optional, I figured it deserved its own small section. The cheese we use here is grated Parmesan. It’s sharp, salty, and melts beautifully without getting stringy or greasy when we add it right at the end.
Listen closely to the timing here, because this is critical for a perfect cheesy topping! You do *not* want to add the cheese before baking. If you do, it will just burn up or turn hard while the dough crawls toward being done. Instead, treat the Parmesan just like you treated that incredible garlic butter topping. It needs to go on immediately after the breadsticks come out of the oven.
As soon as that hot sheet comes out, pull your favorite grater or reach for your pre-grated Parmesan. Sprinkle that salty cheese evenly across the tops of all those hot, glistening breadsticks. The residual heat from the butter and the bread itself is enough to gently melt the cheese, making it cling perfectly to the surface. It gives you that slight crusty, savory bite that compliments the soft interior so well. If you love that Parmesan kick in other recipes, you might also adore the flavor profile I used in my Baked Garlic Parmesan Shrimp!
Seriously, if you’re planning on serving these for a party, just double the batch and make half cheesy. You won’t have any leftovers, guaranteed! These Parmesan Breadsticks become irresistible appetizers!
Serving Suggestions for Your Appetizer Breadsticks
Now we have a huge pile of warm, garlicky, fluffy breadsticks—what do we do with them all? Well, honestly, I think my family could eat the entire batch standing over the sink without any accompaniment, but if you’re planning them as part of a proper meal or serving them up to guests, they shine when paired with flavorful main dishes.
Since these are basically a copycat version of breadsticks served alongside Italian favorites, that’s where they really shine as Dinner Side Breadsticks. They are perfect for soaking up extra sauce. Think about serving them alongside a hearty bowl of my Italian Sausage Gnocchi Soup—you need something sturdy to dunk!
They are also phenomenal with pasta, naturally. If you are making something rich and tomato-based, these are your dipping tool. Seriously, pull up my recipe for Creamy Garlic Tomato Pasta and have these breadsticks ready. Nobody gets a drop left in the bowl!
But don’t just pigeonhole them into dinner! Since they are such a fantastic, easy appetizer, I often whip up a batch just for snacking during a big football game or while we are catching up on a movie. If you’re serving them alone as a starter, maybe serve them up with a small bowl of good quality marinara heated up, or even some warm, herby olive oil for dipping. For some alternative topping ideas while dipping, you can peek at what they do with buttery toppings over here. Enjoy using these wonderful Appetizer Breadsticks!
Storing and Reheating Your Delicious Breadsticks
It’s always a little depressing when you realize you can’t eat all twelve breadsticks right away—but don’t worry! These aren’t the kind of breadsticks that vanish the second they hit room temperature, but we do need to store them correctly so they don’t turn into hard little rocks overnight. Nobody wants a fossilized breadstick on day two, right?
The key to keeping these Homemade Breadsticks tasting fresh is trapping in that wonderful softness we worked so hard to achieve during kneading and baking. If you have leftovers, wrap them up right away. You need an airtight container or a very tightly sealed zip-top bag. Do not use aluminum foil; it tends to let too much air exchange happen, which dries them out faster. If you store them correctly at room temperature—and I mean *room temperature*, not the fridge!—they should stay wonderfully soft for a good two to three days.
Now, the big question: how do we bring them back to life when that craving hits again? You have two main options, and one is definitely better than the other.
Best Way: Reheating in the Oven
If you have ten minutes, the oven is always the winner here. The oven gently warms the butter coating back up without evaporating all the moisture inside the dough. Preheat your oven to a low 300°F (150°C). Place the breadsticks directly on a baking sheet, no need to wrap them in foil or anything. Just let them bake for about 5 to 7 minutes. You’ll smell that little hint of garlic again, and they will be perfectly soft and warm inside. This method basically resets them to almost freshly baked status!
Quick Fix: Using the Microwave
Okay, sometimes you’re starving and you need one breadstick *right now* and you can’t wait 7 minutes for the oven. The microwave is your go-to, but you have to be careful! Microwaves heat water molecules, and unless you manage the steam, they tend to make bread hard once they cool down again. If you are microwaving just one or two, wrap them loosely in a paper towel first. Microwave them for about 15 to 20 seconds on 50% power. Test them! If they seem a little stiff, give them another 5-second burst. This is fast, but remember: eat them right away. They won’t stay soft for long after microwaving.
I never recommend freezing these, even though they are yeast breadsticks. The texture changes too much when thawed. Stick to the day-of or day-two rule, and they will be delicious!
Frequently Asked Questions About Making Breadsticks
I know when you get excited about baking, a million little questions pop up that you forget to ask when you’re first reading the main recipe! It happens to me all the time. Since we want you to have maximum success with these Easy Breadsticks, I figured I’d pull together a few of the questions I get most often about the dough and timing. You’ve got the main recipe down, now let’s handle the tricky bits!
Can I make these breadsticks ahead of time?
Yes, absolutely, but you need to decide what part you want to prep early. If you want them truly fresh, you can make the dough, knead it all up, and instead of letting it prove (rise) for that hour and a half, you can put the bowl covered tightly in the fridge overnight. The cold slows the yeast way down, and it will rise slowly. That way, the next day, you just pull it out, let it warm up on the counter for about 30 minutes, then shape and bake! I definitely recommend baking them the same day you plan to eat them for the absolute best quality, but the dough prep can certainly be done ahead of time! This makes them such great Quick Breadsticks Recipe material for entertaining.
What if I don’t have active dry yeast? Can I use instant yeast for these breadsticks?
This is a fantastic question for any Yeast Breadsticks recipe! If you only have instant yeast, you’re actually in luck because you can skip step one entirely—the foaming step! Instant yeast is ready to go right into the flour mixture. Just whisk your instant yeast (use the same quantity—2 1/4 teaspoons!) right along with the flour and salt, and then add your wet ingredients. No waiting for foam required! It cuts about 10 minutes off the active prep time, which is always a bonus when whipping up a side dish for dinner.
How can I make these breadsticks spicier?
If you like a little kick with your comfort food, that is an easy fix! We don’t want to mess with the dough structure by adding heat there, so we’re going to jazz up that incredible garlic butter topping. Right when you mix your melted butter, garlic powder, and Italian seasoning, throw in about a half teaspoon of red pepper flakes. You can use a whole teaspoon if you’re brave! Toss those piping hot breadsticks right in that spicy buttery goodness, and you’ll have fantastic, slightly fiery Garlic Butter Breadsticks that pair beautifully with any of my quick weeknight dinners.
Share Your Homemade Breadsticks Creations
That’s it! You have created perfection! You made homemade breadsticks that smell out-of-this-world and I bet they taste even better than the ones from the restaurant. I cannot wait to hear how they turned out for you. Seriously, don’t just make these and run away!
When you find a recipe that actually works—and I promise this one is a keeper—you have to tell someone about it. Did they turn out fluffy? Did your kids devour the cheesy ones first? Did you manage to save any leftovers for the next day? I want all the details!
If you made a batch, please take a quick picture and share it on social media, tagging me so I can see your beautiful creation. It honestly makes my entire week when I see your kitchens bringing these recipes to life. You can always send me a message through the contact page too, if you have any specific questions or praise you want to send my way!
And if you really loved this recipe and found it reliable and easy, please hop back up to the top and leave a quick star rating. Those ratings help other home cooks like you feel confident pulling up this recipe. Happy dipping, my friends!
PrintSoft and Fluffy Copycat Garlic Breadsticks (Better Than Olive Garden)
Make soft, fluffy, and buttery garlic breadsticks at home that taste just like the popular restaurant version. This easy recipe uses simple steps to create a perfect side dish or appetizer.
- Prep Time: 20 min
- Cook Time: 12 min
- Total Time: 92 min
- Yield: 12 breadsticks 1x
- Category: Appetizer
- Method: Baking
- Cuisine: American/Italian
- Diet: Vegetarian
Ingredients
- 1 1/2 cups warm water (105-115°F)
- 2 1/4 teaspoons active dry yeast
- 2 tablespoons granulated sugar
- 4 cups all-purpose flour, plus more for dusting
- 1 teaspoon salt
- 1/4 cup vegetable oil, plus more for greasing
- 1/2 cup unsalted butter, melted
- 2 teaspoons garlic powder
- 1 teaspoon dried Italian seasoning
- 1/2 teaspoon salt (for topping)
- 1/2 cup grated Parmesan cheese (optional, for cheesy variation)
Instructions
- Combine the warm water, yeast, and sugar in a large bowl. Let this mixture sit for 5 to 10 minutes until it becomes foamy. This shows the yeast is active.
- Add the flour, 1 teaspoon of salt, and 1/4 cup of vegetable oil to the yeast mixture. Mix with a spoon until a shaggy dough forms, then turn it out onto a lightly floured surface.
- Knead the dough for 5 to 7 minutes until it becomes smooth and elastic.
- Lightly grease a large bowl with oil. Place the dough in the bowl, turning it once to coat. Cover the bowl with plastic wrap or a clean towel and let it rise in a warm place for 1 to 1.5 hours, or until doubled in size.
- Preheat your oven to 400°F (200°C). Line a large baking sheet with parchment paper.
- Punch down the risen dough gently. Divide the dough into 12 equal pieces. Roll each piece into a long, thin breadstick shape, about 10 to 12 inches long. Place the breadsticks on the prepared baking sheet, leaving a little space between them.
- Bake the breadsticks for 10 to 12 minutes, or until they are lightly golden brown.
- While the breadsticks bake, prepare the garlic butter topping. In a small bowl, mix the melted butter, garlic powder, Italian seasoning, and 1/2 teaspoon of salt.
- Immediately after removing the breadsticks from the oven, brush the garlic butter mixture generously over the tops of the hot breadsticks.
- If you want cheesy breadsticks, sprinkle the Parmesan cheese evenly over the buttered breadsticks while they are still hot so the cheese melts slightly.
- Serve the homemade breadsticks warm.
Notes
- For a softer texture, you can cover the baked breadsticks with a clean kitchen towel immediately after brushing with garlic butter to trap the steam.
- If you are short on time, you can use refrigerated pizza dough, skip steps 1 through 4, and proceed directly to shaping the dough.
- Use fresh garlic instead of powder for a stronger flavor; mince 2 cloves and add them to the melted butter.
Nutrition
- Serving Size: 1 breadstick
- Calories: 180
- Sugar: 1
- Sodium: 350
- Fat: 7
- Saturated Fat: 4
- Unsaturated Fat: 3
- Trans Fat: 0
- Carbohydrates: 25
- Fiber: 1
- Protein: 4
- Cholesterol: 15